API GatewayとAWS Lambda(Node.js)を使いQRコードを生成するAPIを作成する その2
こんにちは。
株式会社フルーデンスの小巻です。
今回はタイトルの通り、API GatewayとAWS Lambda(Node.js)を使いQRコードを生成するAPIを作成する方法を書きます。
更新履歴
2023年9月25日
2023年9月25日に、以下の記事を公開しました。
簡易的にQRコードを生成できるようになりましたので、興味がありましたら、ご確認ください。
FileMakerからQRコードを生成するためのAPIを公開しました | フルーデンス
以前、API GatewayとAWS Lambda(Node.js)を使い効率よくWebサービスと連携する その1という記事を書きましたので、その続編になります。
内容は以下の通りです。
目次
- ローカルでコードを書く
- AWS Lambda レイヤーを活用する
- AWS Lambdaで関数を作成する
- Amazon API GatewayでAPIを作成する
- Amazon API GatewayのAPIキーを活用する
環境
- macOS Catalina 10.15.6
- FileMaker Pro 19.1.2.219
前提
- AWSのアカウントを作成していること
- nodeをインストールしていること
少しコードを書きますが、簡単なコードなので、興味がある方は是非とも手を動かして頂ければと思います。
私もNode.jsを勉強中のため、コードに誤りがあったり、より良いコードがあるようでしたらご指摘頂ければと思います。
API化するメリット
- オンラインであれば、URLから挿入ステップで簡単に作成できる。
- (開発者として考えると)さまざまなソリューションで使い回せる。
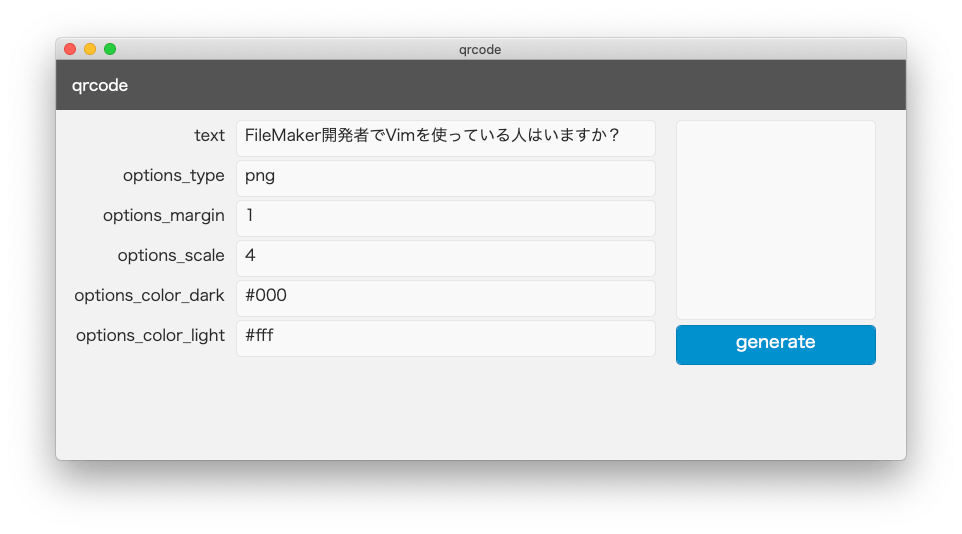
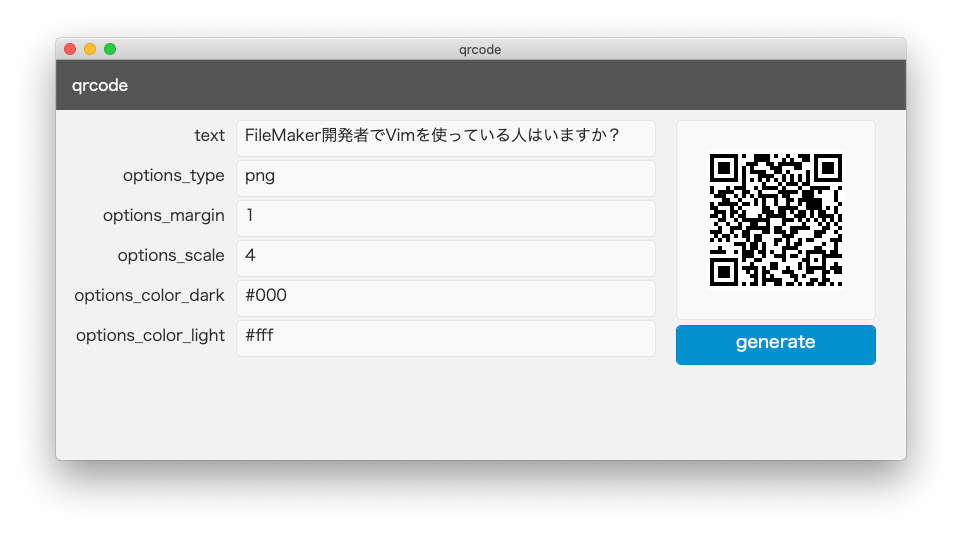
QRコード生成のイメージ
今回のブログの作業が完了すると、FileMakerから簡単にQRコードを生成できます。
// # --- sample param
// # {
"text": "FileMaker開発者でVimを使っている人はいますか?",
"options": {
"type": "png",
"margin": 0,
"scale": 4,
"color": {
"dark": "#000",
"light": "#0000"
}
}
}
#
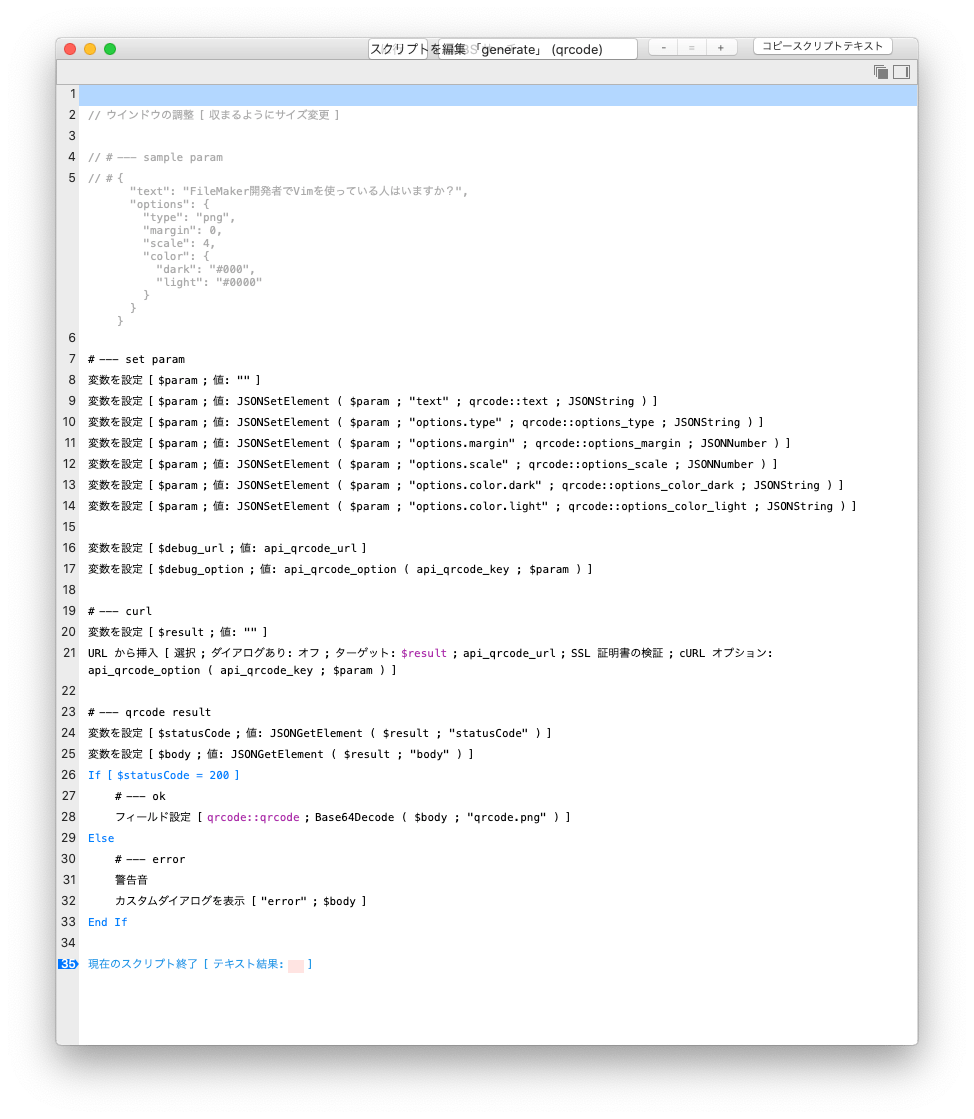
# --- set param
変数を設定 [ $param ; 値: "" ]
変数を設定 [ $param ; 値: JSONSetElement ( $param ; "text" ; qrcode::text ; JSONString ) ]
変数を設定 [ $param ; 値: JSONSetElement ( $param ; "options.type" ; qrcode::options_type ; JSONString ) ]
変数を設定 [ $param ; 値: JSONSetElement ( $param ; "options.margin" ; qrcode::options_margin ; JSONNumber ) ]
変数を設定 [ $param ; 値: JSONSetElement ( $param ; "options.scale" ; qrcode::options_scale ; JSONNumber ) ]
変数を設定 [ $param ; 値: JSONSetElement ( $param ; "options.color.dark" ; qrcode::options_color_dark ; JSONString ) ]
変数を設定 [ $param ; 値: JSONSetElement ( $param ; "options.color.light" ; qrcode::options_color_light ; JSONString ) ]
#
変数を設定 [ $debug_url ; 値: api_qrcode_url ]
変数を設定 [ $debug_option ; 値: api_qrcode_option ( api_qrcode_key ; $param ) ]
#
# --- curl
変数を設定 [ $result ; 値: "" ]
URL から挿入 [ 選択 ; ダイアログあり: オフ ; ターゲット: $result ; api_qrcode_url ; SSL 証明書の検証 ; cURL オプション: api_qrcode_option ( api_qrcode_key ; $param ) ]
#
# --- qrcode result
変数を設定 [ $statusCode ; 値: JSONGetElement ( $result ; "statusCode" ) ]
変数を設定 [ $body ; 値: JSONGetElement ( $result ; "body" ) ]
If [ $statusCode = 200 ]
# --- ok
フィールド設定 [ qrcode::qrcode ; Base64Decode ( $body ; "qrcode.png" ) ]
Else
# --- error
警告音
カスタムダイアログを表示 [ "error" ; $body ]
End If
#
現在のスクリプト終了 [ テキスト結果: ]
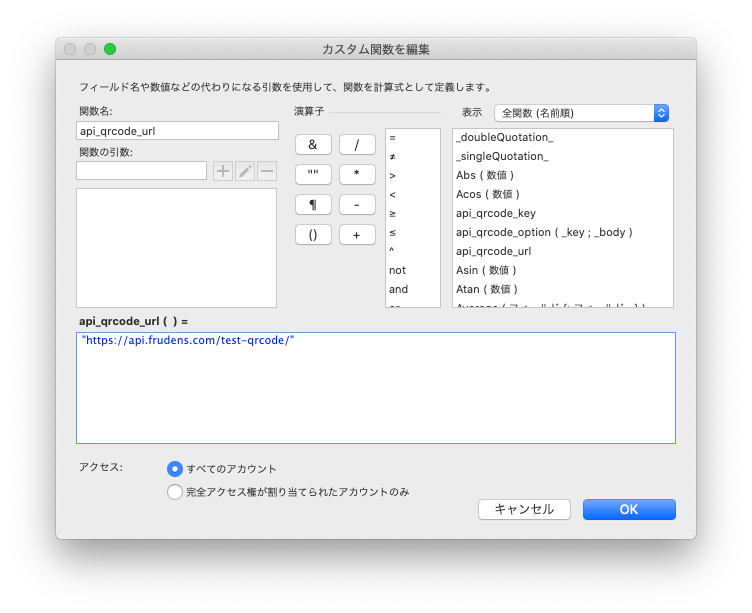
"https://api.frudens.com/test-qrcode/"
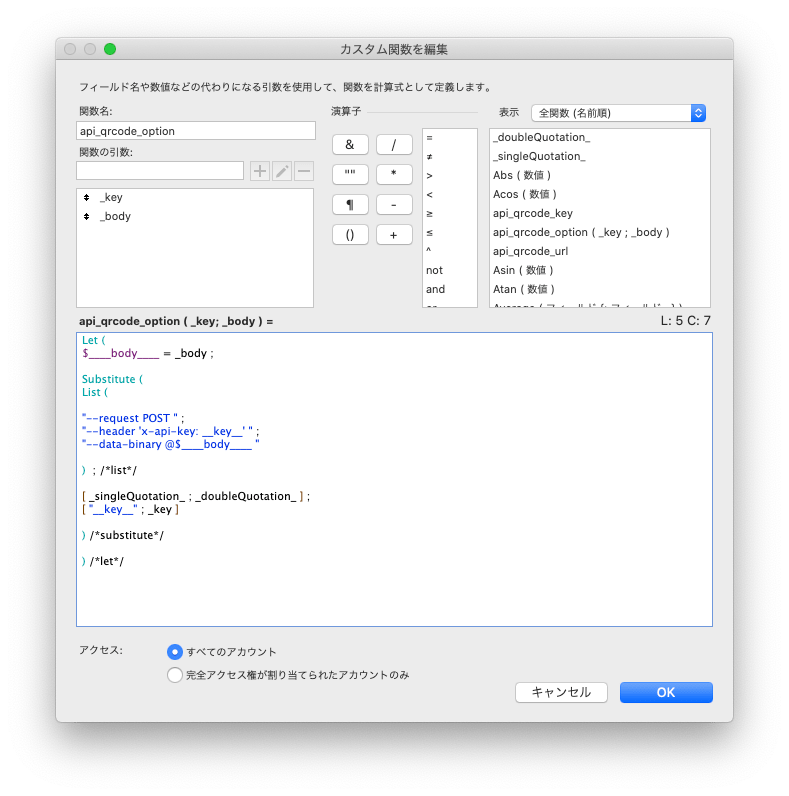
Let (
$____body____ = _body ;

Substitute (
List (

"--request POST " ;
"--header 'x-api-key: __key__' " ;
"--data-binary @$____body____ "

)  ; /*list*/

[ _singleQuotation_ ; _doubleQuotation_ ] ;
[ "__key__" ; _key ]

) /*substitute*/

) /*let*/
オブジェクトフィールドをエクスポートして…
ターミナルで確認します。

(ins) teruhiro@MacBook-Pro-13:~ $ zbarimg Desktop/qrcode.png
QR-Code:FileMaker開発者でVimを使っている人はいますか?
scanned 1 barcode symbols from 1 images in 0.01 seconds

        . EAN/UPC (EAN-13, EAN-8, EAN-2, EAN-5, UPC-A, UPC-E, ISBN-10, ISBN-13)
        . DataBar, DataBar Expanded
        . Code 128
        . Code 93
        . Code 39
        . Codabar
        . Interleaved 2 of 5
        . QR code
        . SQ code
  - is the barcode large enough in the image?
  - is the barcode mostly in focus?
  - is there sufficient contrast/illumination?
  - If the symbol is split in several barcodes, are they combined in one image?
  - Did you enable the barcode type?
    some EAN/UPC codes are disabled by default. To enable all, use:
    $ zbarimg -S*.enable
    Please also notice that some variants take precedence over others.
    Due to that, if you want, for example, ISBN-10, you should do:
    $ zbarimg -Sisbn10.enable
これから先は、macOSでターミナルを使う作業になります。
Windowsの方は、WSL2を有効にして頂き、Linux環境を準備して頂ければ、ほぼ同じコマンドで実行できると思います。
また Node.js がインストールされている前提で進めます。
ちなみに、私は Node.js のインストールには、nodebrewを使っています。
https://github.com/hokaccha/nodebrew
ローカルでコードを書く
ディレクトリを作成する
ターミナルを起動します。
作業用のディレクトリを作成します。
(ins) teruhiro@MacBook-Pro-13:~ $ node -v
v12.18.3
(ins) teruhiro@MacBook-Pro-13:~ $ npm -v
6.14.8
(ins) teruhiro@MacBook-Pro-13:~ $ pwd
/Users/teruhiro
(ins) teruhiro@MacBook-Pro-13:~ $ mkdir -p ~/tmp/test_qrcode
(ins) teruhiro@MacBook-Pro-13:~ $ cd ~/tmp/test_qrcode
(ins) teruhiro@MacBook-Pro-13:~/tmp/test_qrcode $ npm init -y
Wrote to /Users/teruhiro/tmp/test_qrcode/package.json:

{
  "name": "test_qrcode",
  "version": "1.0.0",
  "description": "",
  "main": "index.js",
  "scripts": {
    "test": "echo \"Error: no test specified\" && exit 1"
  },
  "keywords": [],
  "author": "",
  "license": "ISC"
}
パッケージをインストールする
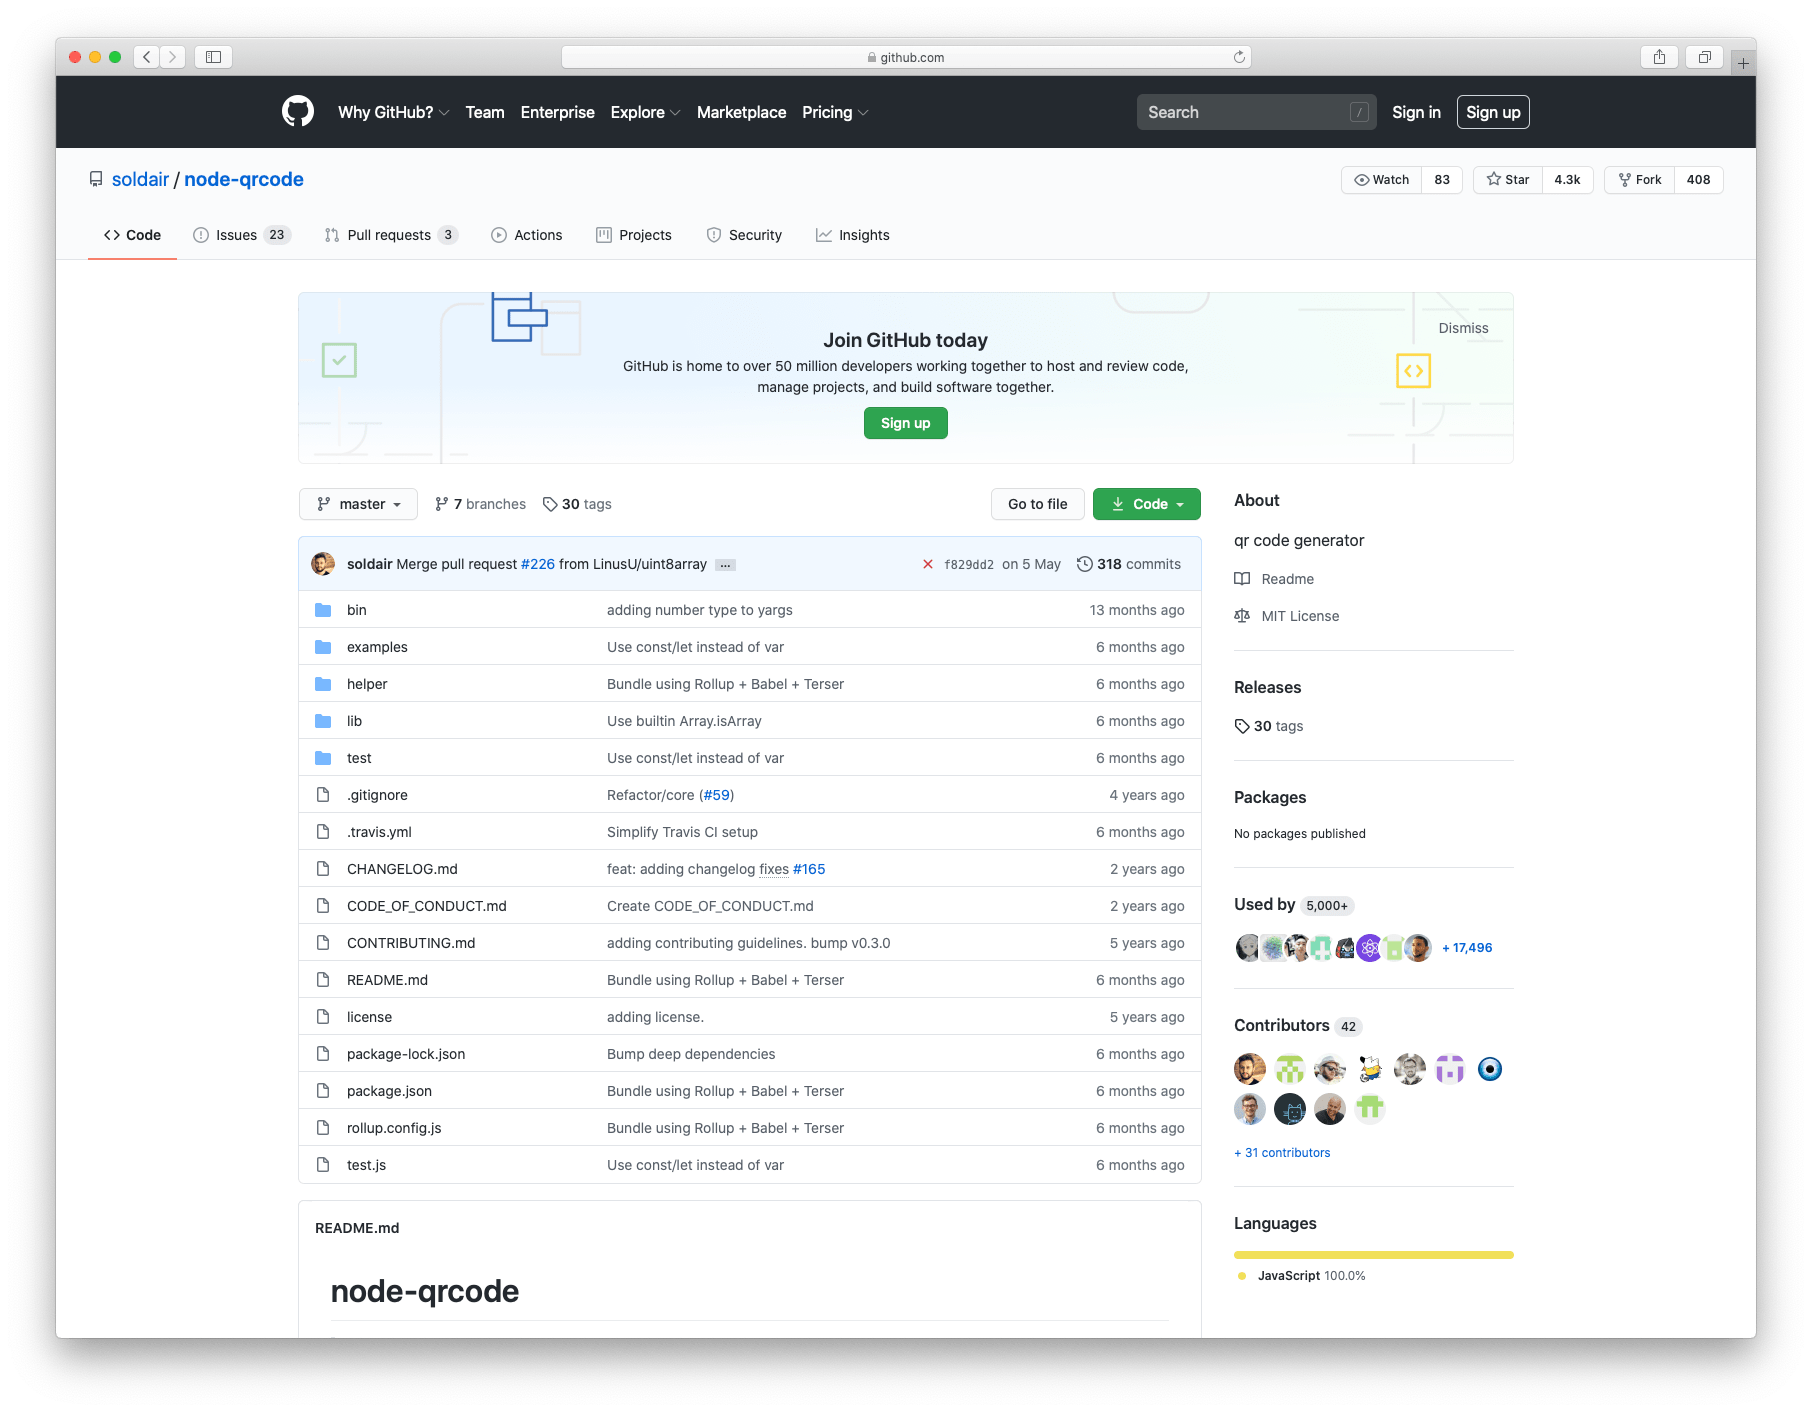
今回利用するパッケージは qrcode です。
https://github.com/soldair/node-qrcode
パッケージをインストールします。
(ins) teruhiro@MacBook-Pro-13:~/tmp/test_qrcode $ npm install --save qrcode
npm notice created a lockfile as package-lock.json. You should commit this file.
npm WARN test_qrcodee@1.0.0 No description
npm WARN test_qrcode@1.0.0 No repository field.

+ qrcode@1.4.4
added 37 packages from 28 contributors and audited 37 packages in 1.58s

1 package is looking for funding
  run `npm fund` for details

found 0 vulnerabilities
好きなエディタを起動して編集する
コードを書くために index1.js というファイルを作成します。
(修正しdiffを見るために index1.js というファイル名にしています。)
(ins) teruhiro@MacBook-Pro-13:~/tmp/test_qrcode $ touch index1.js
(ins) teruhiro@MacBook-Pro-13:~/tmp/test_qrcode $ ls -l
total 32
-rw-r--r--   1 teruhiro  staff      0 Sep 30 23:55 index1.js
drwxr-xr-x  40 teruhiro  staff   1280 Sep 30 23:55 node_modules
-rw-r--r--   1 teruhiro  staff  10662 Sep 30 23:55 package-lock.json
-rw-r--r--   1 teruhiro  staff    284 Sep 30 23:55 package.json
index1.js を好きなエディタで開いてください。
私はVimが好きなので、Vimで開きます。
(ins) teruhiro@MacBook-Pro-13:~/tmp/test_qrcode $ vim index1.js
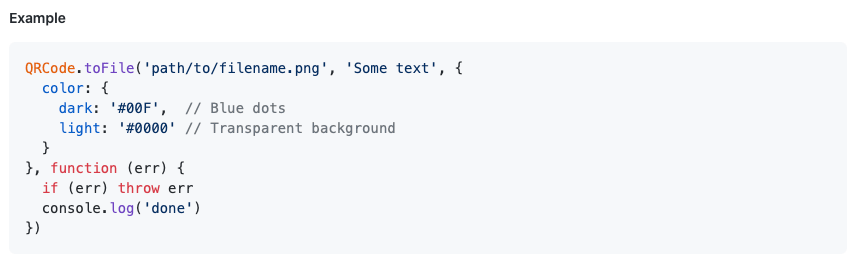
まずは、リポジトリのREADMEのサンプルを参考に、以下のコードを貼り付けて実行してみます。
toFile(path, text, [options], [cb(error)])
https://github.com/soldair/node-qrcode#tofilepath-text-options-cberror
const qrcode = require('qrcode')

const options = {
  color: {
    dark: '#000',
    light: '#0000'
  },
  margin: 0
}

qrcode.toFile('tmp.png', 'I like Vim.', options, err => {
  if (err) throw err
  console.log('done')
})
QRコードが生成できるか確認する
ターミナルを開き、コードを実行します。
(ins) teruhiro@MacBook-Pro-13:~/tmp/test_qrcode $ ls -l
total 48
-rw-r--r--   1 teruhiro  staff    224 Sep 30 23:38 index1.js
drwxr-xr-x  40 teruhiro  staff   1280 Sep 29 19:07 node_modules
-rw-r--r--   1 teruhiro  staff  10655 Sep 29 19:07 package-lock.json
-rw-r--r--   1 teruhiro  staff    277 Sep 29 19:07 package.json

(ins) teruhiro@MacBook-Pro-13:~/tmp/test_qrcode $ node index1.js
done
(ins) teruhiro@MacBook-Pro-13:~/tmp/test_qrcode $ ls -l
total 56
-rw-r--r--   1 teruhiro  staff    224 Sep 30 23:38 index1.js
drwxr-xr-x  40 teruhiro  staff   1280 Sep 29 19:07 node_modules
-rw-r--r--   1 teruhiro  staff  10655 Sep 29 19:07 package-lock.json
-rw-r--r--   1 teruhiro  staff    277 Sep 29 19:07 package.json
-rw-r--r--   1 teruhiro  staff    580 Oct  1 00:00 tmp.png
tmp.pngが生成されましたので、確認します。
openコマンドでファイルを開くか、もしくは、ファインダーをひらきます。
(ins) teruhiro@MacBook-Pro-13:~/tmp/test_qrcode $ open tmp.png
もしくは…
(ins) teruhiro@MacBook-Pro-13:~/tmp/test_qrcode $ open .
QRコードの読み取りは、手元のiPhoneやAndroidのカメラをアプリを使って確認してください。
ターミナルで確認したい!という方は、brewで zbar をインストールしてください。
https://formulae.brew.sh/formula/zbar
生成したpngをbase64エンコードする
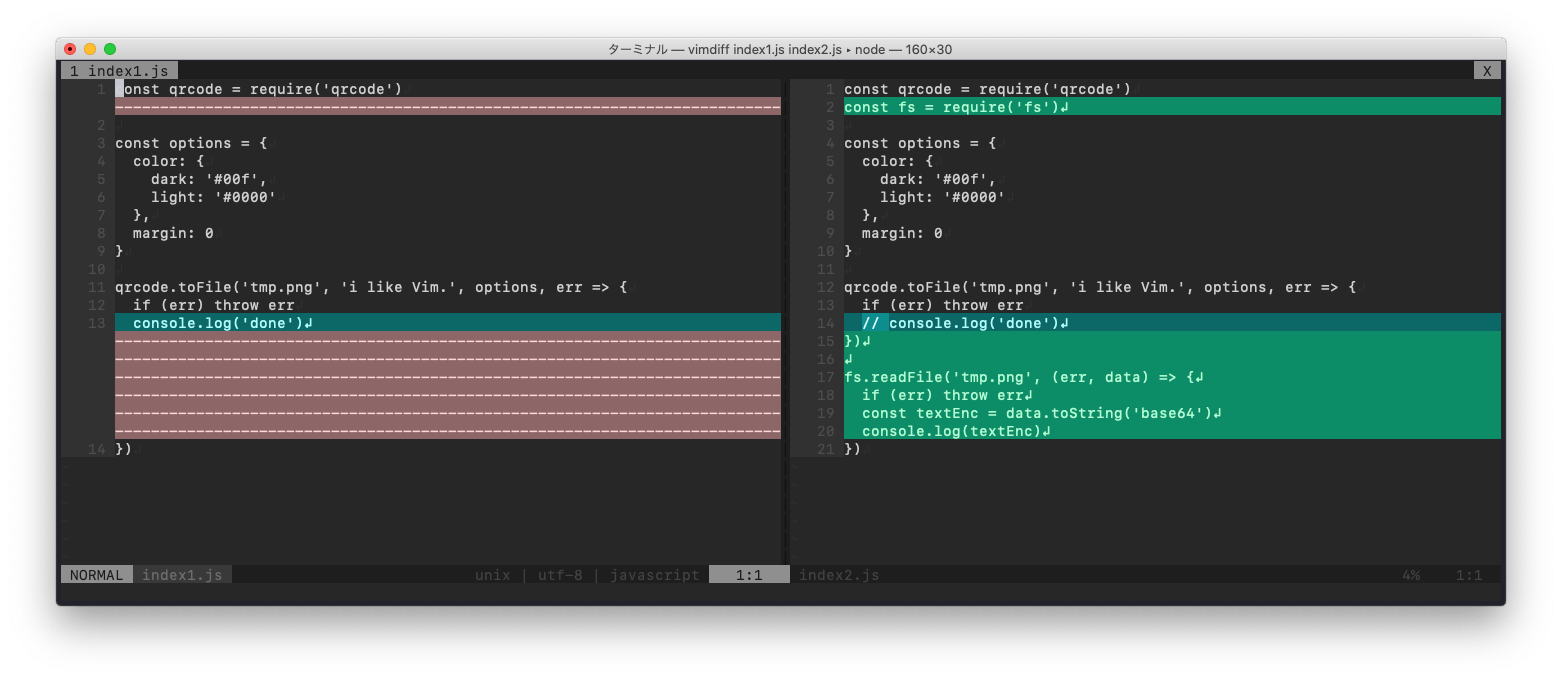
生成したtmp.pngをbase64エンコードしたいので、複製しコードを修正します。
(cmd) teruhiro@MacBook-Pro-13:~/tmp/test_qrcode $ cp index1.js index2.js
(cmd) teruhiro@MacBook-Pro-13:~/tmp/test_qrcode $ vim index2.js
以下のように修正します。
const qrcode = require('qrcode')
const fs = require('fs')

const options = {
  color: {
    dark: '#000',
    light: '#0000'
  },
  margin: 0
}

qrcode.toFile('tmp.png', 'I like Vim.', options, err => {
  if (err) throw err
  // console.log('done')
})

fs.readFile('tmp.png', (err, data) => {
  if (err) throw err
  const textEnc = data.toString('base64')
  console.log(textEnc)
})
vimdiffコマンドで確認します。
確認します。
(ins) teruhiro@MacBook-Pro-13:~/tmp/test_qrcode $ node index2.js
iVBORw0KGgoAAAANSUhEUgAAAFQAAABUCAYAAAAcaxDBAAAAAklEQVR4AewaftIAAAICSURBVO3BUYprSQwFwUxx97/lM78WDdUUVttvQBFCwkcpTcIV5UrCBxVrVLFGFWvUww/KqIQrylHCkXKkjEp4UaxRxRpVrFEPv0q4olxRjhL+VMIV5aBYo4o1qlijHr4uoVEapUn4hxVrVLFGFWvUw9cpTUKjHCn/kGKNKtaoYo16+JXyT0tolCvKoGKNKtaoYo16+CHhoxIapUlolCbhSsIfKtaoYo0q1ij5uoQjpUk4Ur6oWKOKNapYox5IaJQm4UhpEq4oRwlvSWiUo4RGaRIOijWqWKOKNUp+ldAoTUKjHCU0ypWEK8pbEhqlSXhRrFHFGlWsUQ8kNMpRwpWEtyQcKVcSGqVJaJQLxRpVrFHFGiUkNMpbEhplVEKjvCXhSLlQrFHFGlWsUfJDQqMcJfwp5SihUZqEI+UtCS+KNapYo4o1Sr4uoVGahCPlLQmN0iQ0SpPwolijijWqWKOEhI9SmoRGOUo4Uq4kNMobijWqWKOKNerhB2VUwlsSGuUooVGOlCbhDcUaVaxRxRr18KuEK8oV5S0JjXKU0ChXlINijSrWqGKNevi6hEa5ohwlNMqR0iQ0CY3yolijijWqWKMe/vcSjpQrCUfKQbFGFWtUsUY9/Er5U0qTcJRwpDQJV5QrCS+KNapYo4o1Skj4KKVJ+CjlSkKjHBRrVLFGFWvUfzK6mrU252RdAAAAAElFTkSuQmCC
tmp.pngをbase64エンコードできました。
デコードして、同じファイルが生成できるか確認します。
(ins) teruhiro@MacBook-Pro-13:~/tmp/test_qrcode $ node index2.js | base64 -D > tmp2.png
(ins) teruhiro@MacBook-Pro-13:~/tmp/test_qrcode $ ls -l
total 88
drwxr-xr-x  11 teruhiro  staff    352 Oct  3 23:08 .
drwxr-xr-x  65 teruhiro  staff   2080 Oct  2 17:03 ..
-rw-r--r--   1 teruhiro  staff    224 Oct  1 00:06 index1.js
-rw-r--r--   1 teruhiro  staff    382 Oct  1 00:14 index2.js
drwxr-xr-x  40 teruhiro  staff   1280 Sep 29 19:07 node_modules
-rw-r--r--   1 teruhiro  staff  10655 Sep 29 19:07 package-lock.json
-rw-r--r--   1 teruhiro  staff    277 Sep 29 19:07 package.json
-rw-r--r--   1 teruhiro  staff    580 Oct  3 23:07 tmp.png
-rw-r--r--   1 teruhiro  staff    580 Oct  3 23:08 tmp2.png
複製しコードを修正します。
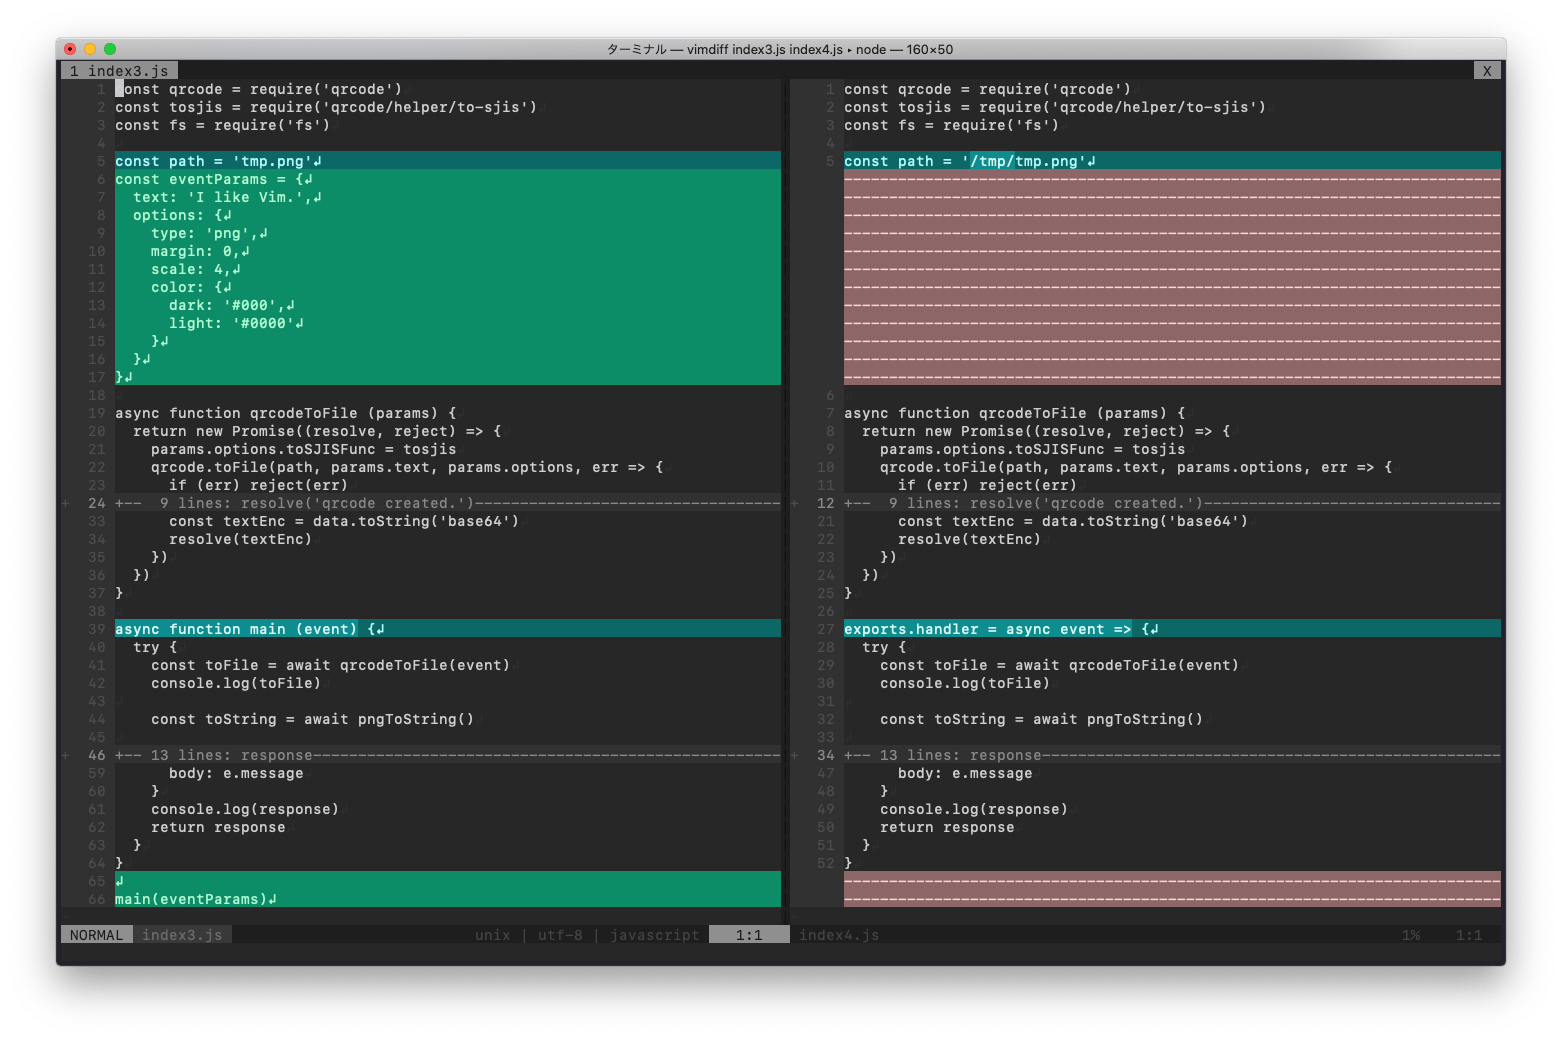
(cmd) teruhiro@MacBook-Pro-13:~/tmp/test_qrcode $ cp index2.js index3.js
(cmd) teruhiro@MacBook-Pro-13:~/tmp/test_qrcode $ vim index3.js
const qrcode = require('qrcode')
const tosjis = require('qrcode/helper/to-sjis')
const fs = require('fs')

const path = 'tmp.png'
const eventParams = {
  text: 'I like Vim.',
  options: {
    type: 'png',
    margin: 0,
    scale: 4,
    color: {
      dark: '#000',
      light: '#0000'
    }
  }
}

async function qrcodeToFile (params) {
  return new Promise((resolve, reject) => {
    params.options.toSJISFunc = tosjis
    qrcode.toFile(path, params.text, params.options, err => {
      if (err) reject(err)
      resolve('qrcode created.')
    })
  })
}

async function pngToString () {
  return new Promise((resolve, reject) => {
    fs.readFile(path, (err, data) => {
      if (err) reject(err)
      const textEnc = data.toString('base64')
      resolve(textEnc)
    })
  })
}

async function main (event) {
  try {
    const toFile = await qrcodeToFile(event)
    console.log(toFile)

    const toString = await pngToString()

    // response
    const response = {
      statusCode: 200,
      body: toString
    }
    console.log(response)
    return response
  } catch (e) {
    console.error(e)

    // response
    const response = {
      statusCode: 400,
      body: e.message
    }
    console.log(response)
    return response
  }
}

main(eventParams)
実行します。
(ins) teruhiro@MacBook-Pro-13:~/tmp/test_qrcode $ node index3.js
qrcode created.
{
  statusCode: 200,
  body: 'iVBORw0KGgoAAAANSUhEUgAAAFQAAABUCAYAAAAcaxDBAAAAAklEQVR4AewaftIAAAHNSURBVO3BUaojUQxDwSPT+9+y5jcm4HBppfMGXCXAPEt05ow4Yx5UrKhiRRUr6uKdyDJnxMzMxExkmRfFiipWVLGiLj4zZ8QZMTPfZc6IQbGiihVVrKiL3zOd6ERn/rBiRRUrqlhRF78nOtOJmfhDihVVrKhiRV18Jv4204kzIqhYUcWKKlbUxTvzLNOJznSiM2fMFxUrqlhRxYoSv2dmojMz8UPFiipWVLGiLsB0ojMz0ZkzYmbuMZ2YmU50ZlCsqGJFFStKfGY60ZlOzEwnzpgz4h7Tic68KFZUsaKKFXUBphMzc8bcY2bijOlEZzpxoFhRxYoqVpQA04l7TCeyTCfuMTNxoFhRxYoqVpR4ZzoxM98lZqYTnZmJe8yLYkUVK6pYUeL3TCc6MxP3mE50phOdeVGsqGJFFStKgHmW6EwnZmYmzphO3FCsqGJFFSvq4p3IMveYTsxMJ2aiMzcUK6pYUcWKuvjMnBFnxD2mEzPTiTNiUKyoYkUVK+ri90wnzoiZ6cRMdKYznXhRrKhiRRUr6uL/Z2bijJmJQbGiihVVrKiLz8R3ic7MzEx05ow4Y14UK6pYUcWKEmCeJTrzLHHGdGJQrKhiRRUr6h8/nk24a0yfCgAAAABJRU5ErkJggg=='
}
AWS Lambda レイヤーを活用する
今までのコードをLambdaに貼り付けて、テストしたいところですが、Lambdaには ローカルでインストールしたqrcodeパッケージがありません。
そのため、Lambdaのレイヤーを活用します。
以下のURLに記載の内容の一部を修正し記載します。
レイヤーを使用して、最新バージョンの AWS SDK for JavaScript を Node.js Lambda 関数に統合する方法を教えてください。
qrcodeパッケージをレイヤーで利用するためのコード
1.作業ディレクトリを作成します。
mkdir -p ~/tmp/qrcode-layer/nodejs

2.作業ディレクトリに変更します。
cd ~/tmp/qrcode-layer/nodejs

3.AWS SDK の最新バージョンをインストールします。
npm install qrcode

4.レイヤーにアップロードする .zip ファイルを作成します。
zip -r ../package.zip ../
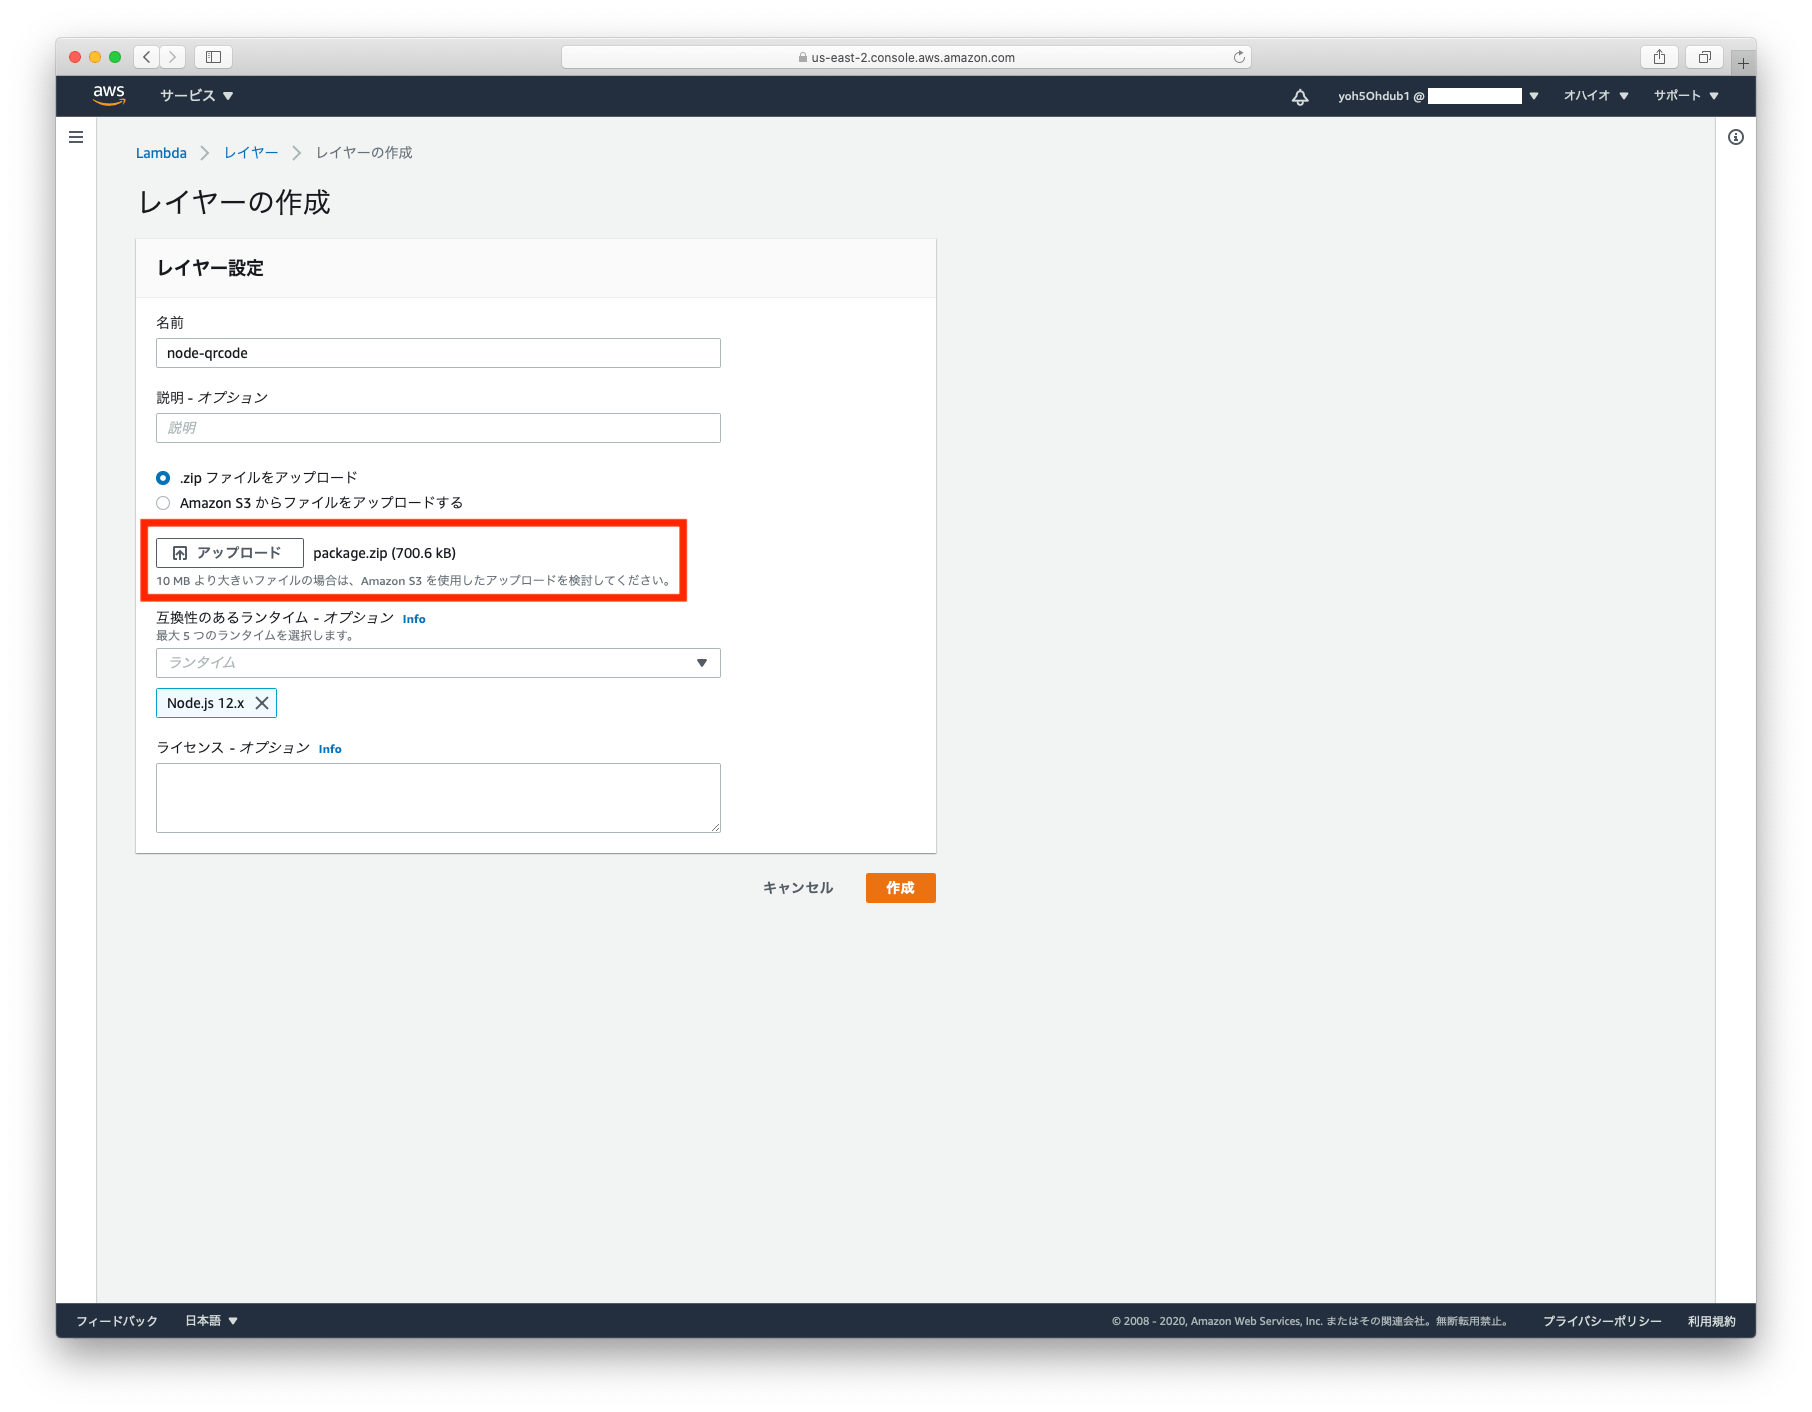
zipの準備ができました。
Lambda レイヤーを作成する
AWSにログインし、Lambda > レイヤーをクリックします。
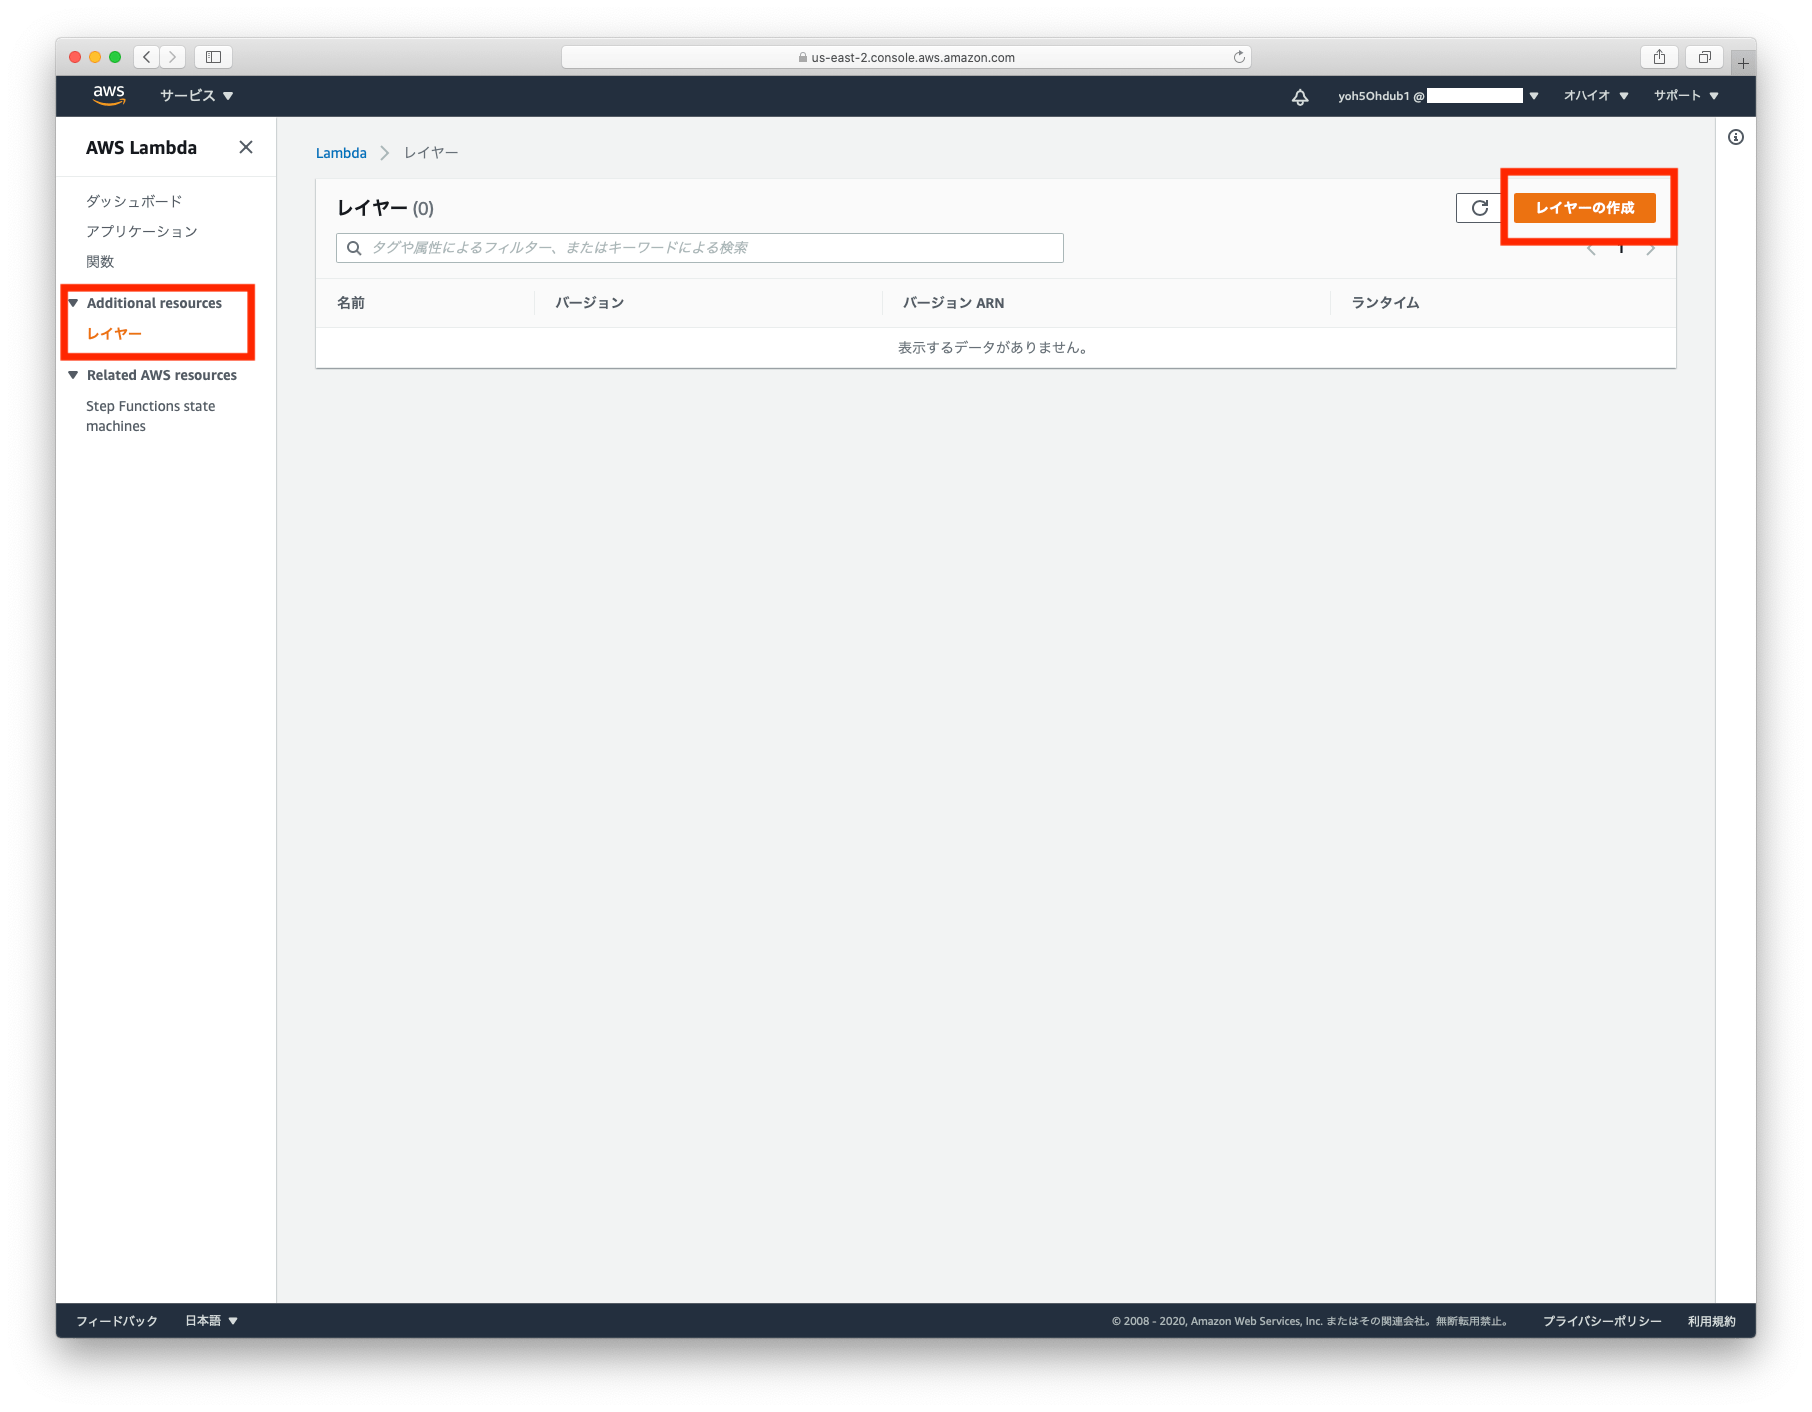
アップロードから、作成した package.zip を選択し、レイヤーを作成します。
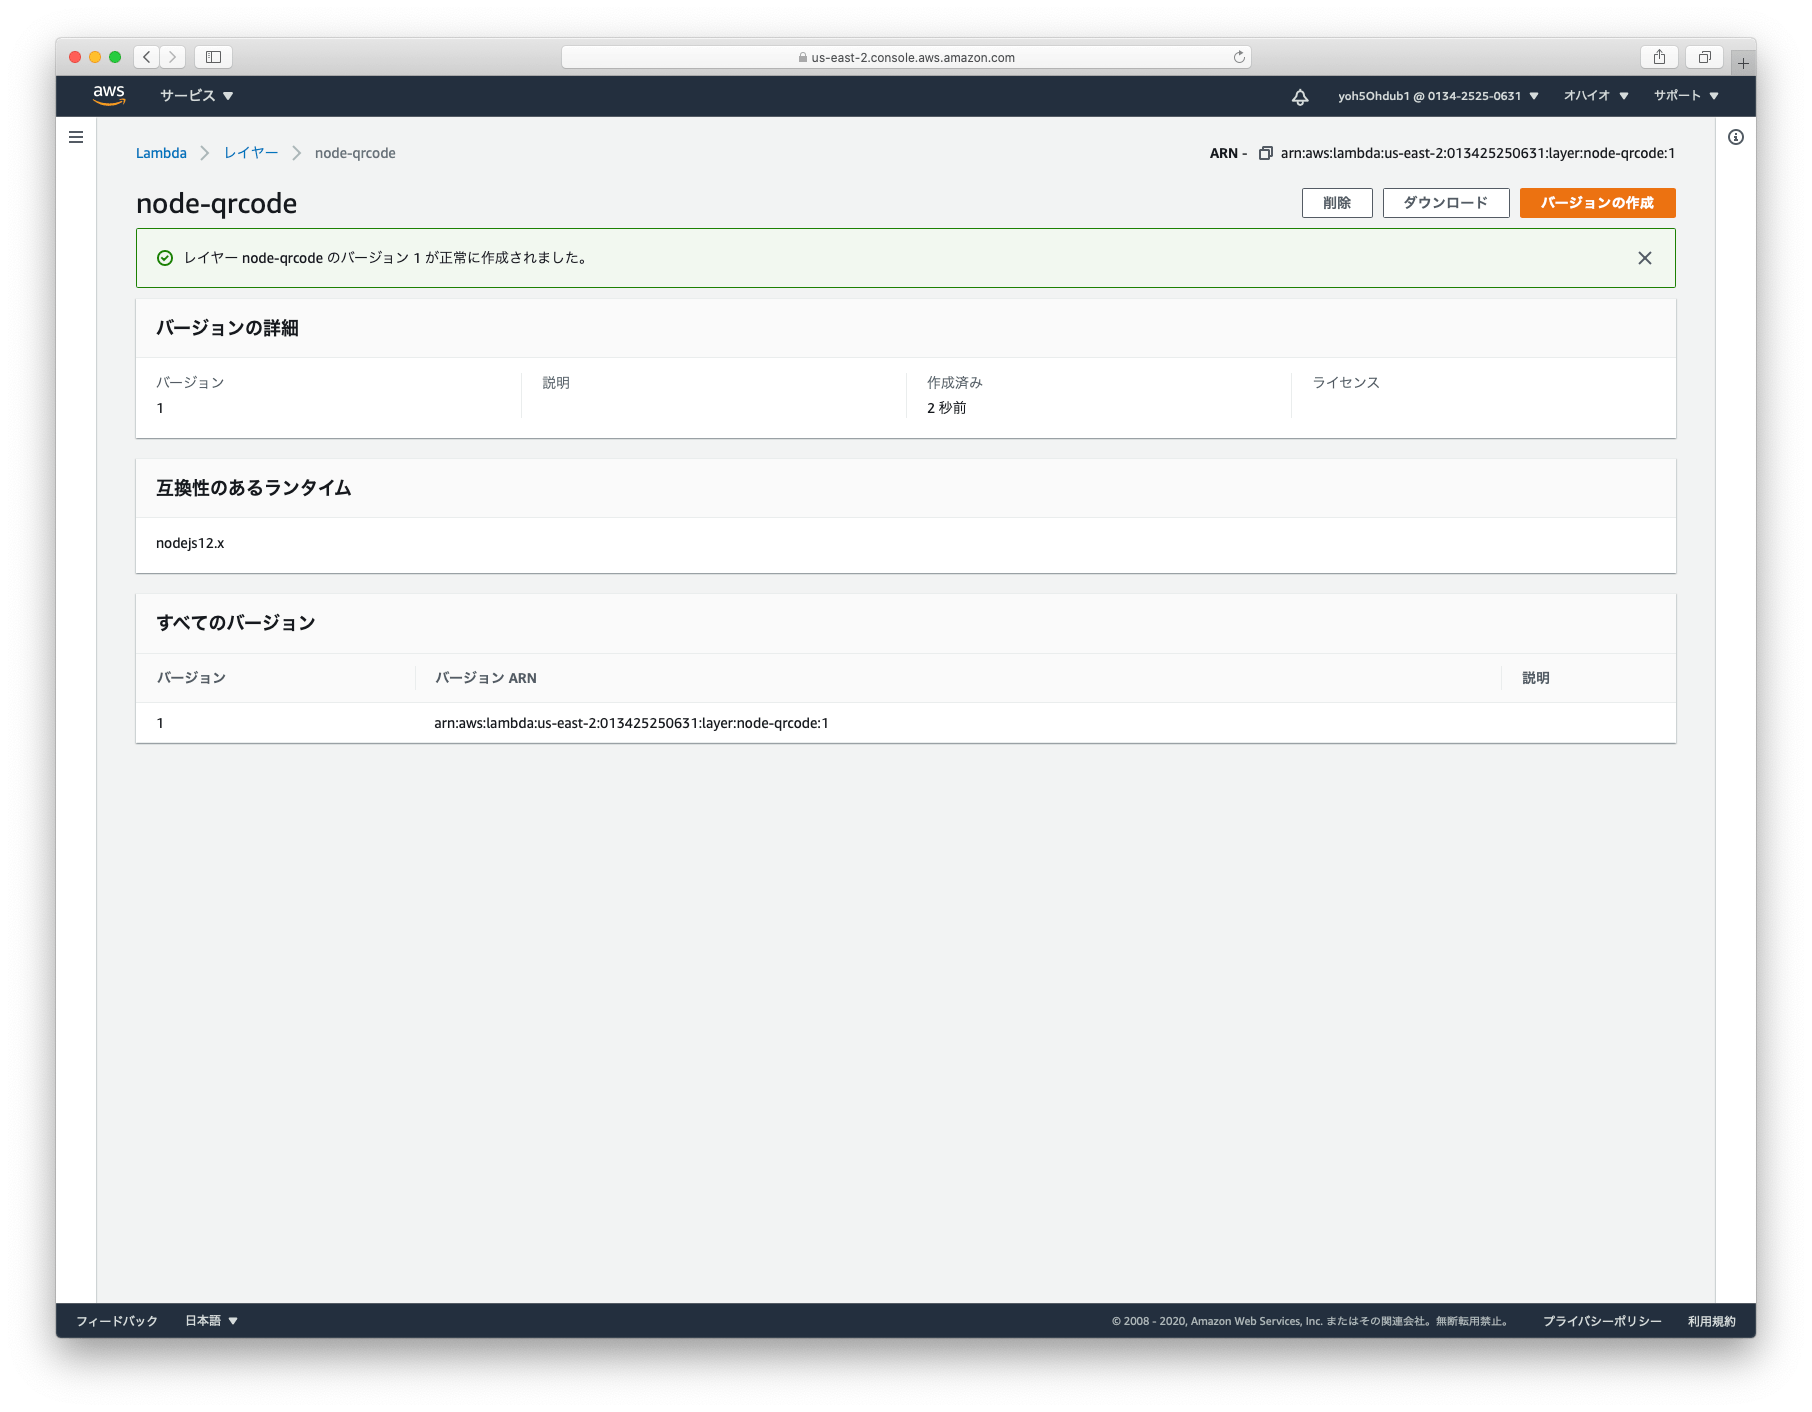
作成できました。
AWS Lambdaで関数を作成する
関数を作成します。
今回は test-qrcode という名前にしました。
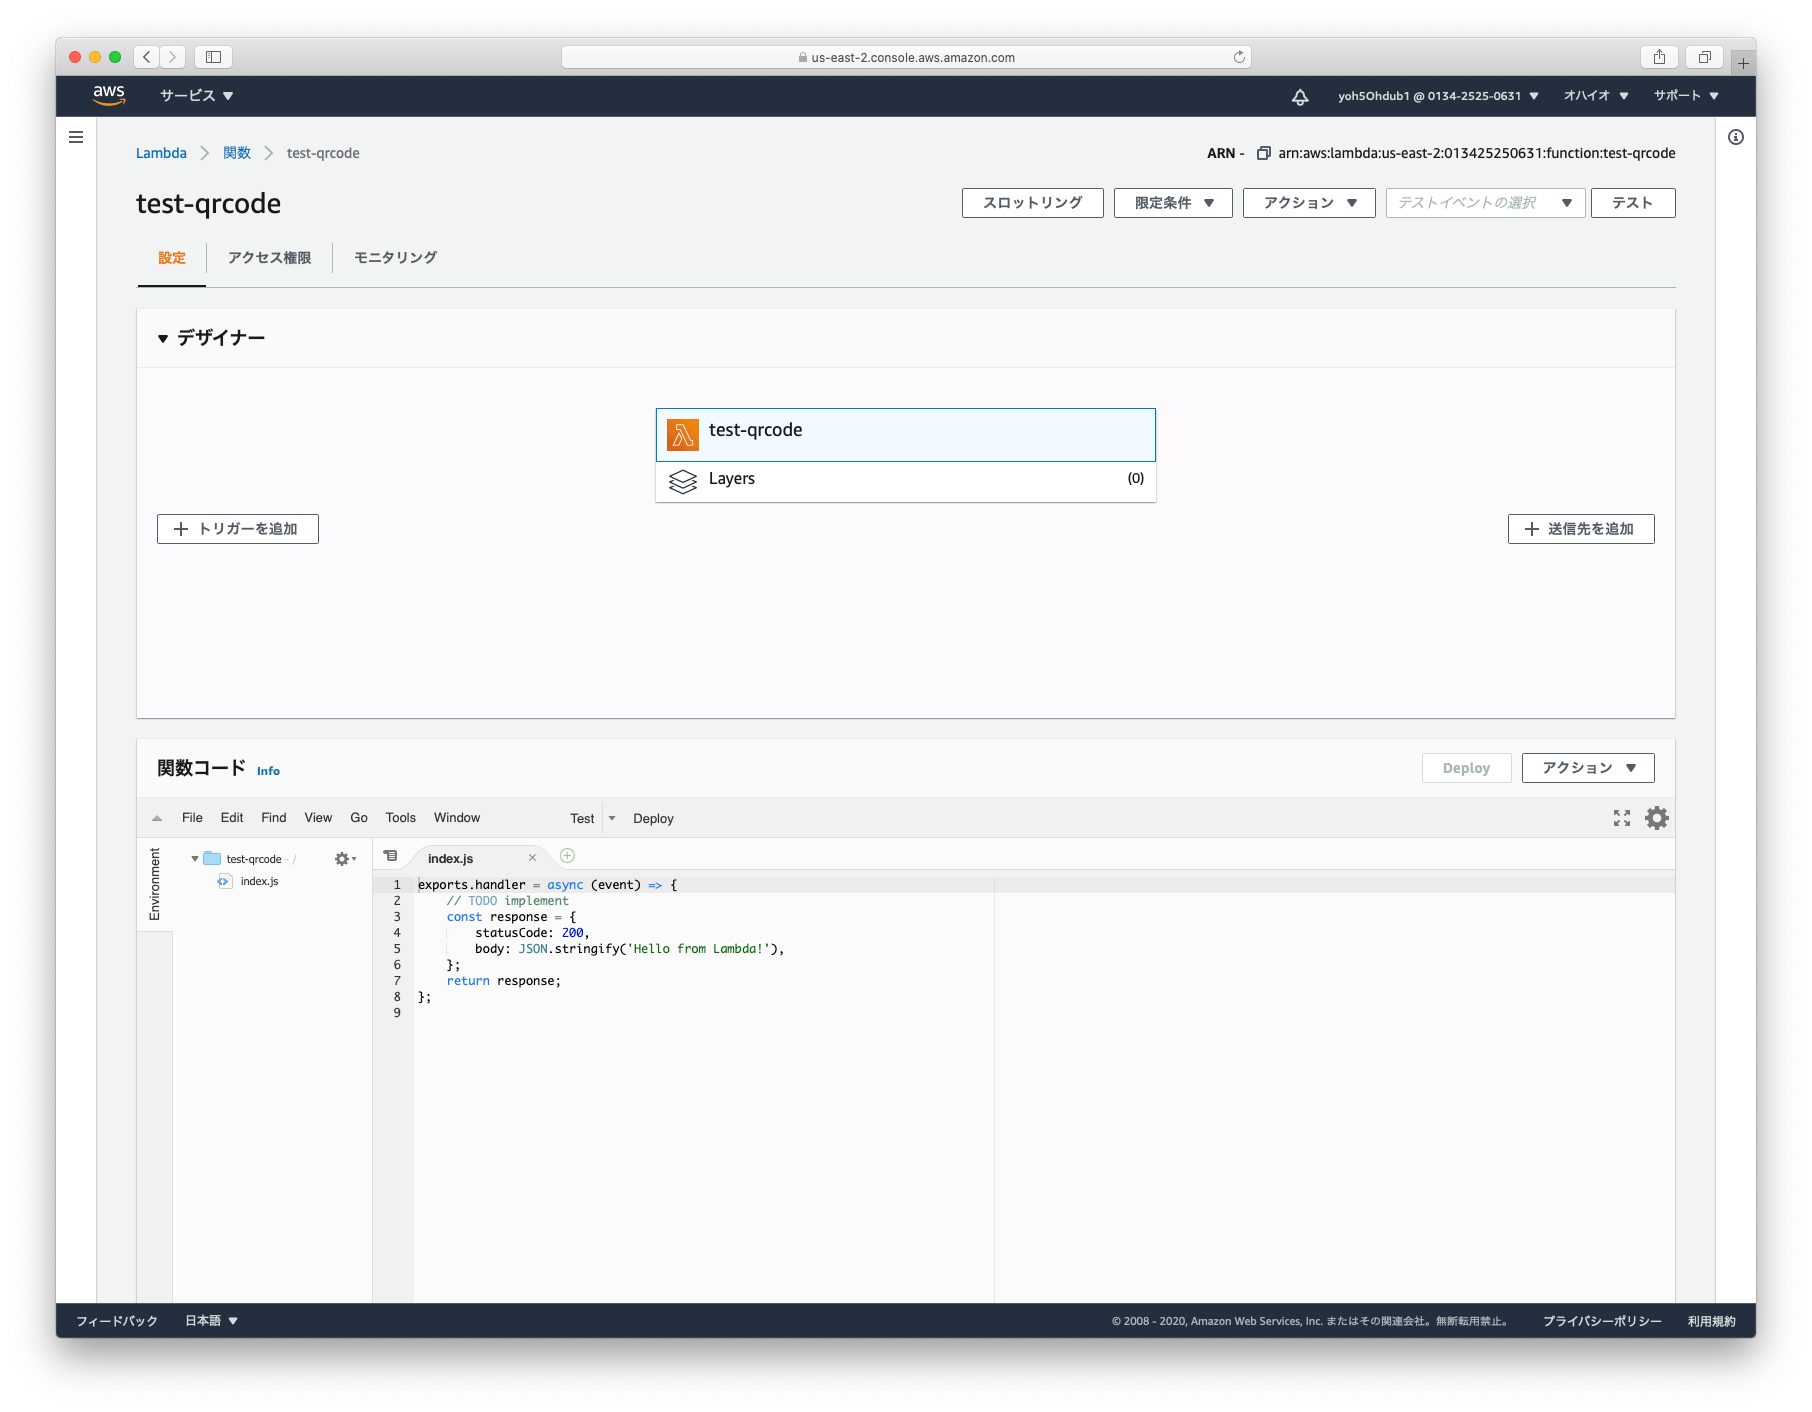
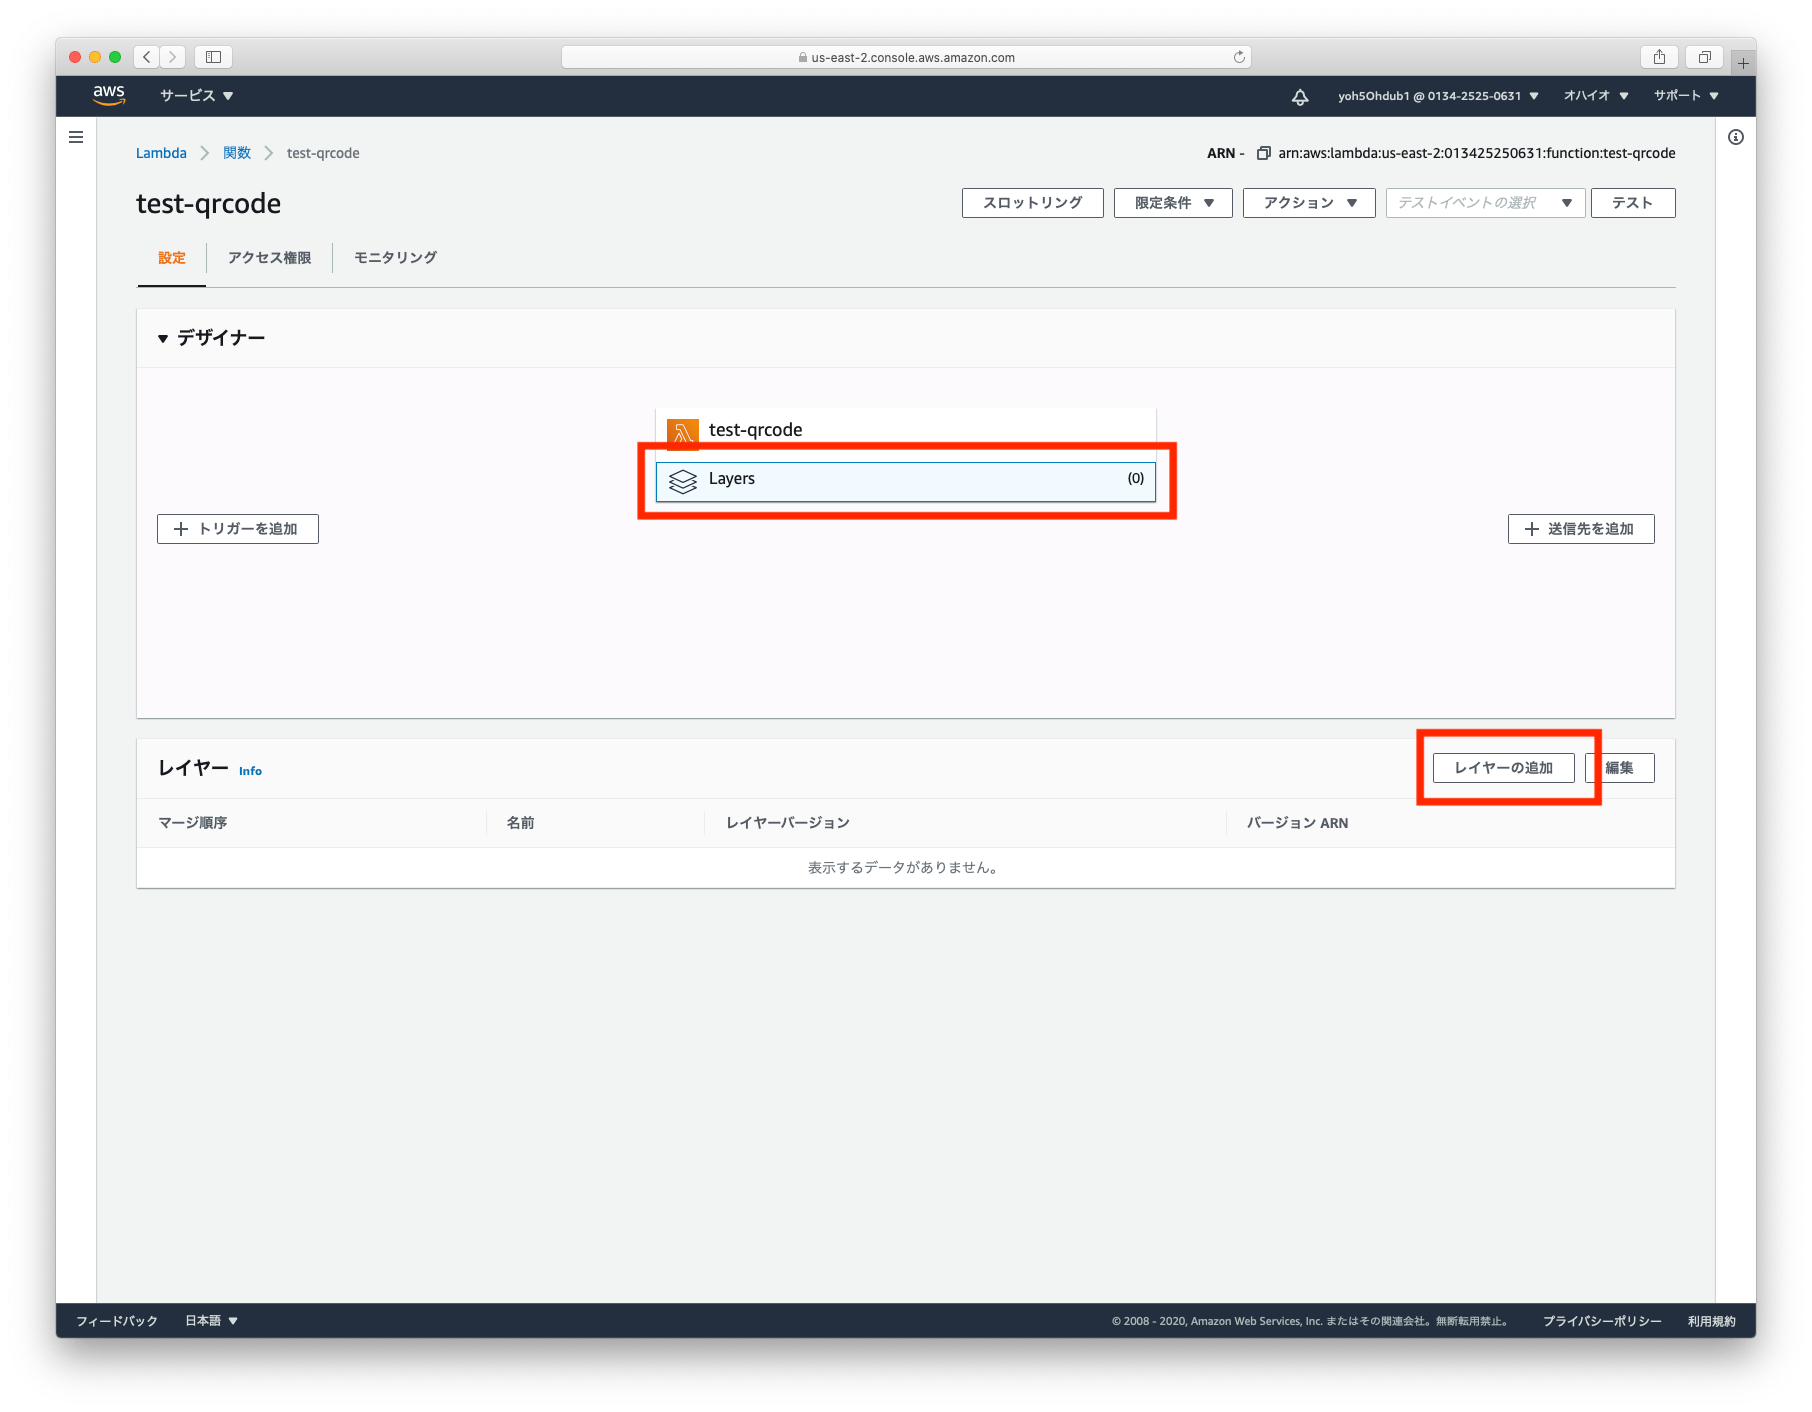
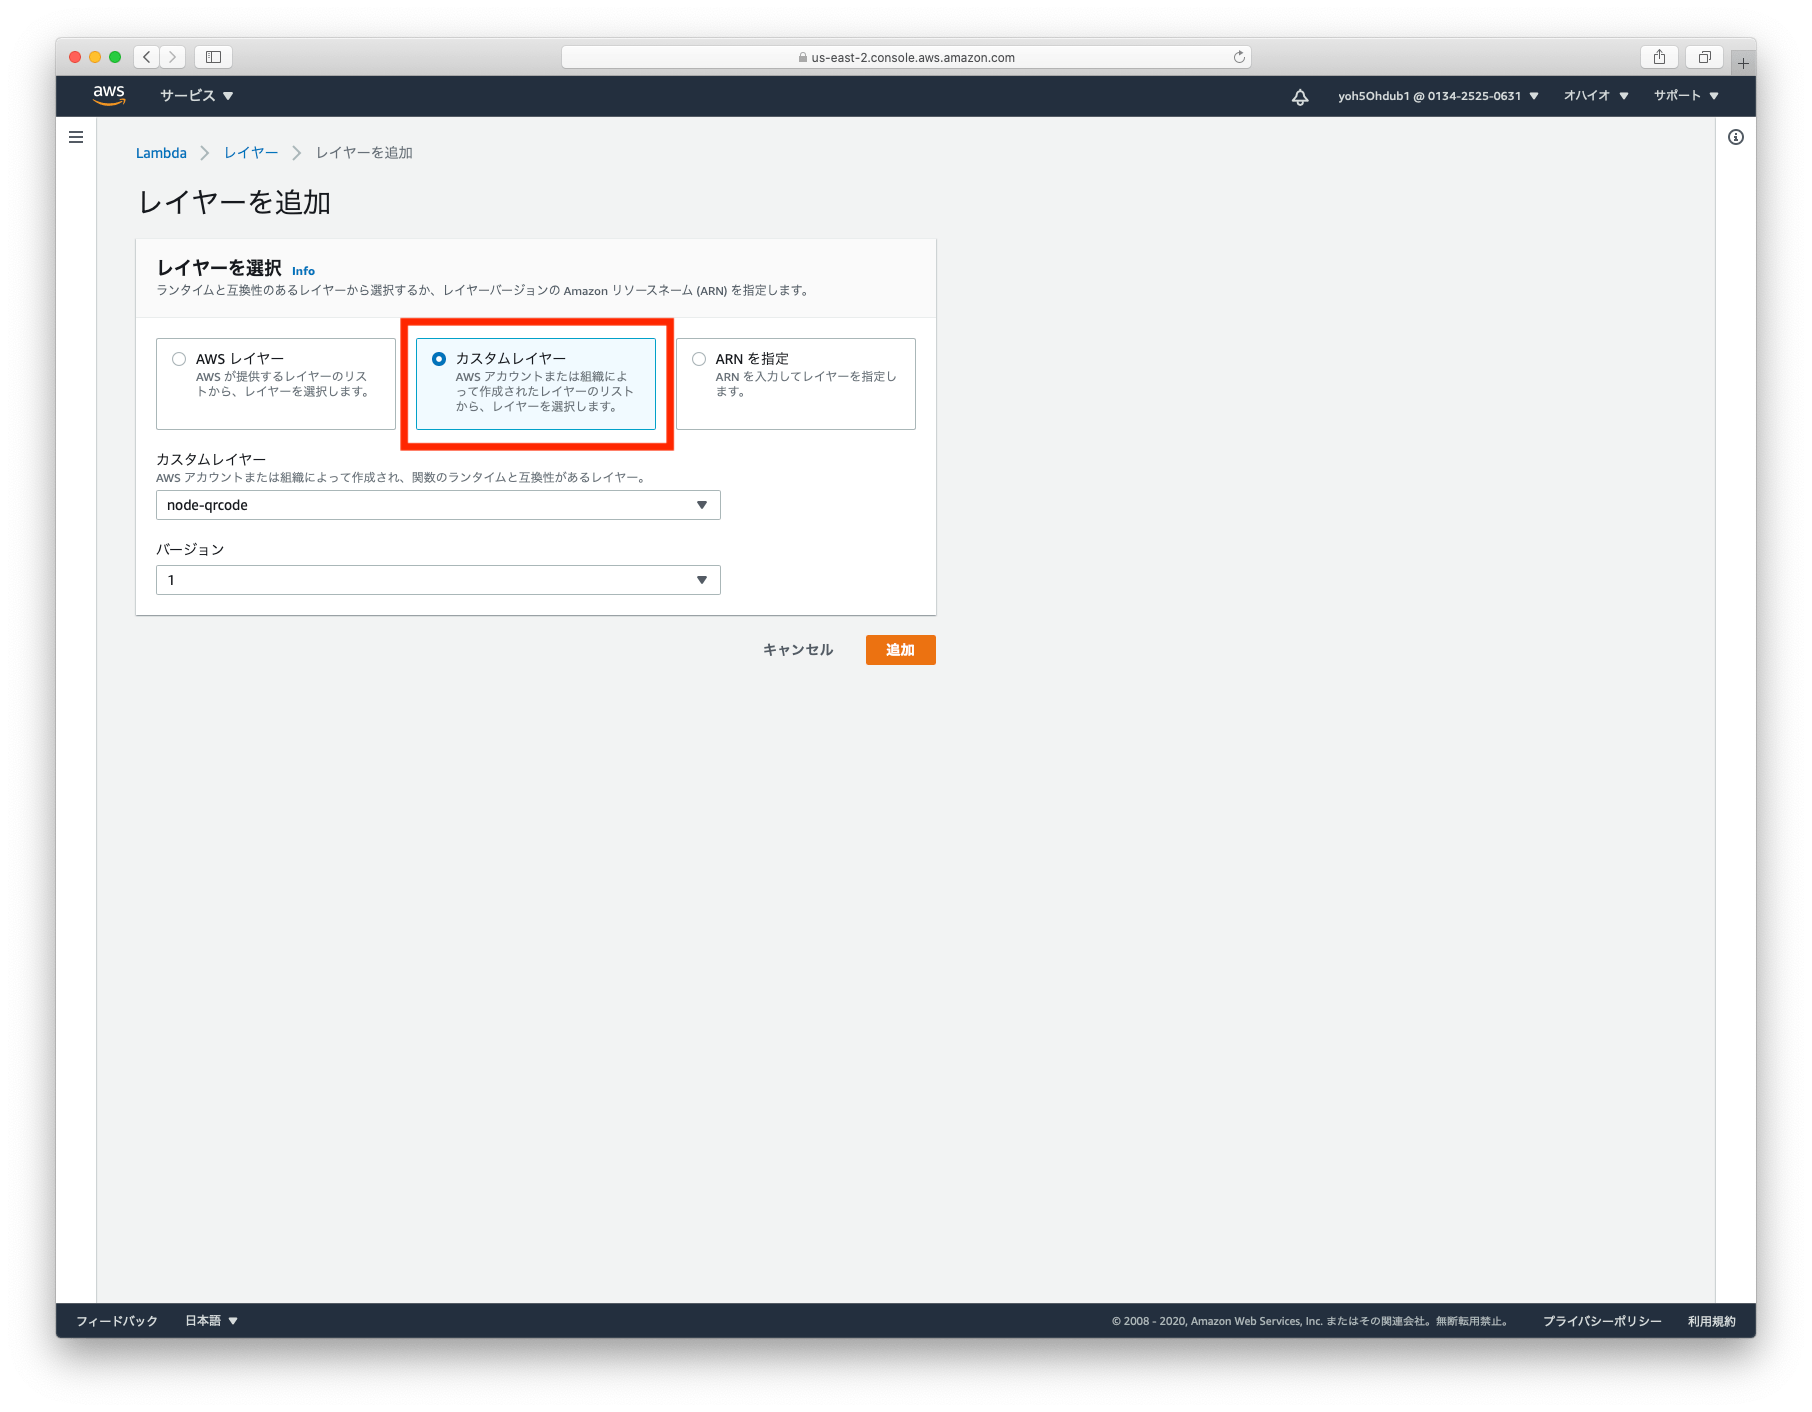
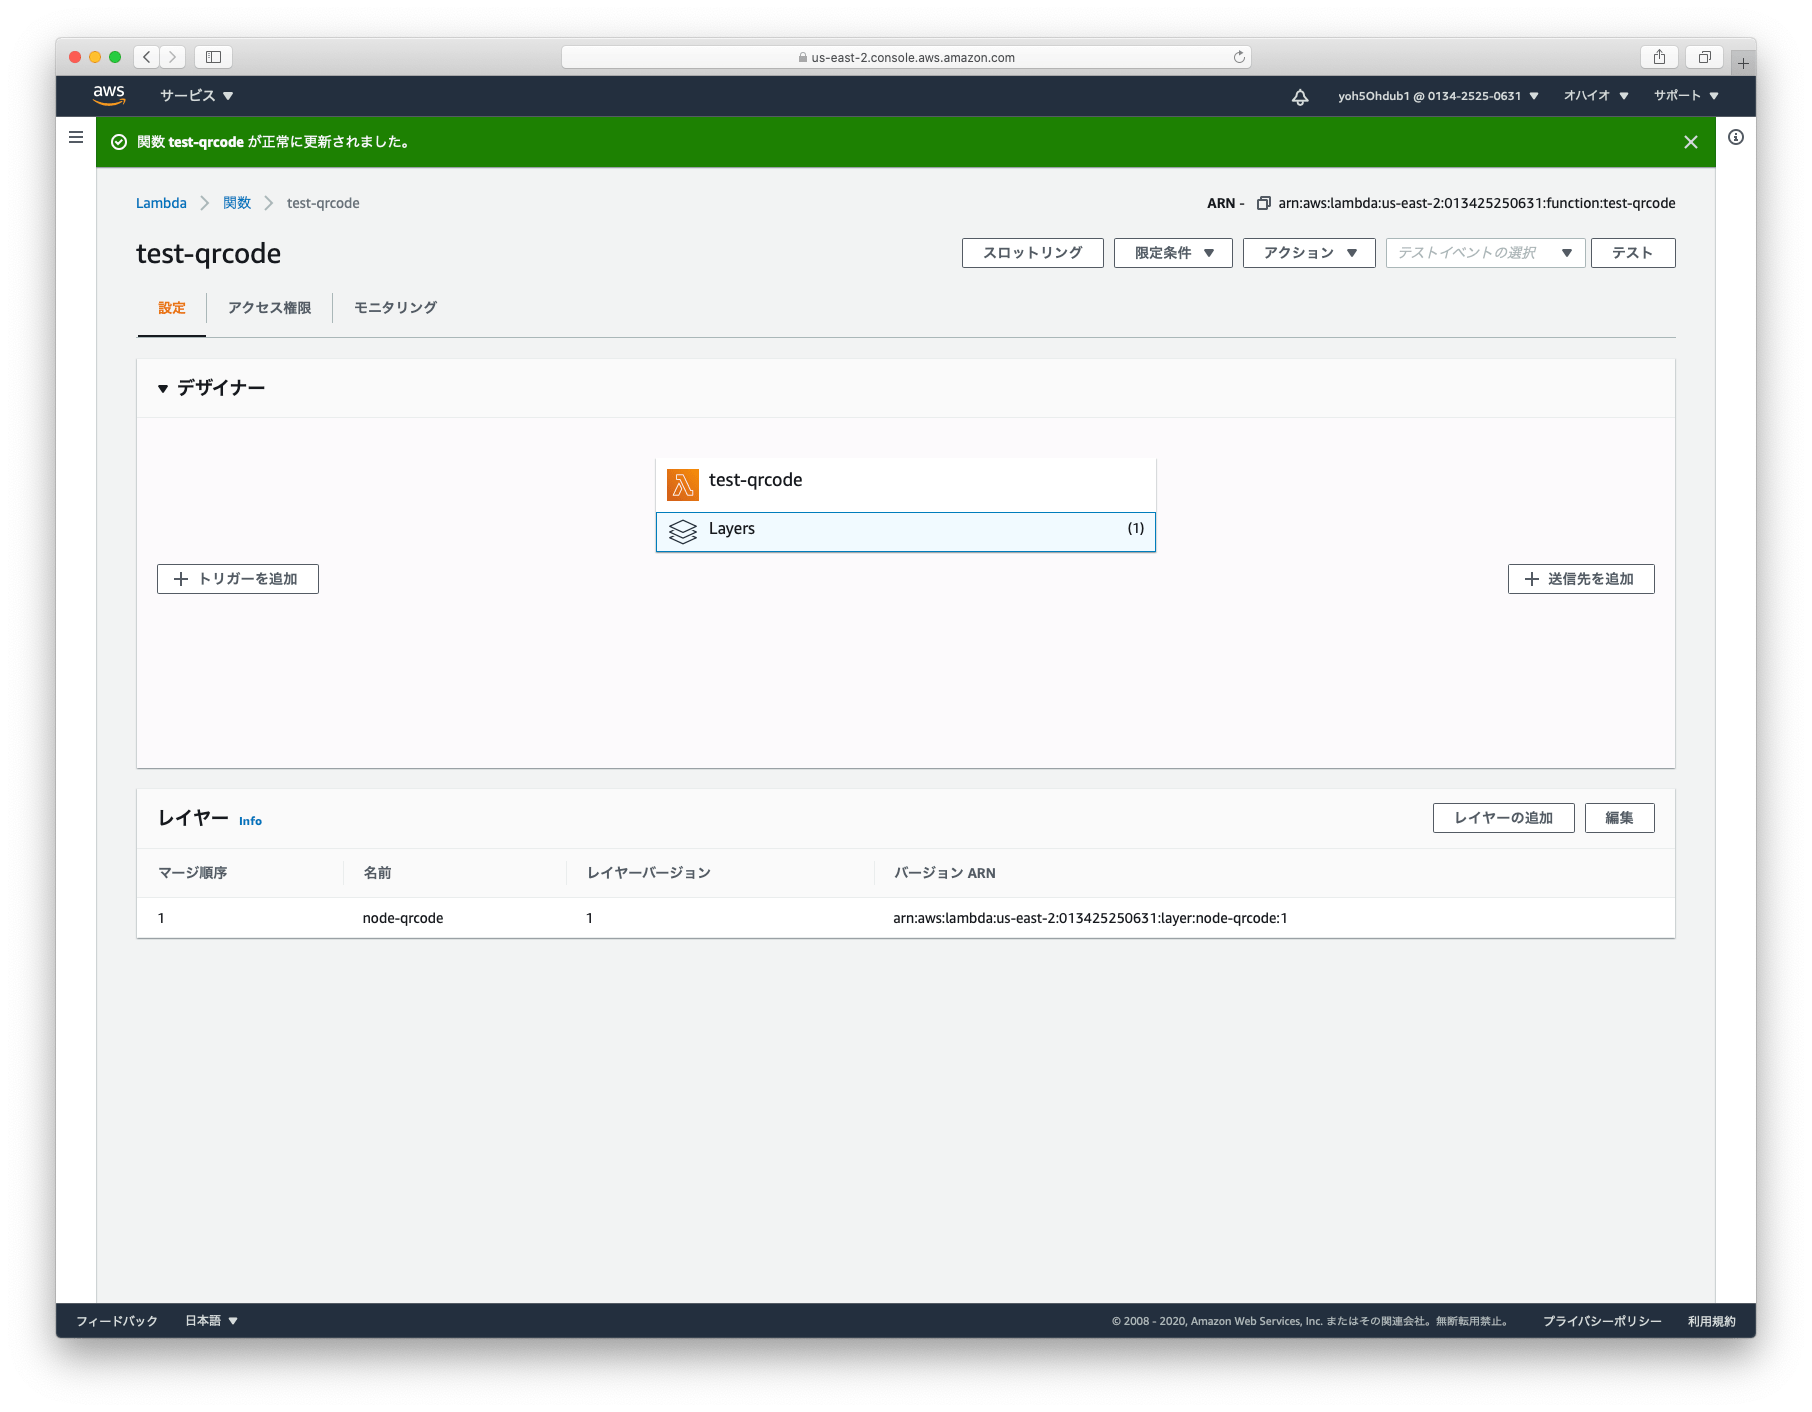
レイヤーを設定する
レイヤーを選択し、追加します。
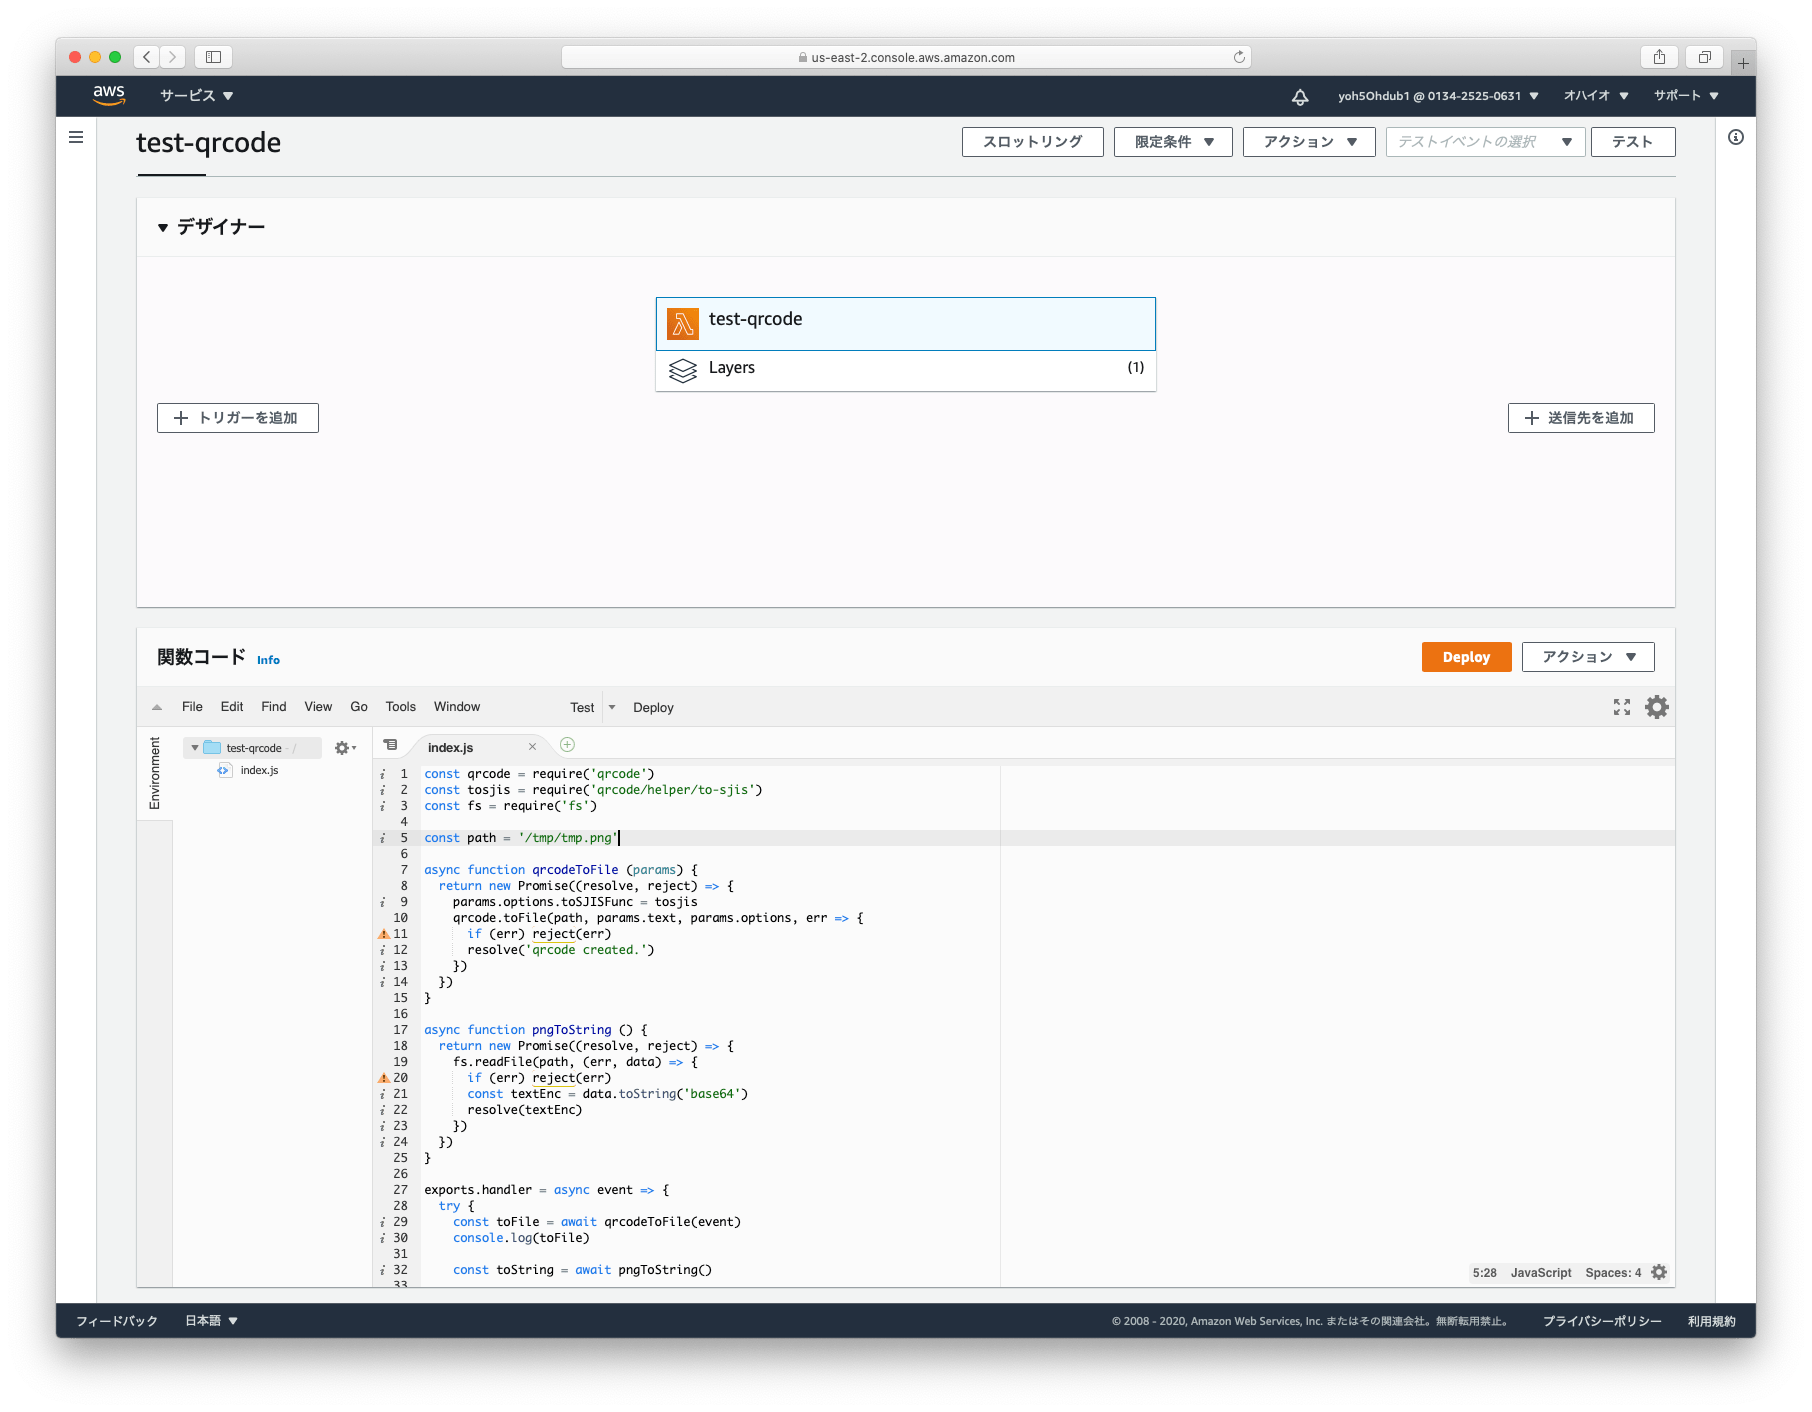
コードを貼り付ける
デフォルトで以下のコードが設定されています。
exports.handler = async (event) => {
    // TODO implement
    const response = {
        statusCode: 200,
        body: JSON.stringify('Hello from Lambda!'),
    };
    return response;
};
先ほど、作成したコードを貼り付けますが、Lambdaで実行するため一部を修正します。
以下のコードを貼り付けます。
const qrcode = require('qrcode')
const tosjis = require('qrcode/helper/to-sjis')
const fs = require('fs')

const path = '/tmp/tmp.png'

async function qrcodeToFile (params) {
  return new Promise((resolve, reject) => {
    params.options.toSJISFunc = tosjis
    qrcode.toFile(path, params.text, params.options, err => {
      if (err) reject(err)
      resolve('qrcode created.')
    })
  })
}

async function pngToString () {
  return new Promise((resolve, reject) => {
    fs.readFile(path, (err, data) => {
      if (err) reject(err)
      const textEnc = data.toString('base64')
      resolve(textEnc)
    })
  })
}

exports.handler = async event => {
  try {
    const toFile = await qrcodeToFile(event)
    console.log(toFile)

    const toString = await pngToString()

    // response
    const response = {
      statusCode: 200,
      body: toString
    }
    console.log(response)
    return response
  } catch (e) {
    console.error(e)

    // response
    const response = {
      statusCode: 400,
      body: e.message
    }
    console.log(response)
    return response
  }
}
貼り付けたら Deploy をクリックします。
vimdiffで確認します。
テストイベントを設定する
コードの引数として使っていたオブジェクトをテストイベントにJSONとして貼り付けます。
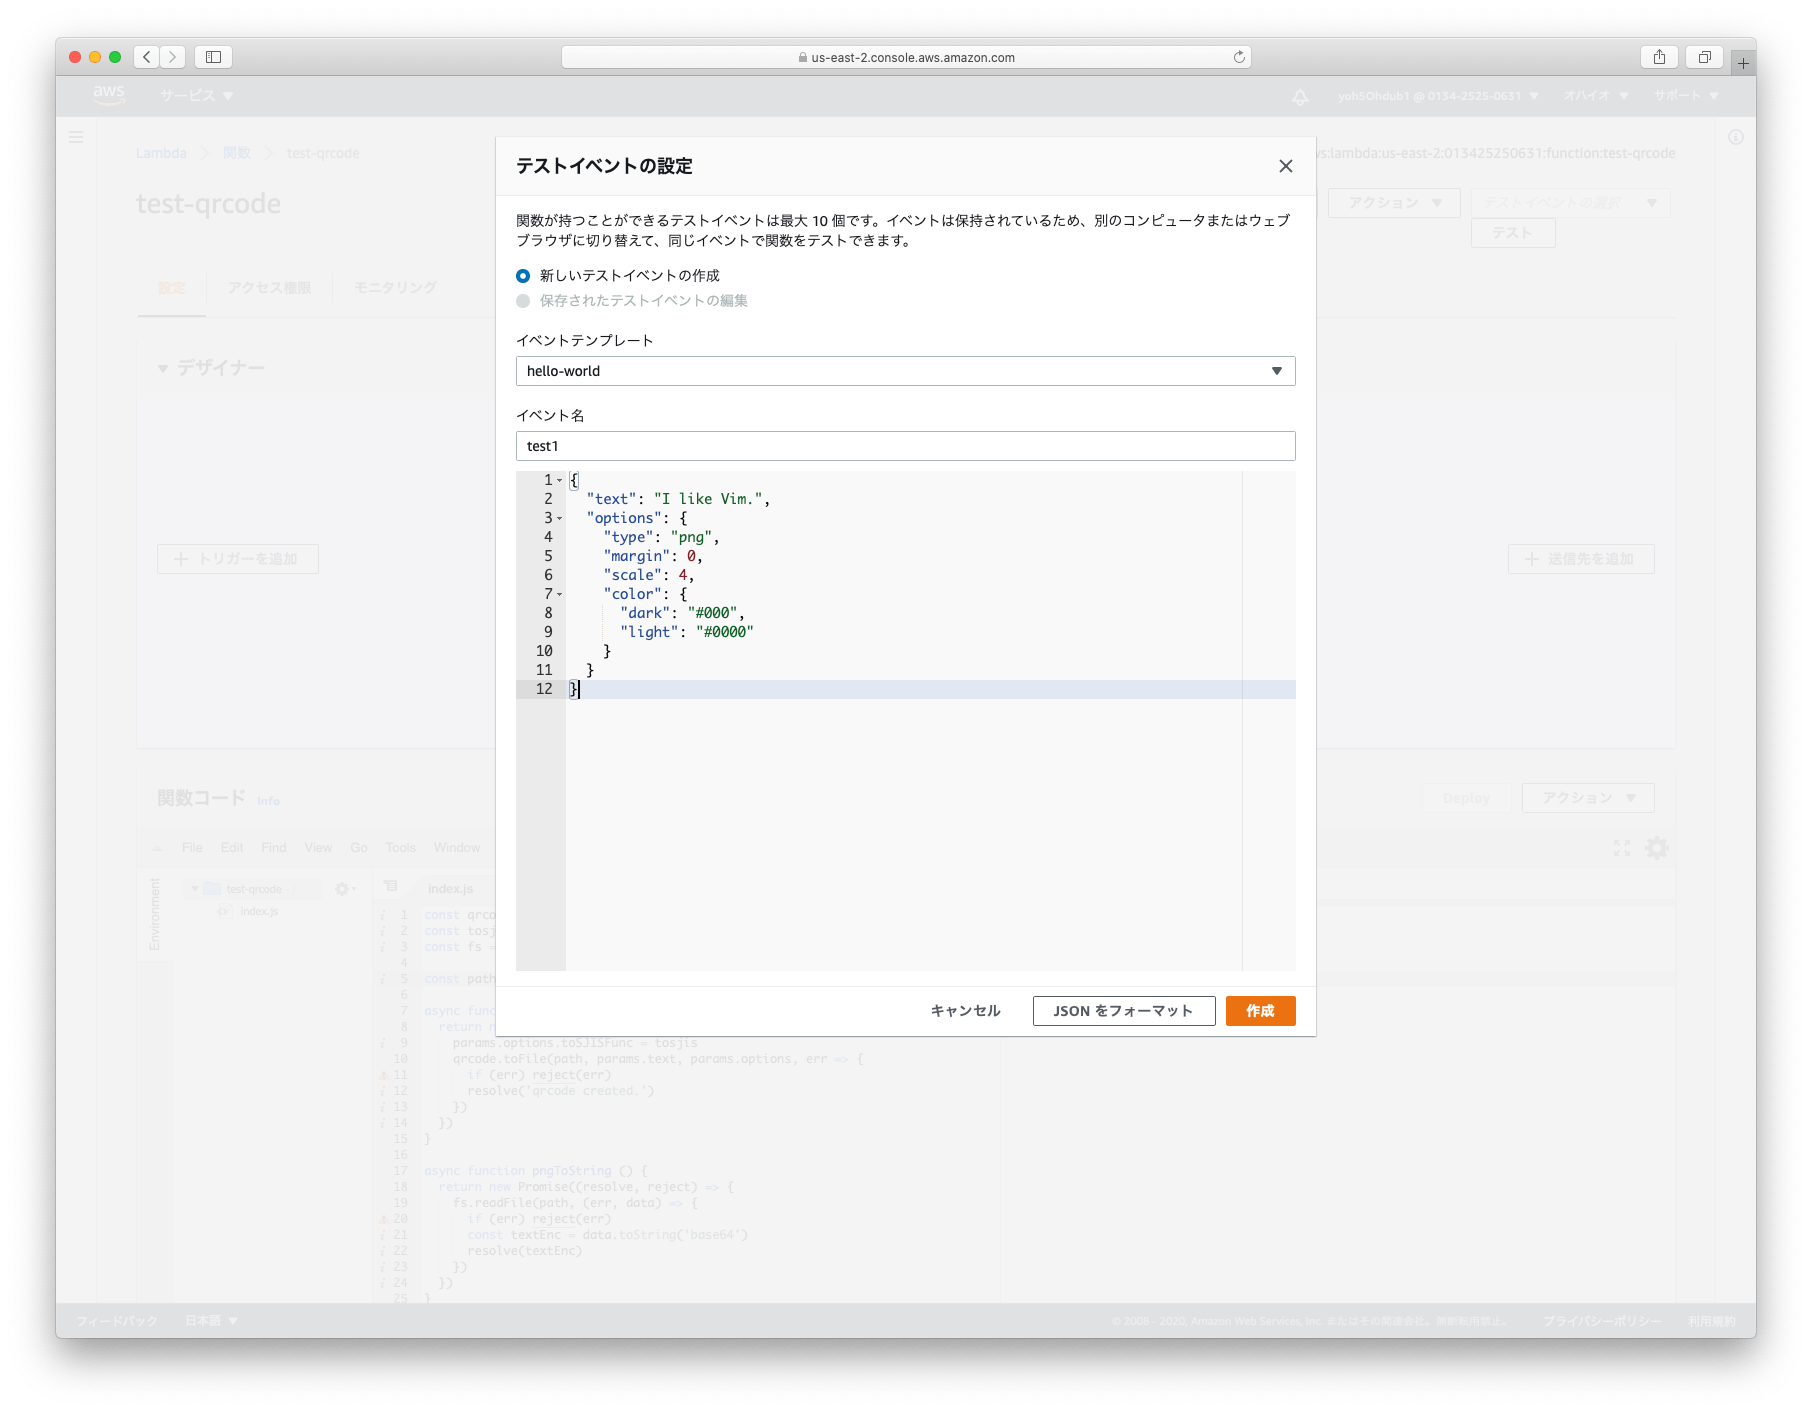
const eventParams = {
  text: 'I like Vim.',
  options: {
    type: 'png',
    margin: 0,
    scale: 4,
    color: {
      dark: '#000',
      light: '#0000'
    }
  }
}
{
  "text": "I like Vim.",
  "options": {
    "type": "png",
    "margin": 0,
    "scale": 4,
    "color": {
      "dark": "#000",
      "light": "#0000"
    }
  }
}
テストをクリックします。
ローカルと同じ結果になればOKです。

これで、Lambdaは設定できましたので、API Gatewayを設定します。
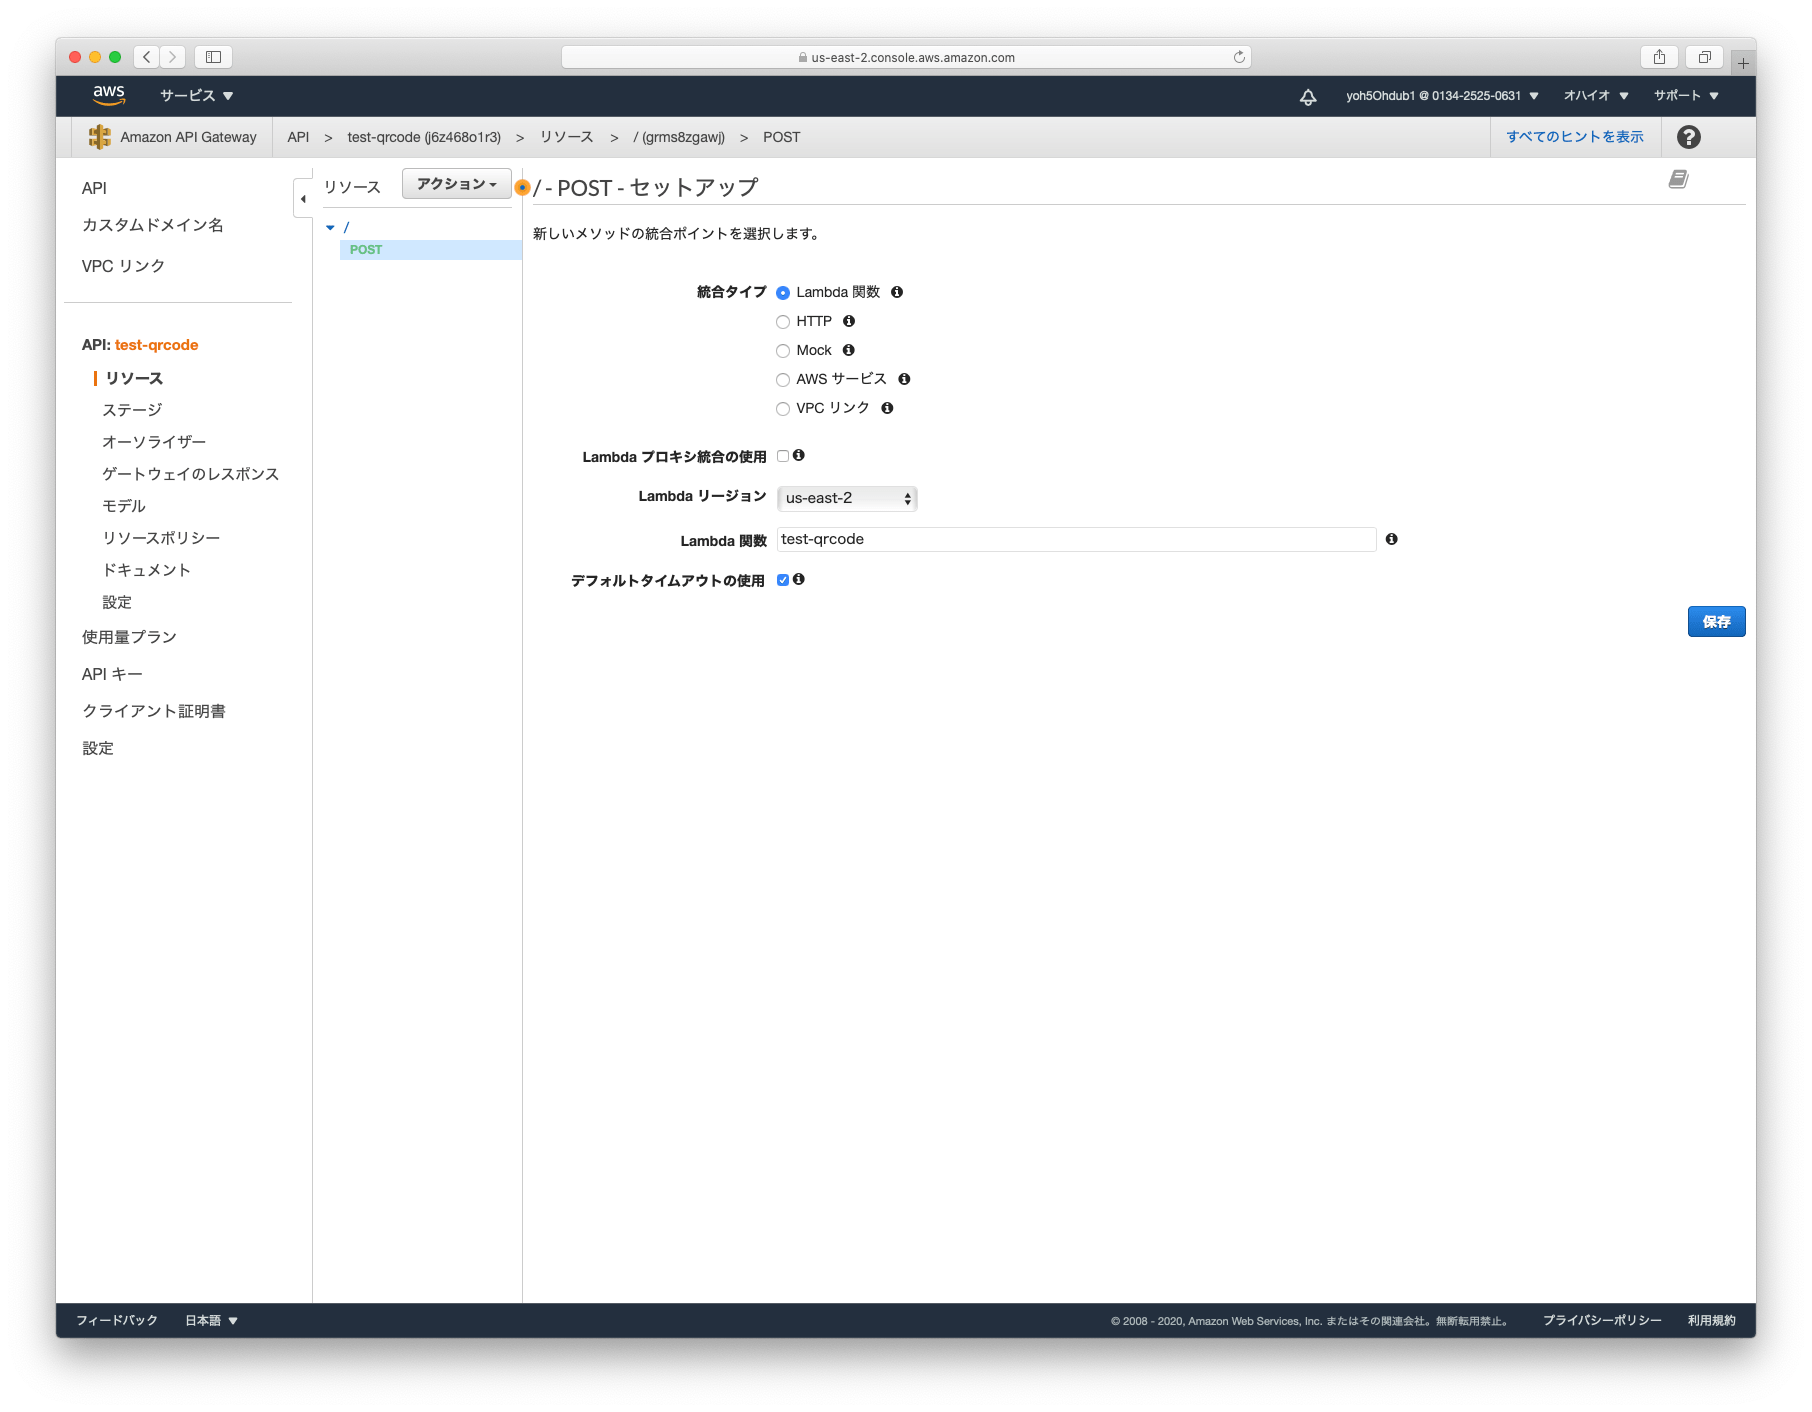
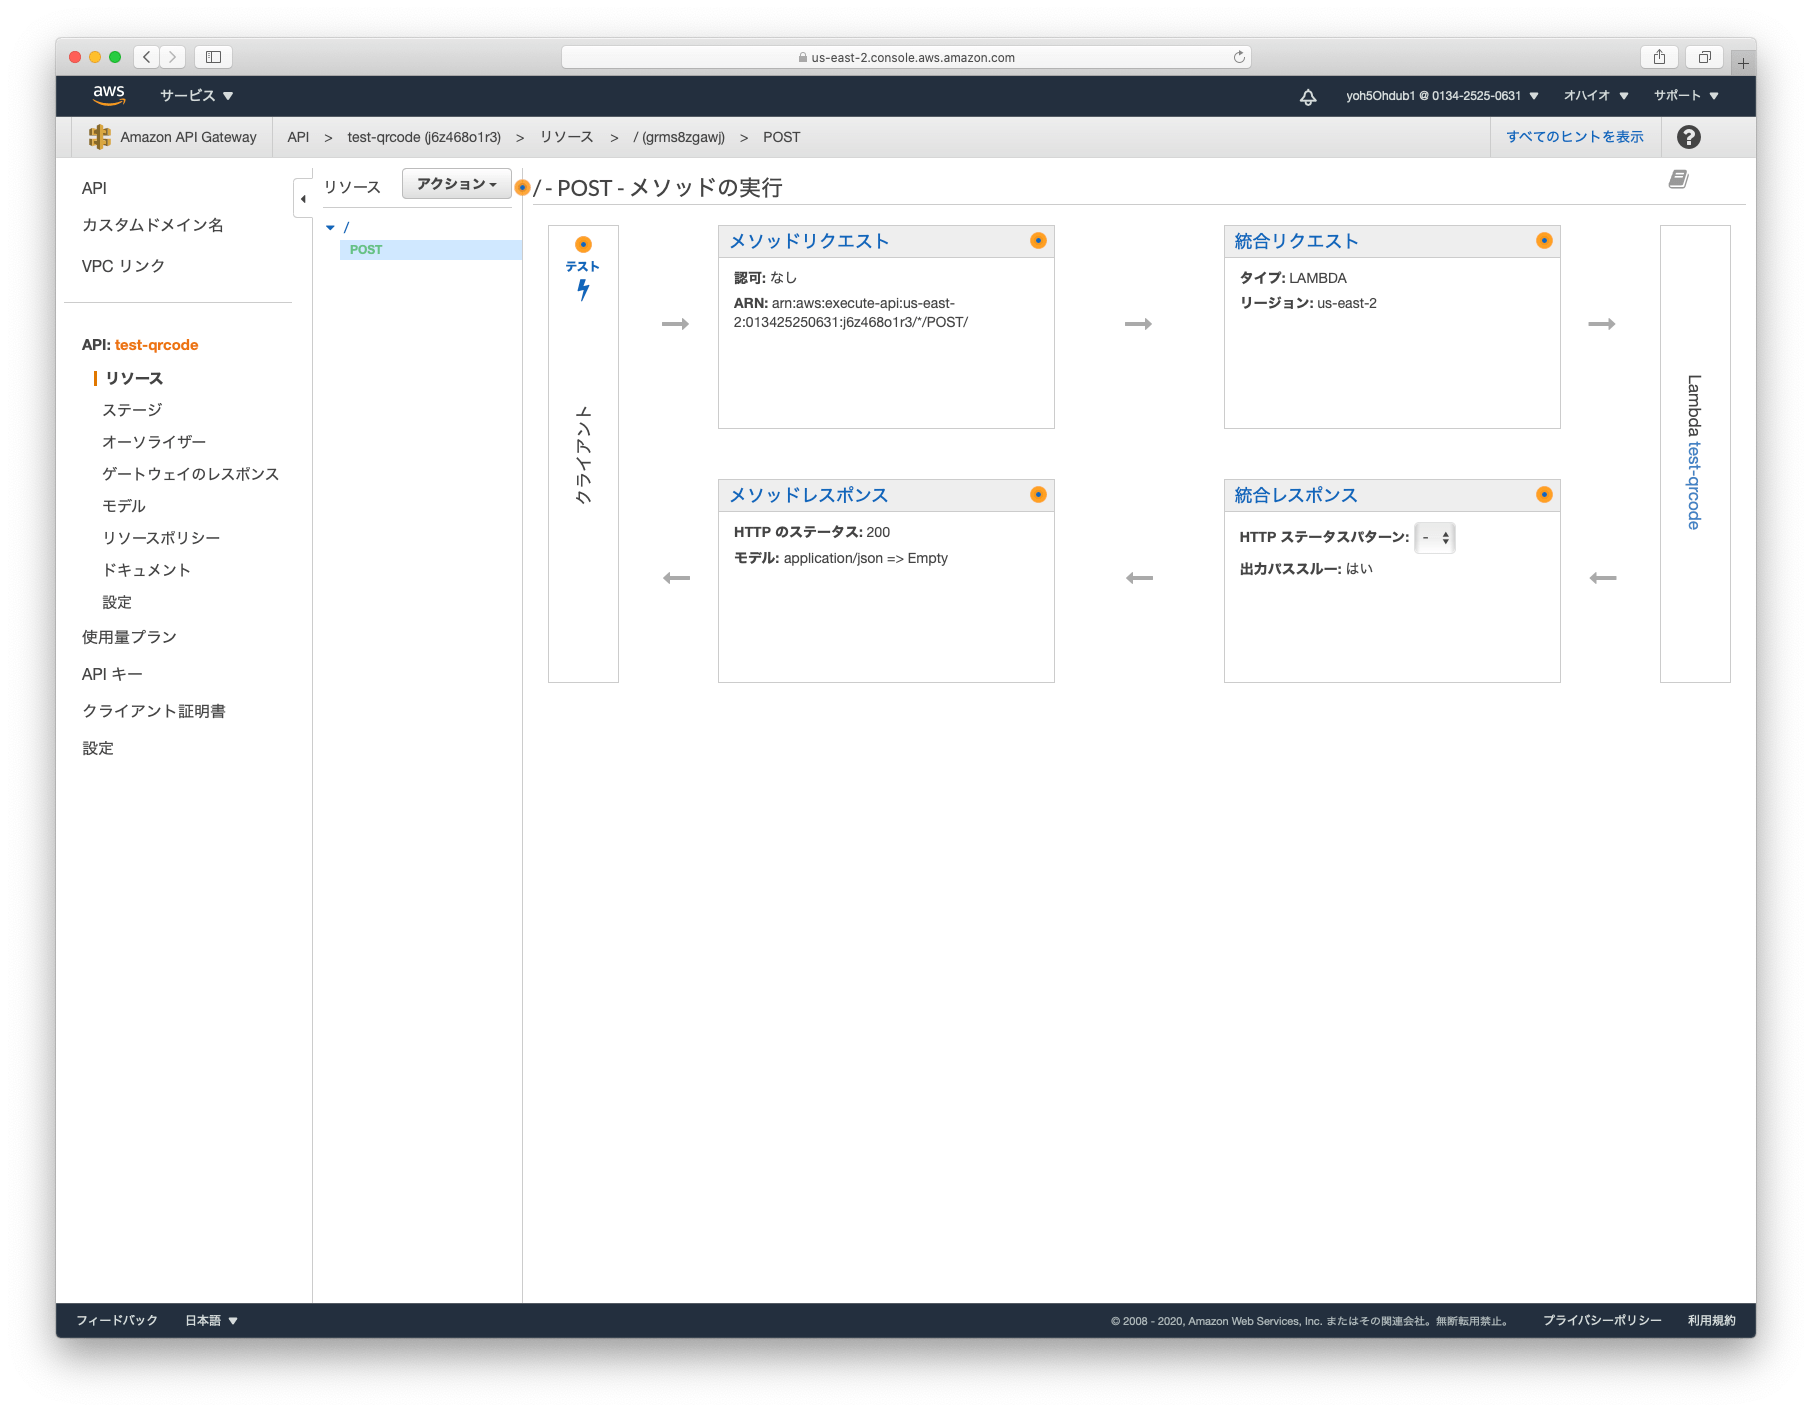
Amazon API GatewayでAPIを作成する
API Gatewayをクリックします。
APIを作成します。
作成方法の詳細は API GatewayとAWS Lambda(Node.js)を使い効率よくWebサービスと連携する その1 という記事に記載していますので、分からないかたは参照してください。
テストします。
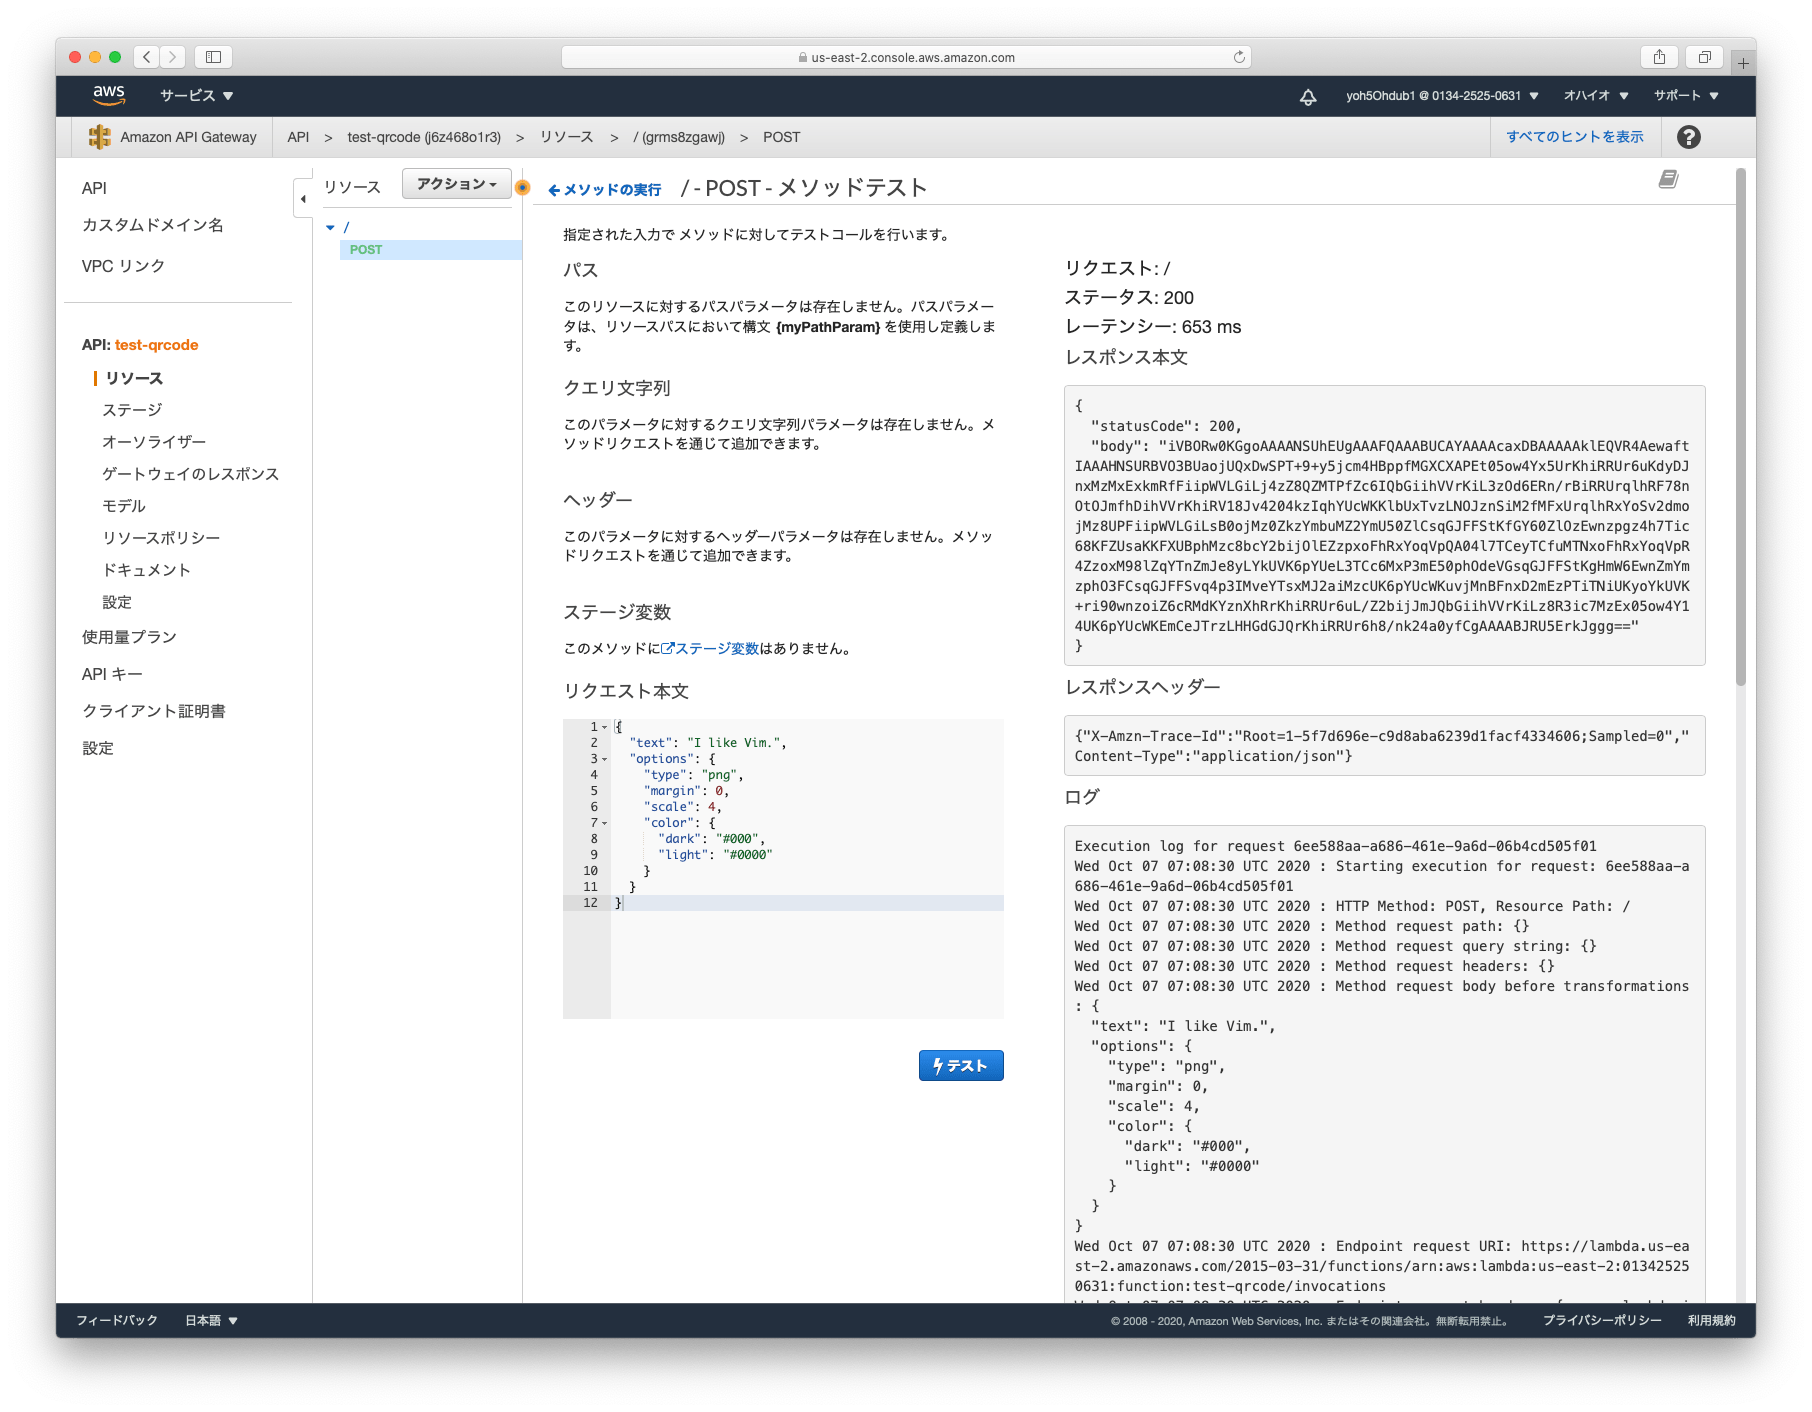
デプロイする

以下のURLが発行されました。
このURLにPOSTすれば、関連付けたLambdaを実行できるようになります。
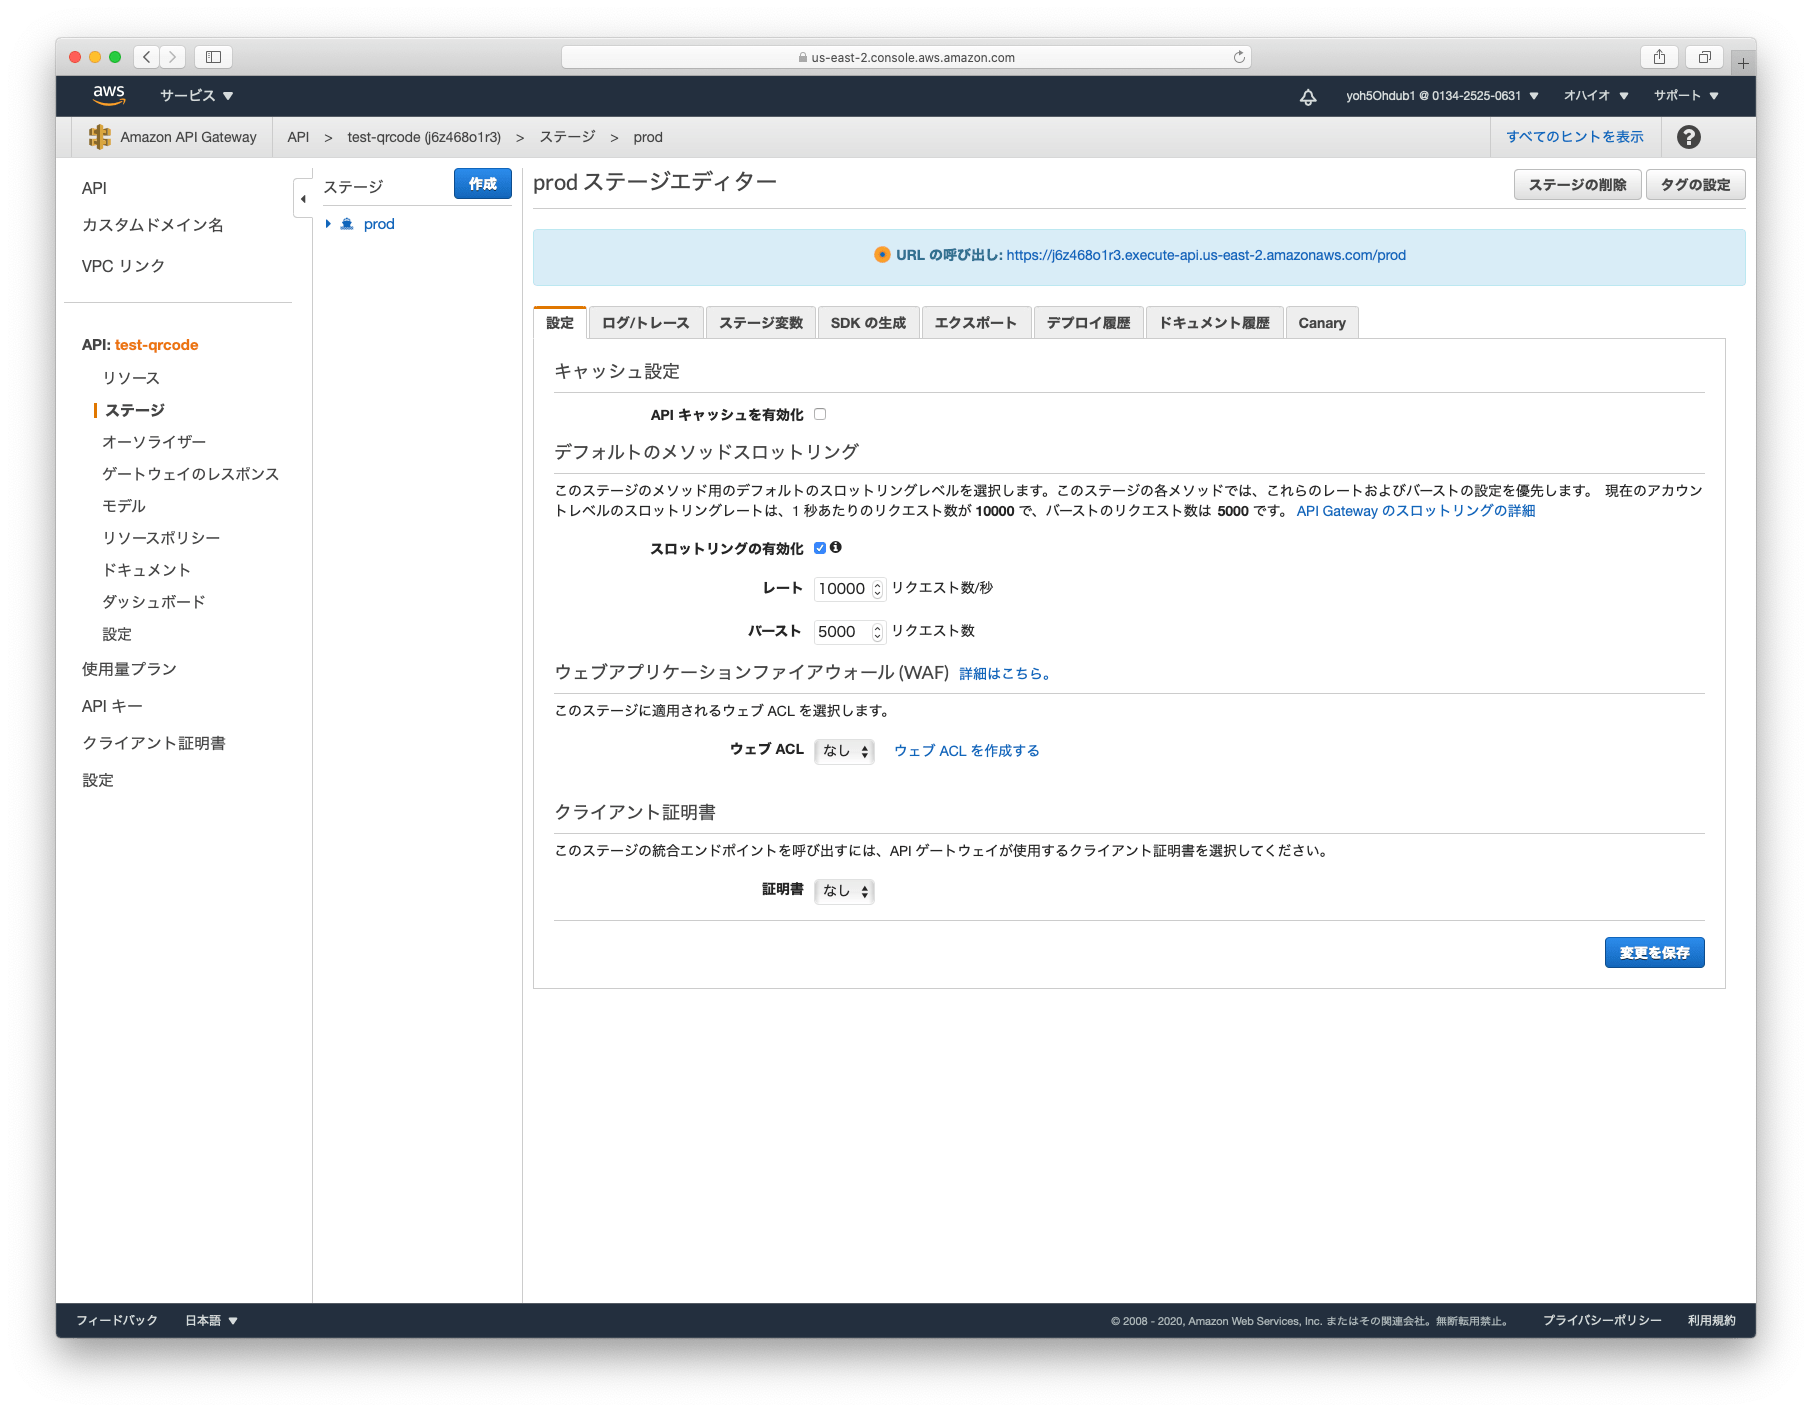
https://j6z468o1r3.execute-api.us-east-2.amazonaws.com/prod
デプロイについても API GatewayとAWS Lambda(Node.js)を使い効率よくWebサービスと連携する その1 という記事に記載していますので、分からないかたは参照してください。
FileMakerでAPIをリクエストする
FileMakerでリクエストします。

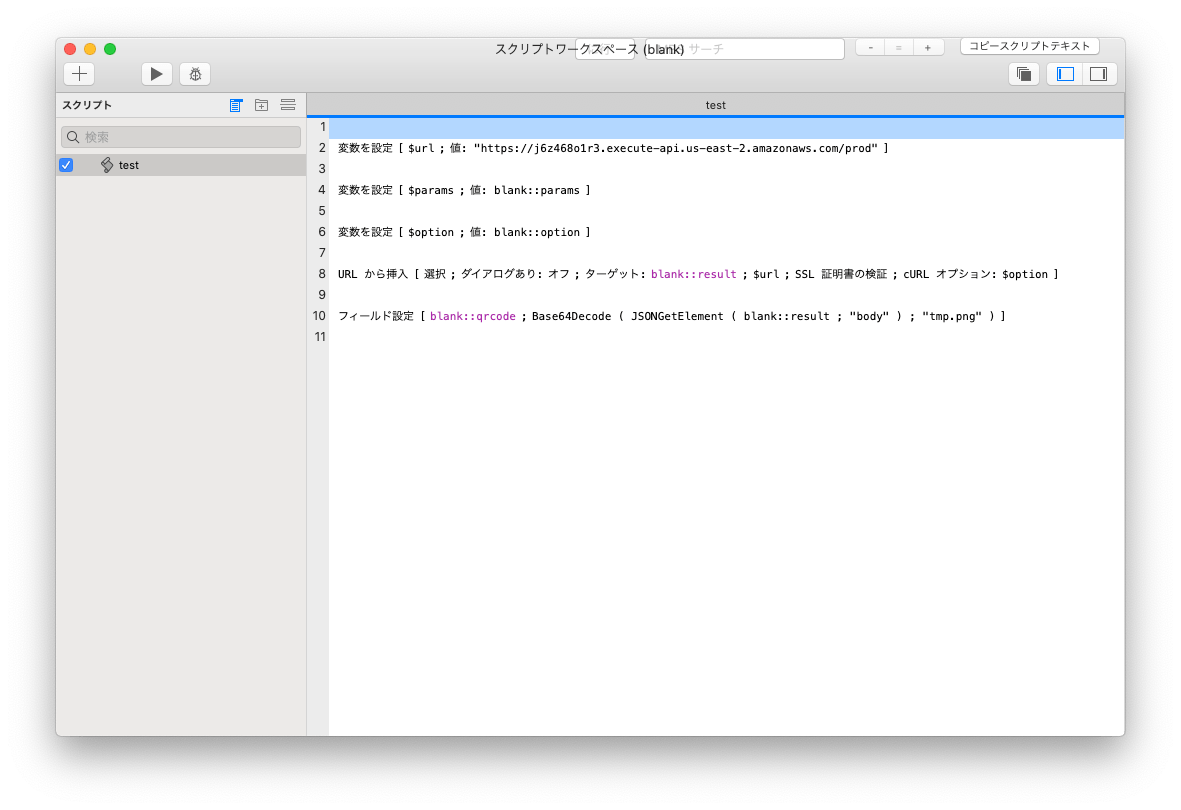
#
変数を設定 [ $url ; 値: "https://j6z468o1r3.execute-api.us-east-2.amazonaws.com/prod" ]
#
変数を設定 [ $params ; 値: blank::params ]
#
変数を設定 [ $option ; 値: blank::option ]
#
URL から挿入 [ 選択 ; ダイアログあり: オフ ; ターゲット: blank::result ; $url ; SSL 証明書の検証 ; cURL オプション: $option ]
#
フィールド設定 [ blank::qrcode ; Base64Decode ( JSONGetElement ( blank::result ; "body" ) ; "tmp.png" ) ]
#
無事QRコードを生成することができました。
問題点が…
しかし、現在の状態では、URLさえ分かれば、誰でもリクエストできてしまいます。
そのため、APIキーがある場合のみ実行できるようにします。
Amazon API GatewayのAPIキーを活用する
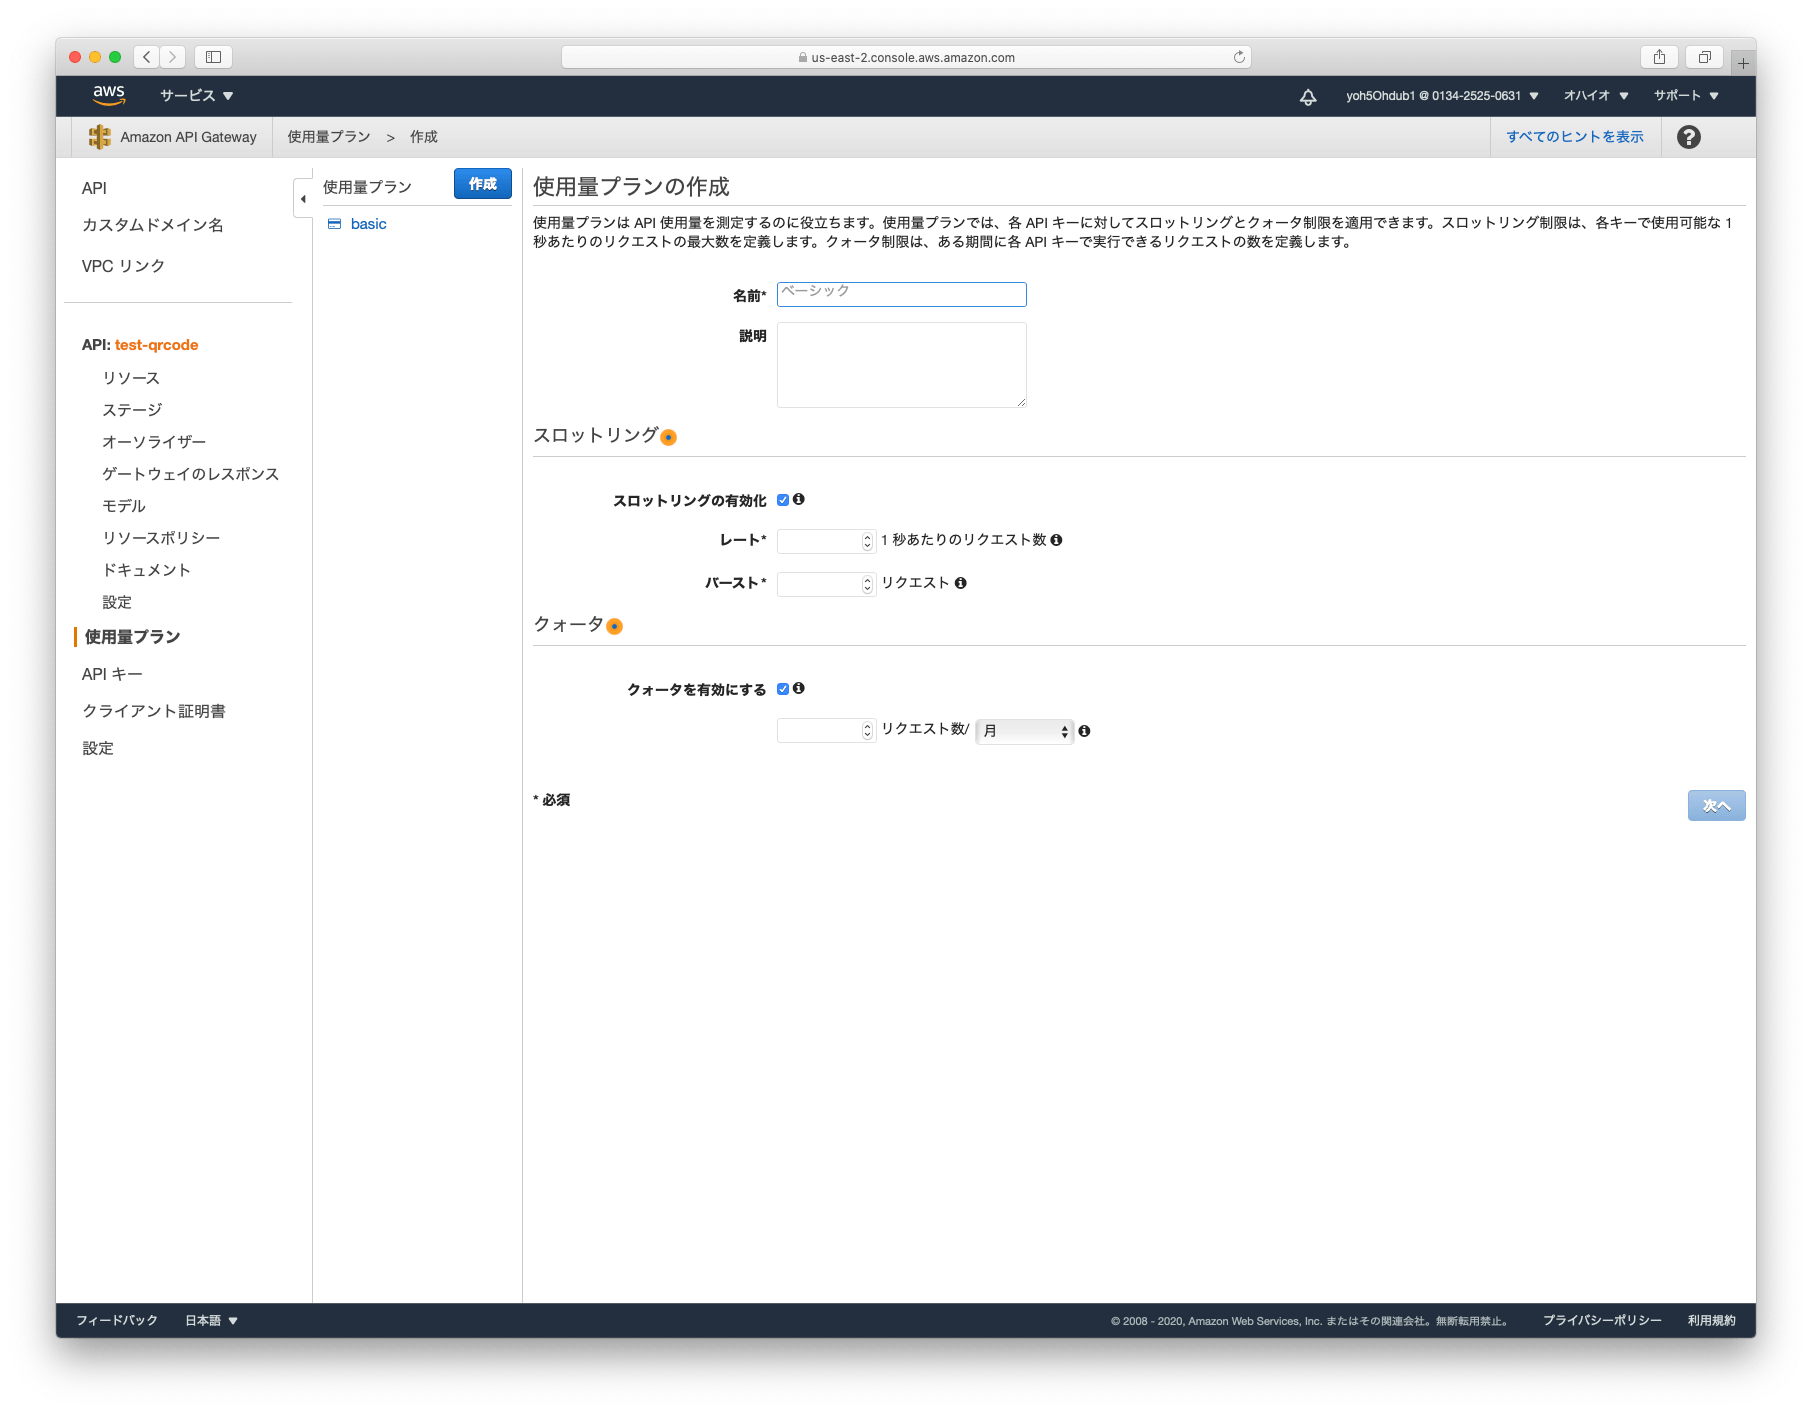
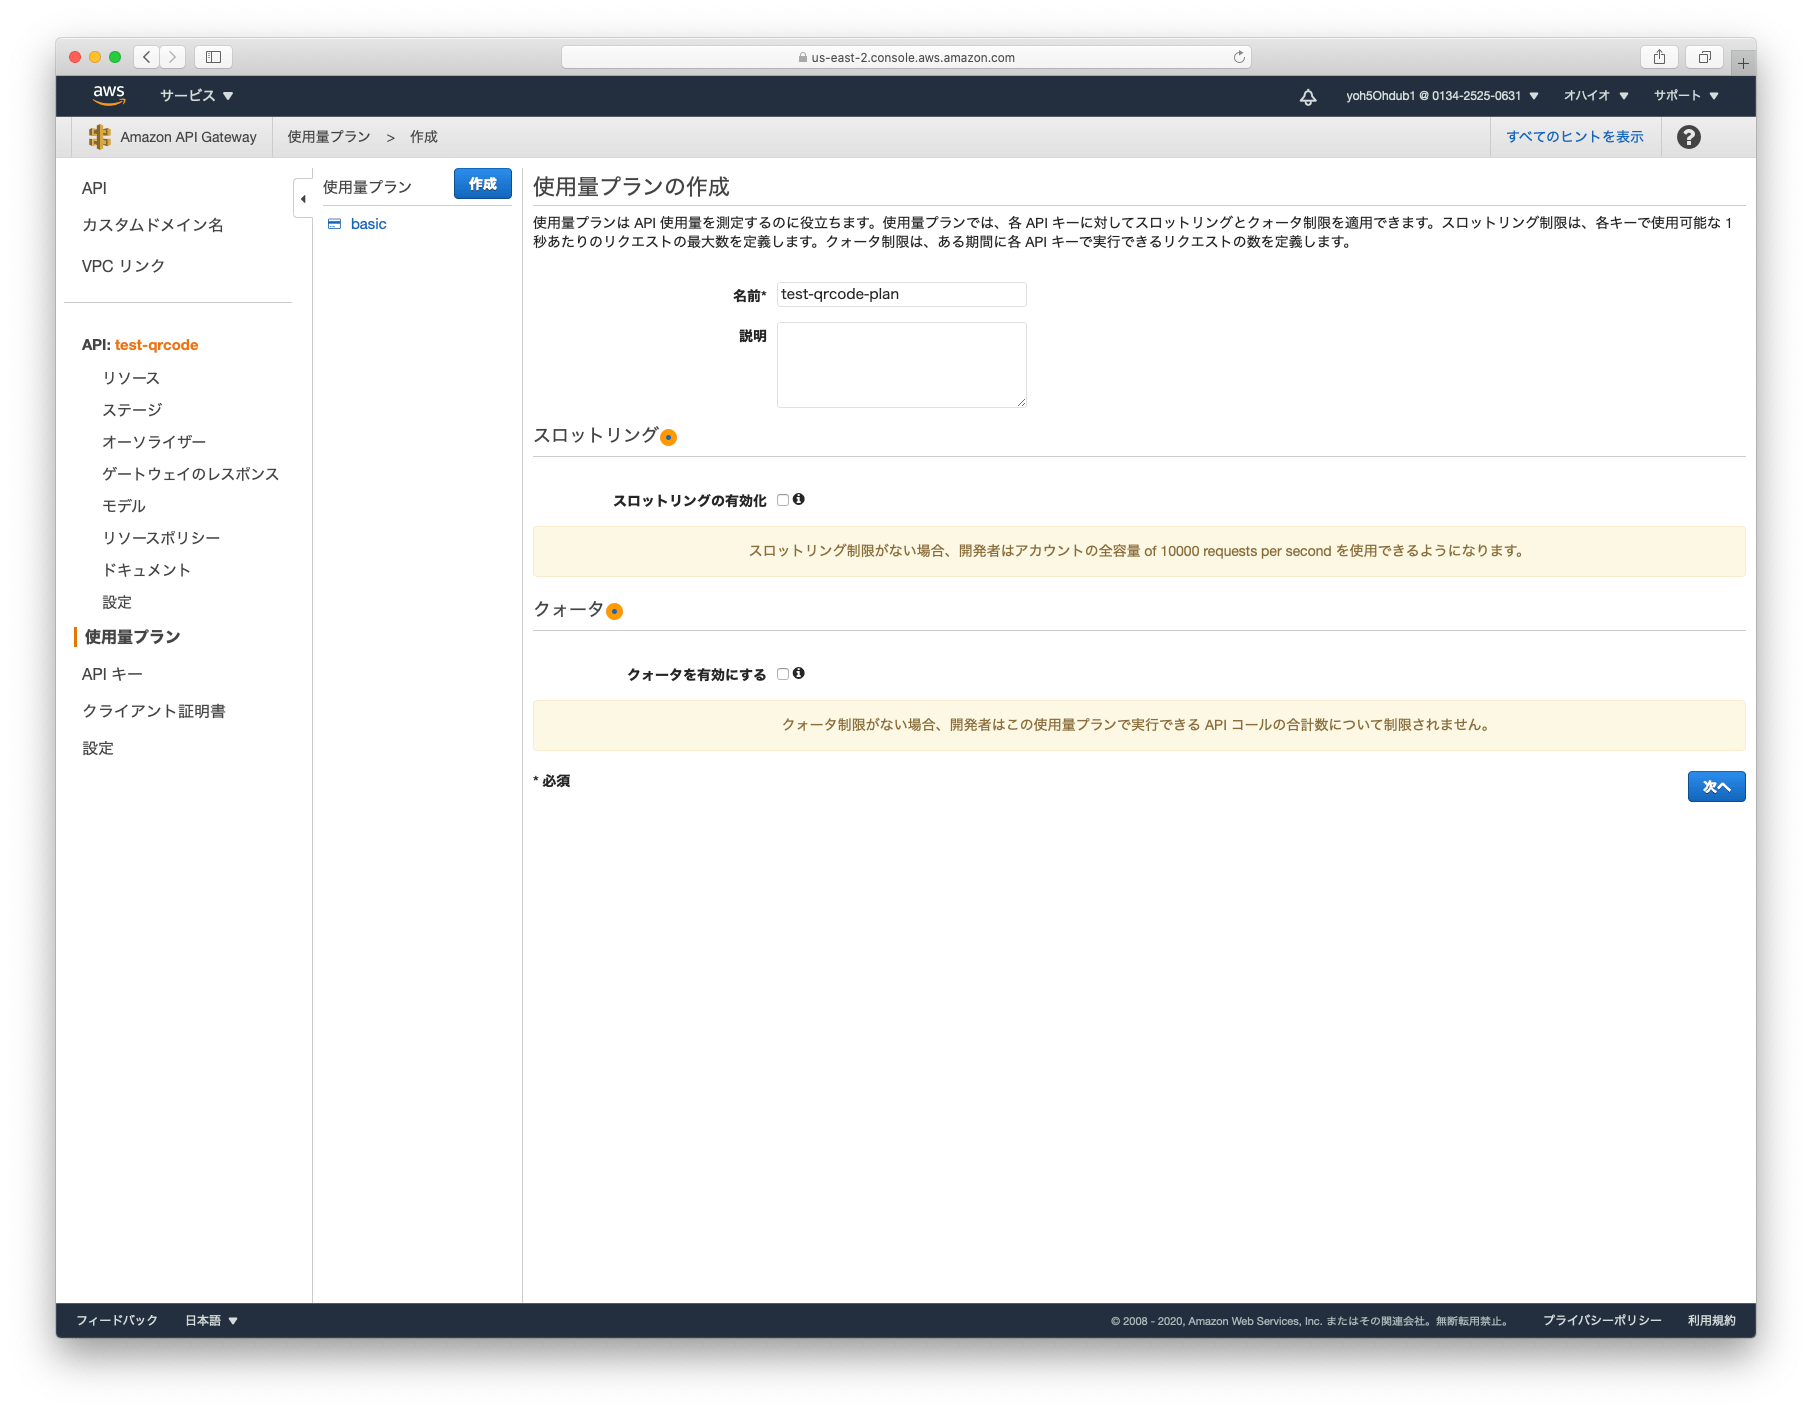
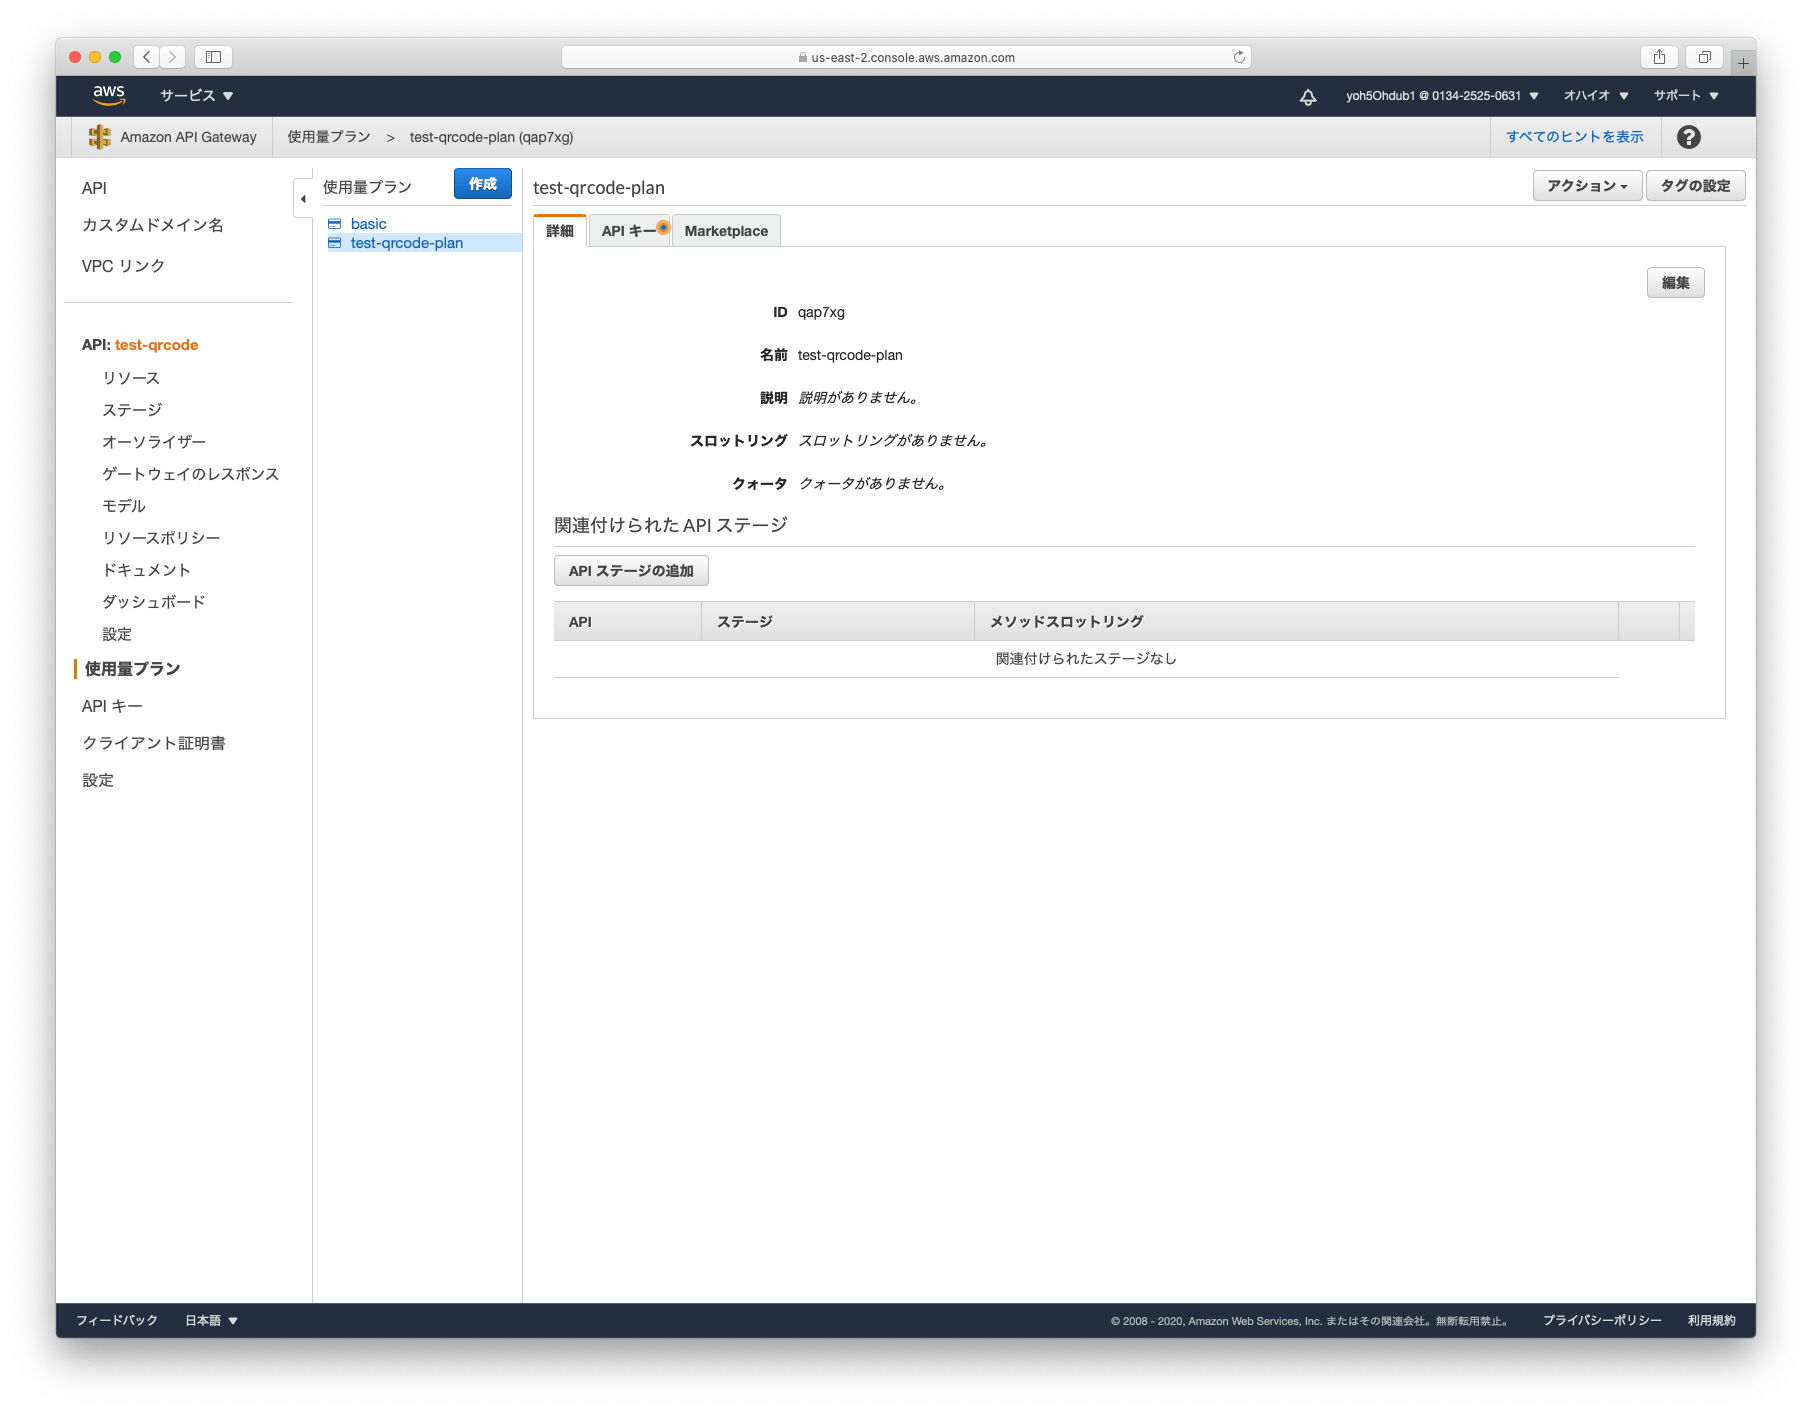
使用料プランを作成する
使用料プランを作成します。
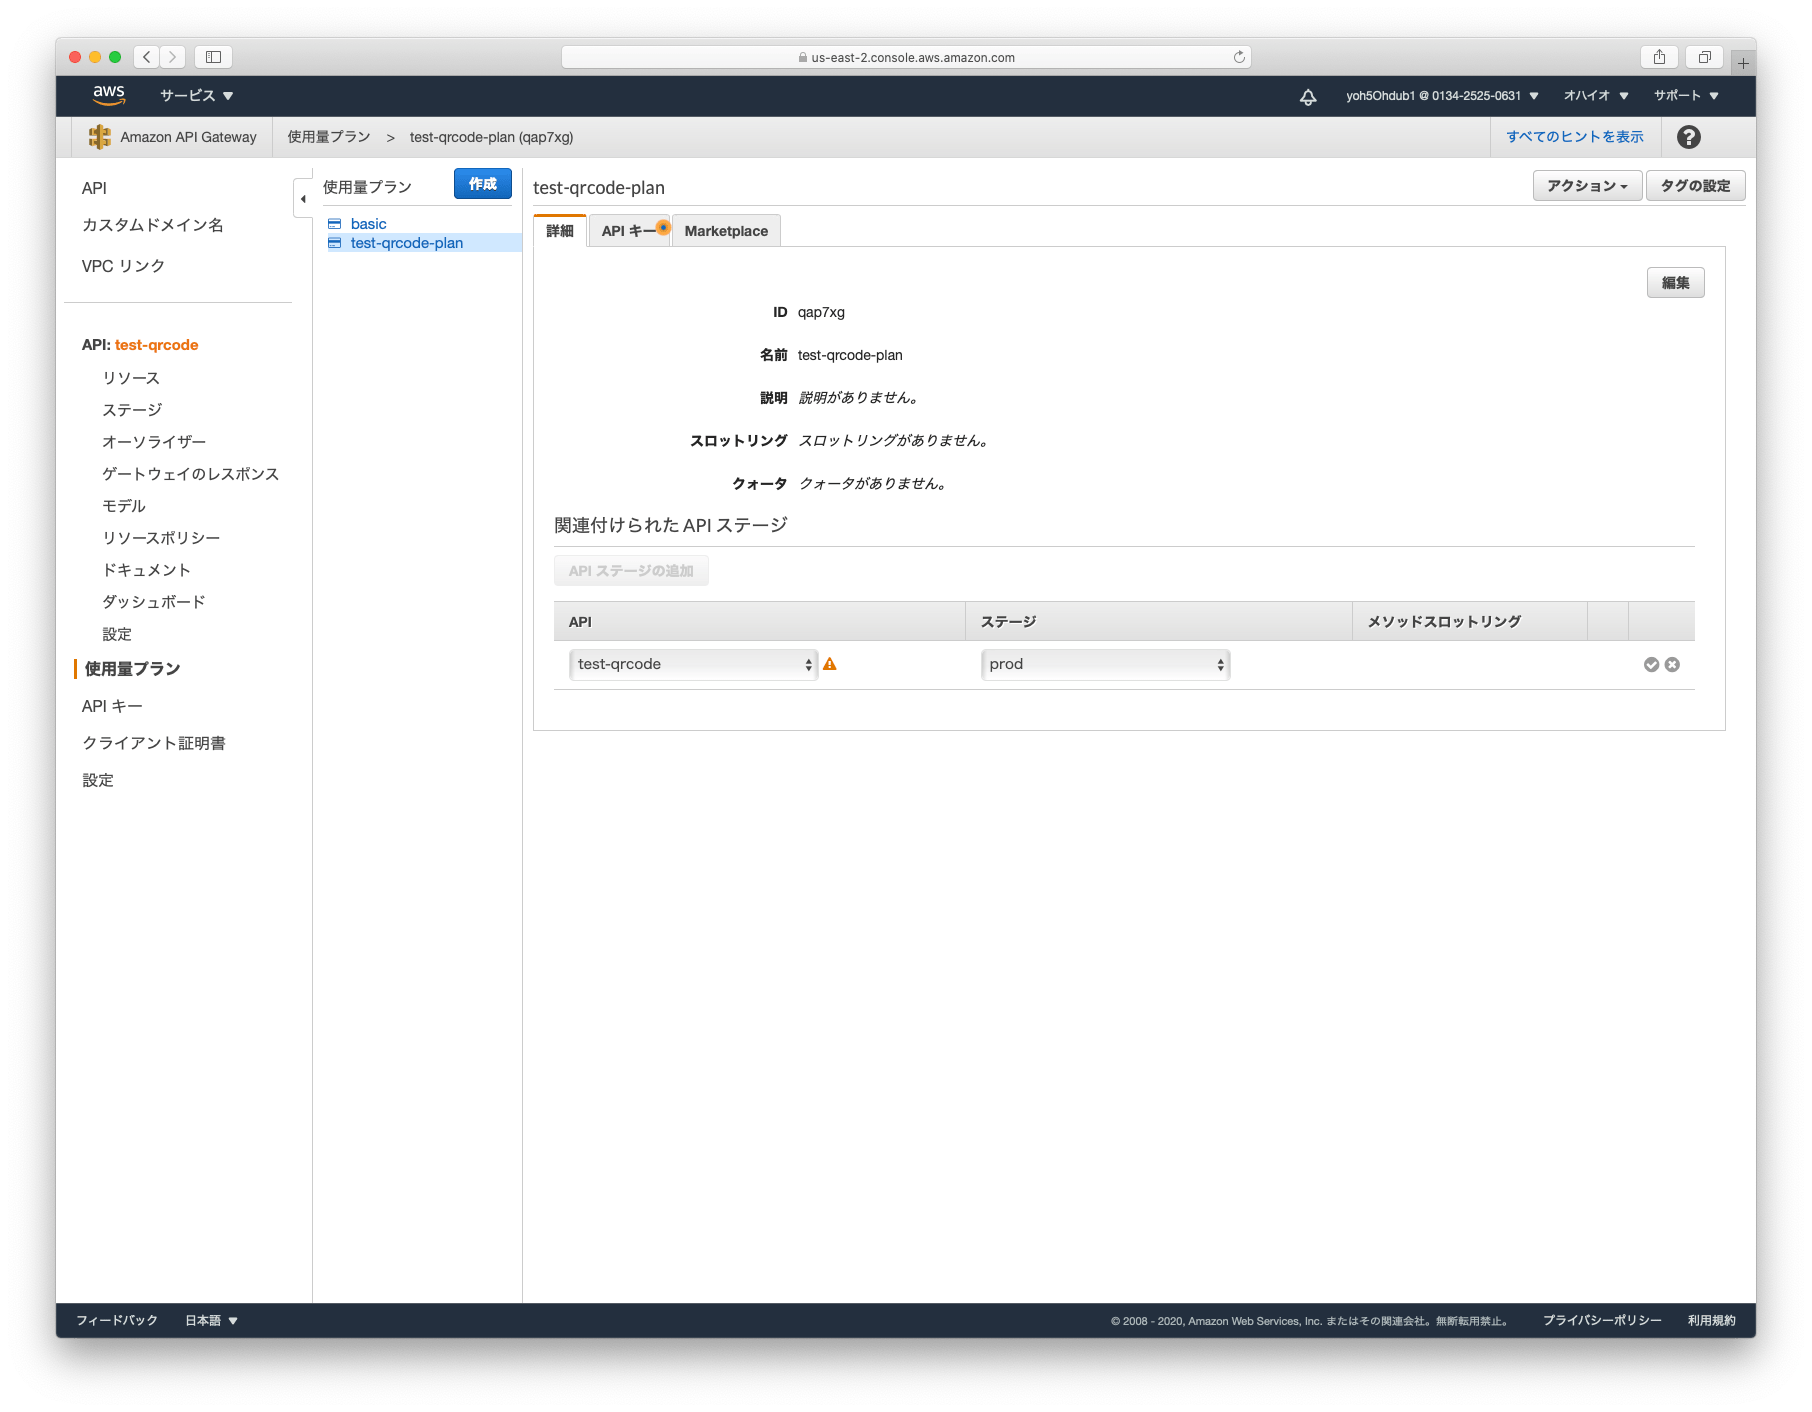
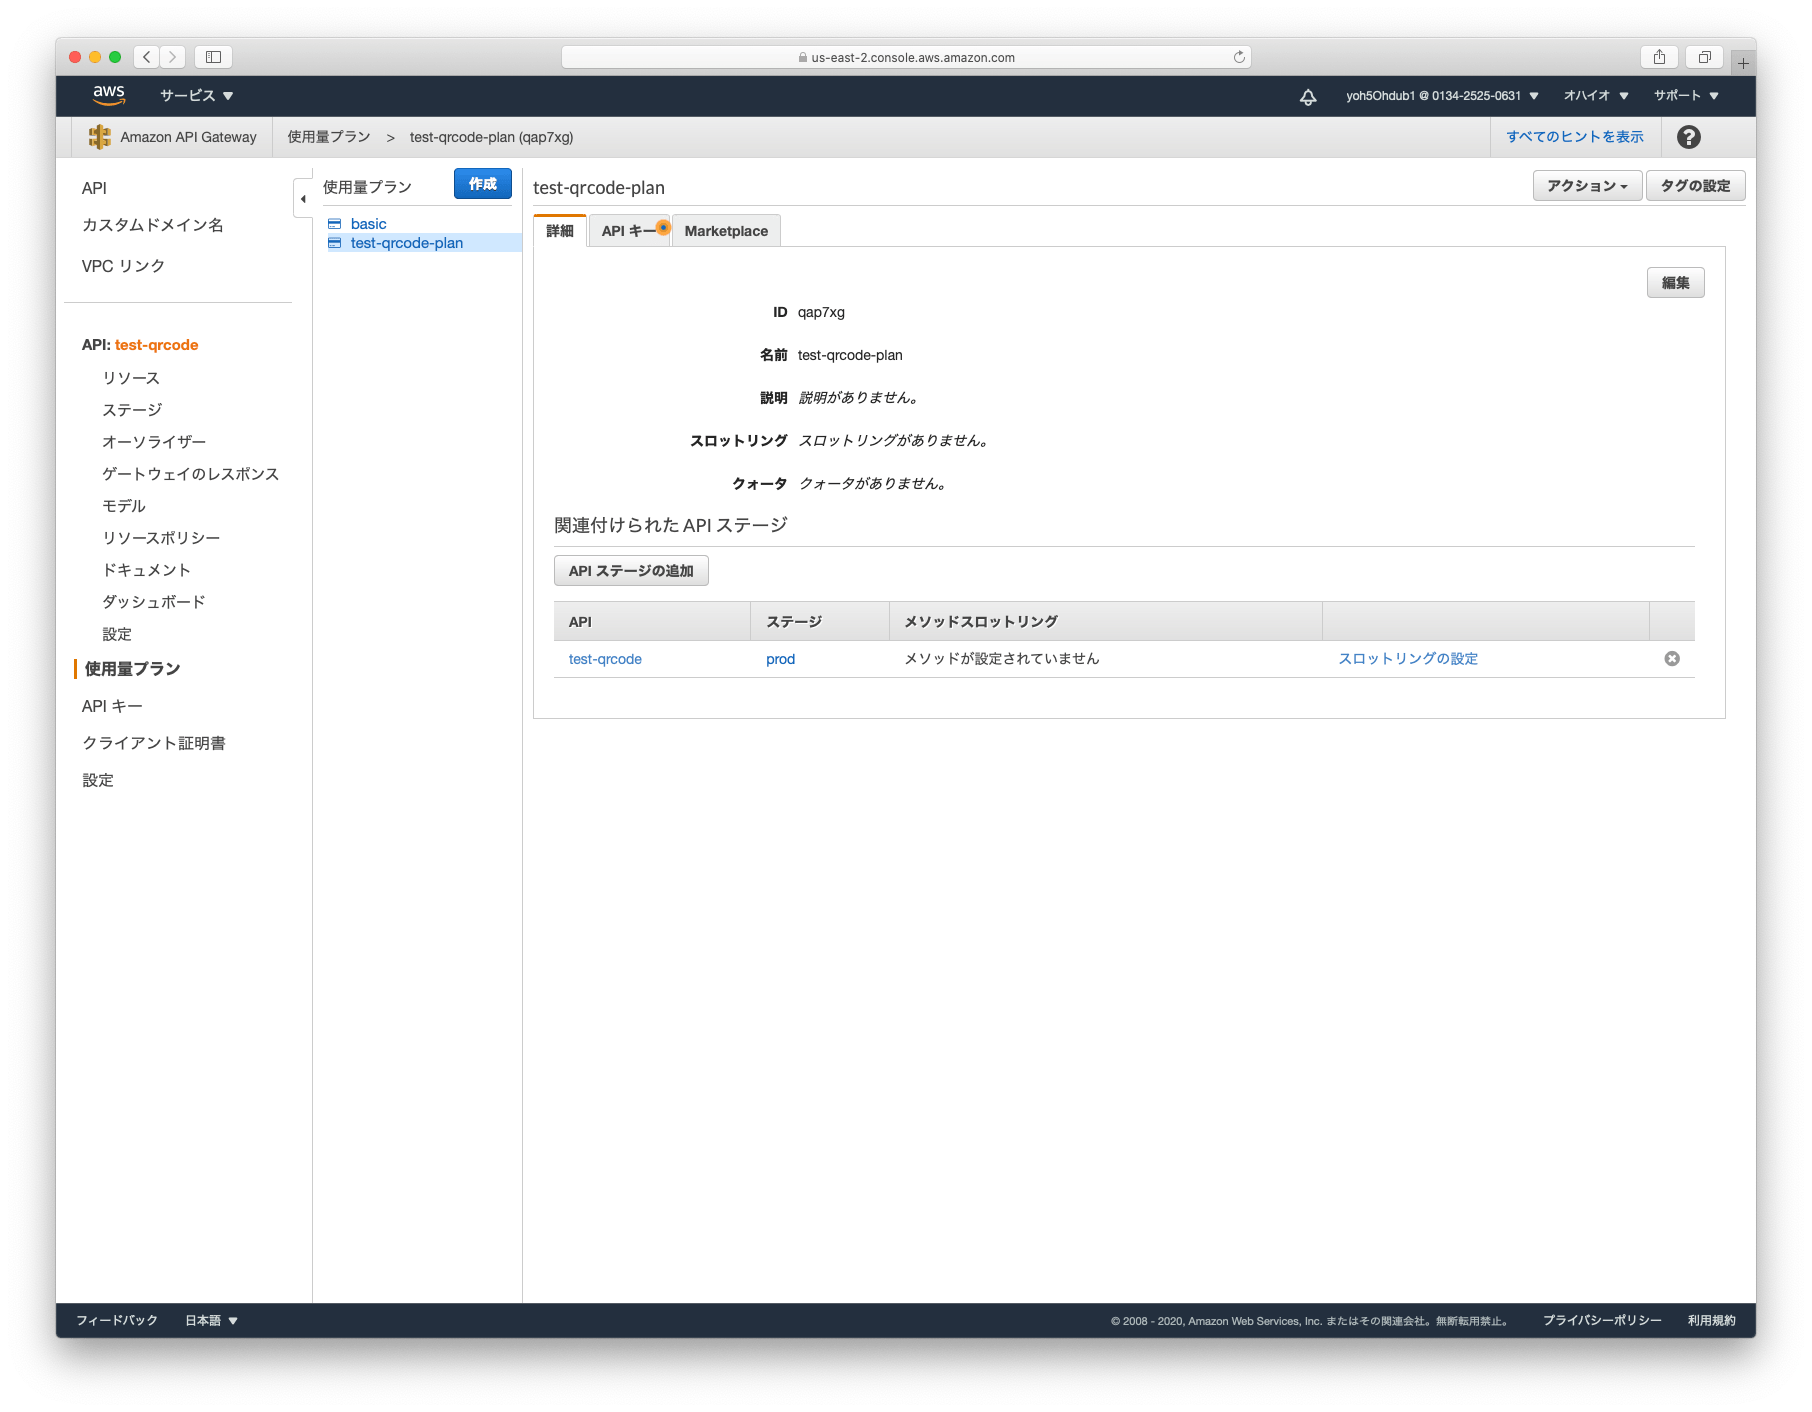
APIステージを追加する
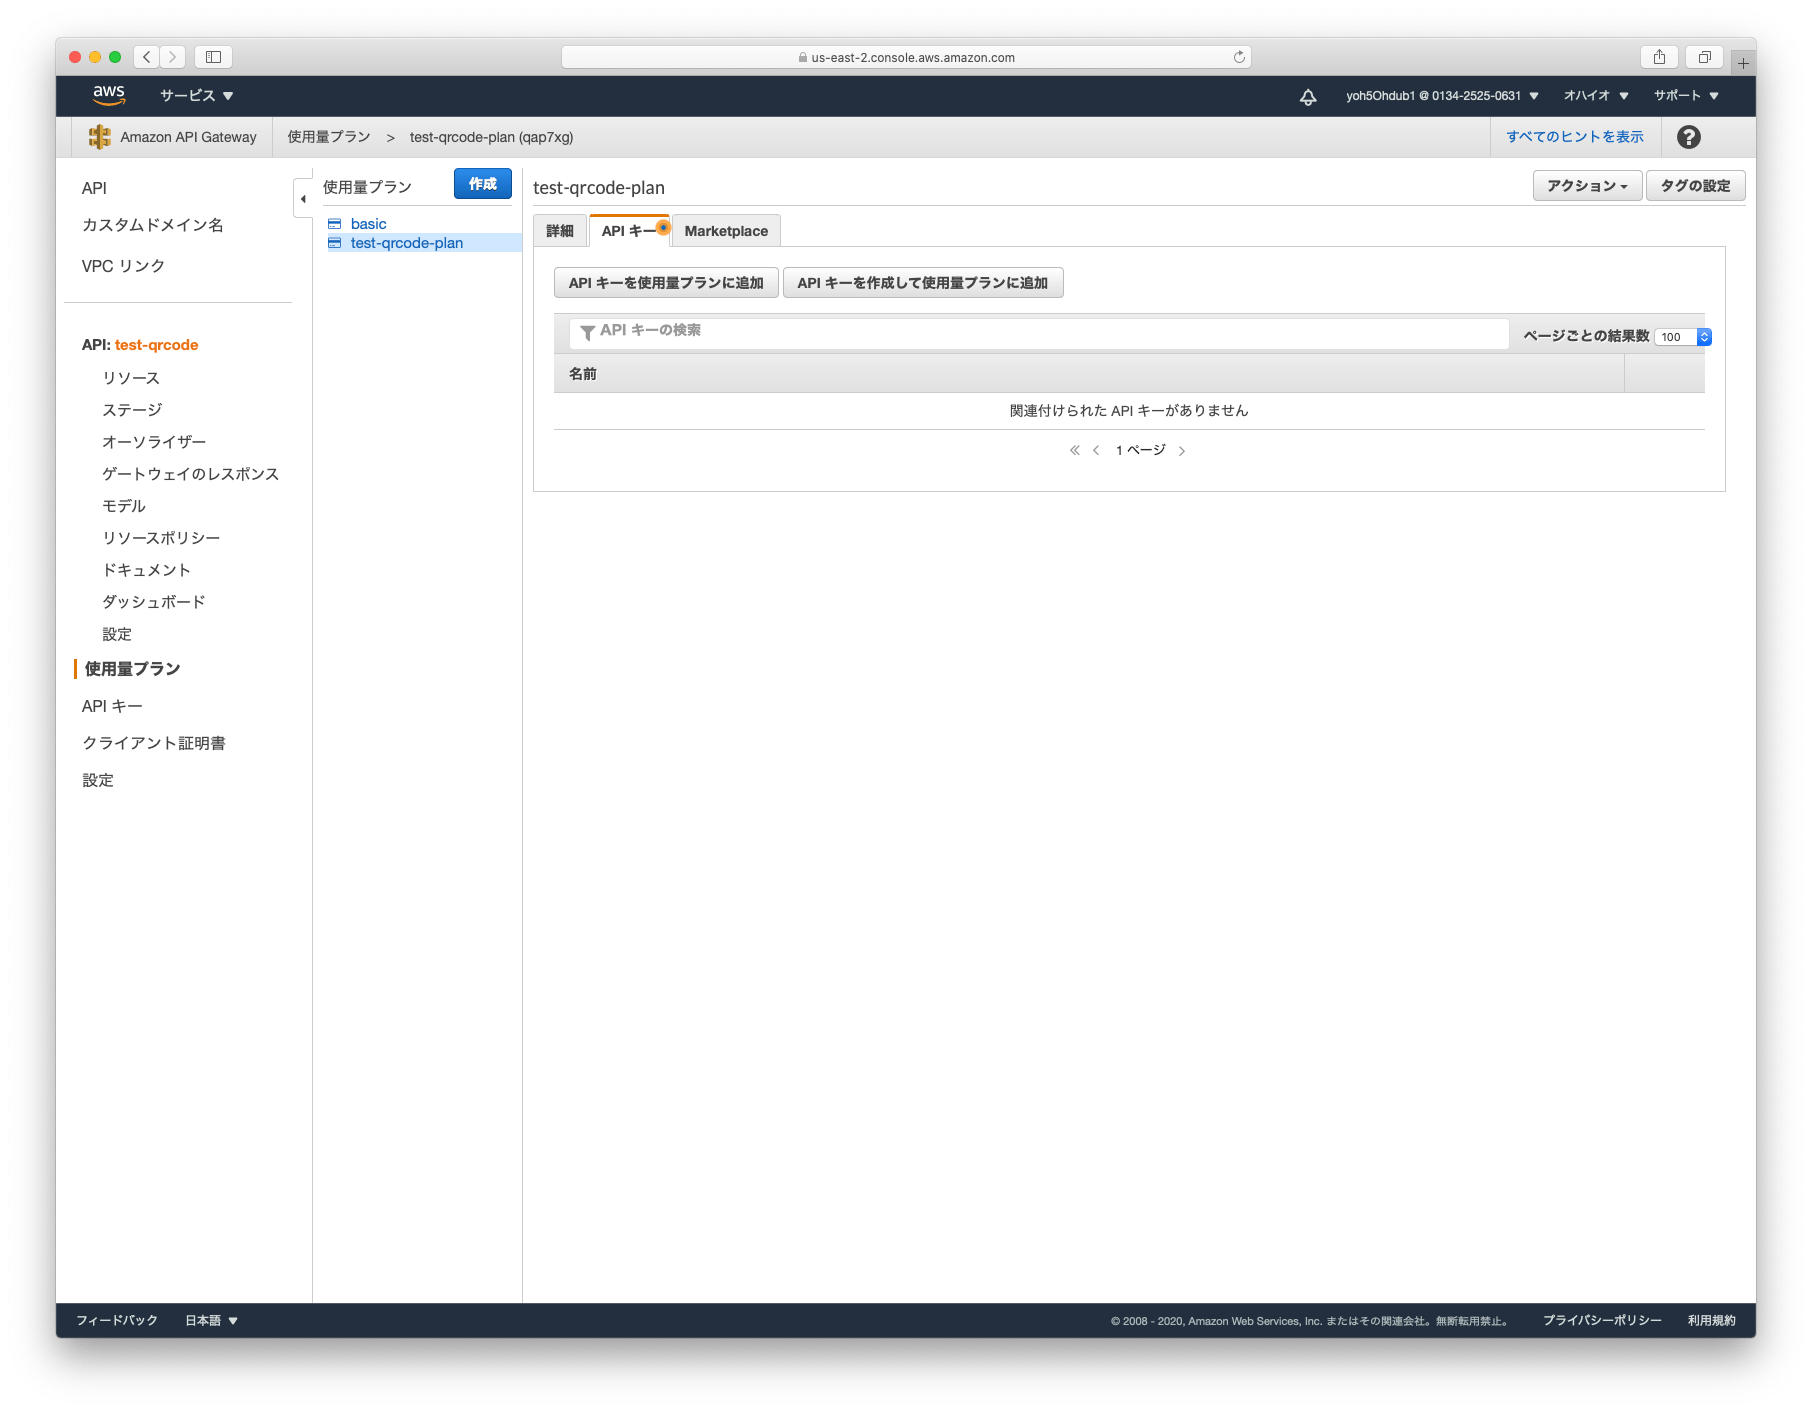
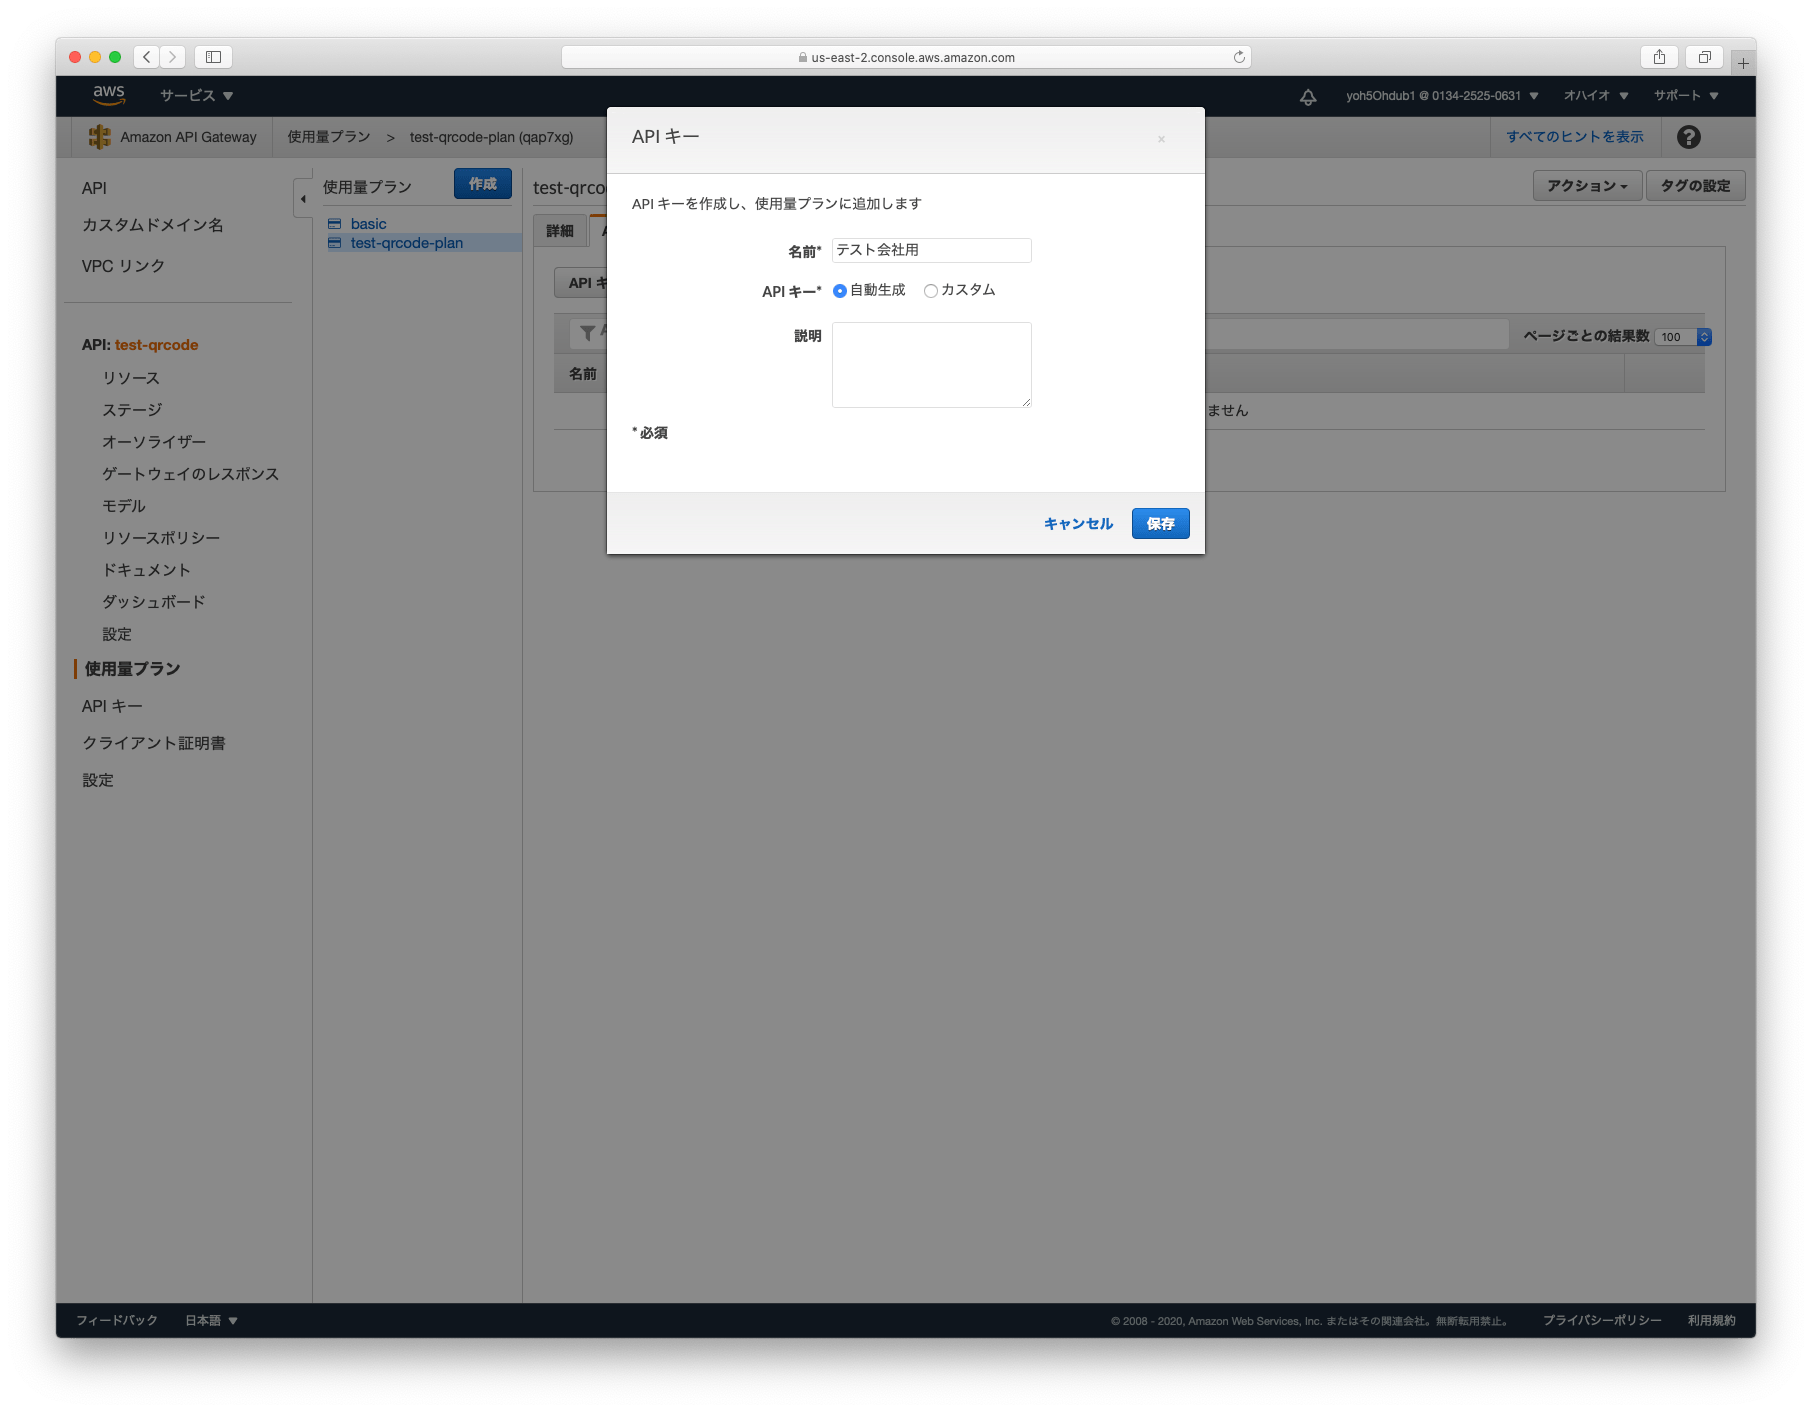
APIキーを作成する
「API キーを作成して使用量プランに追加」をクリックして、APIキーを作成します。
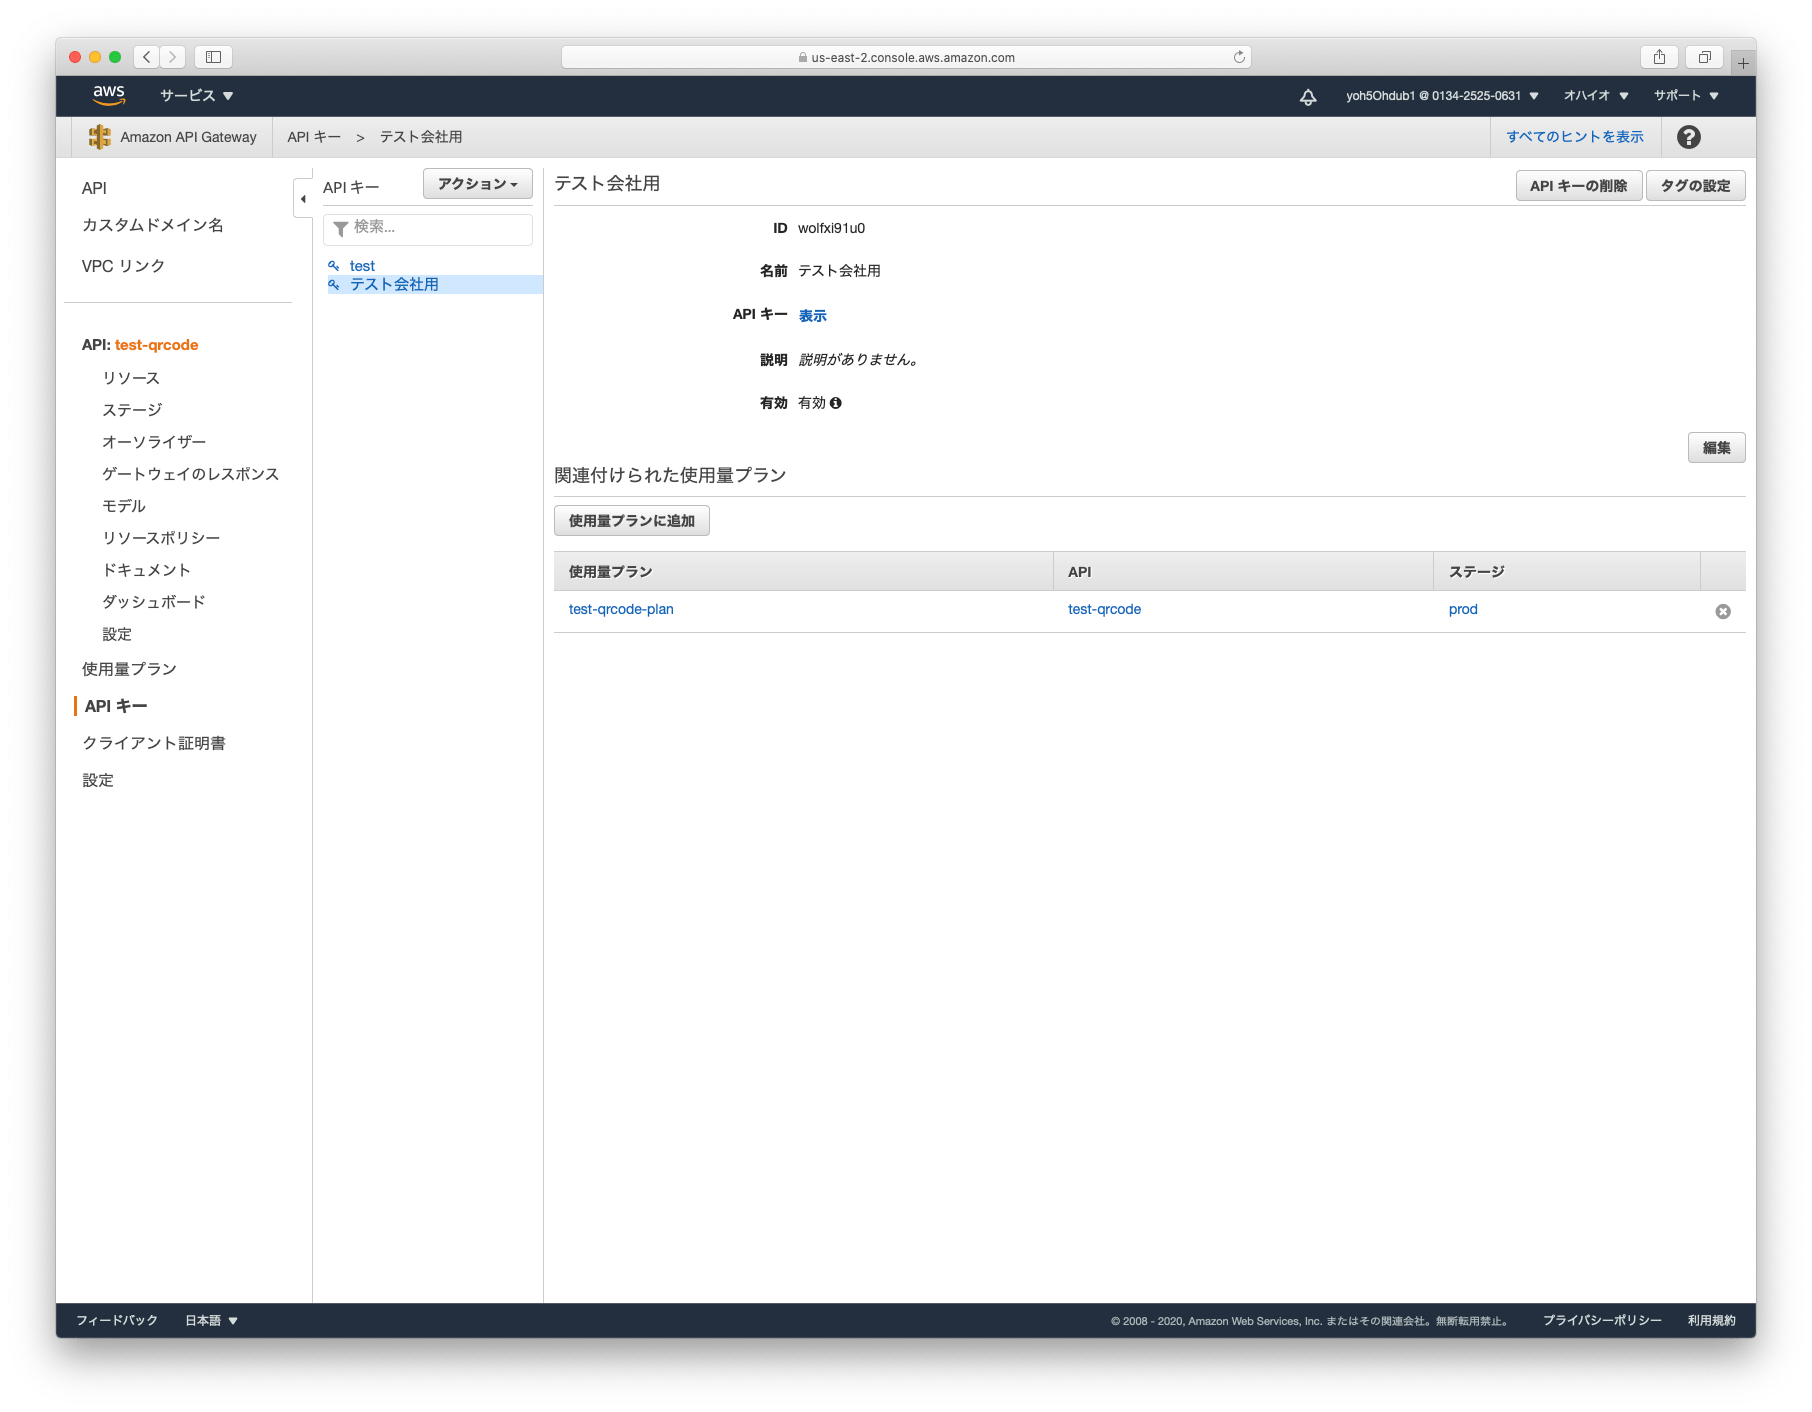
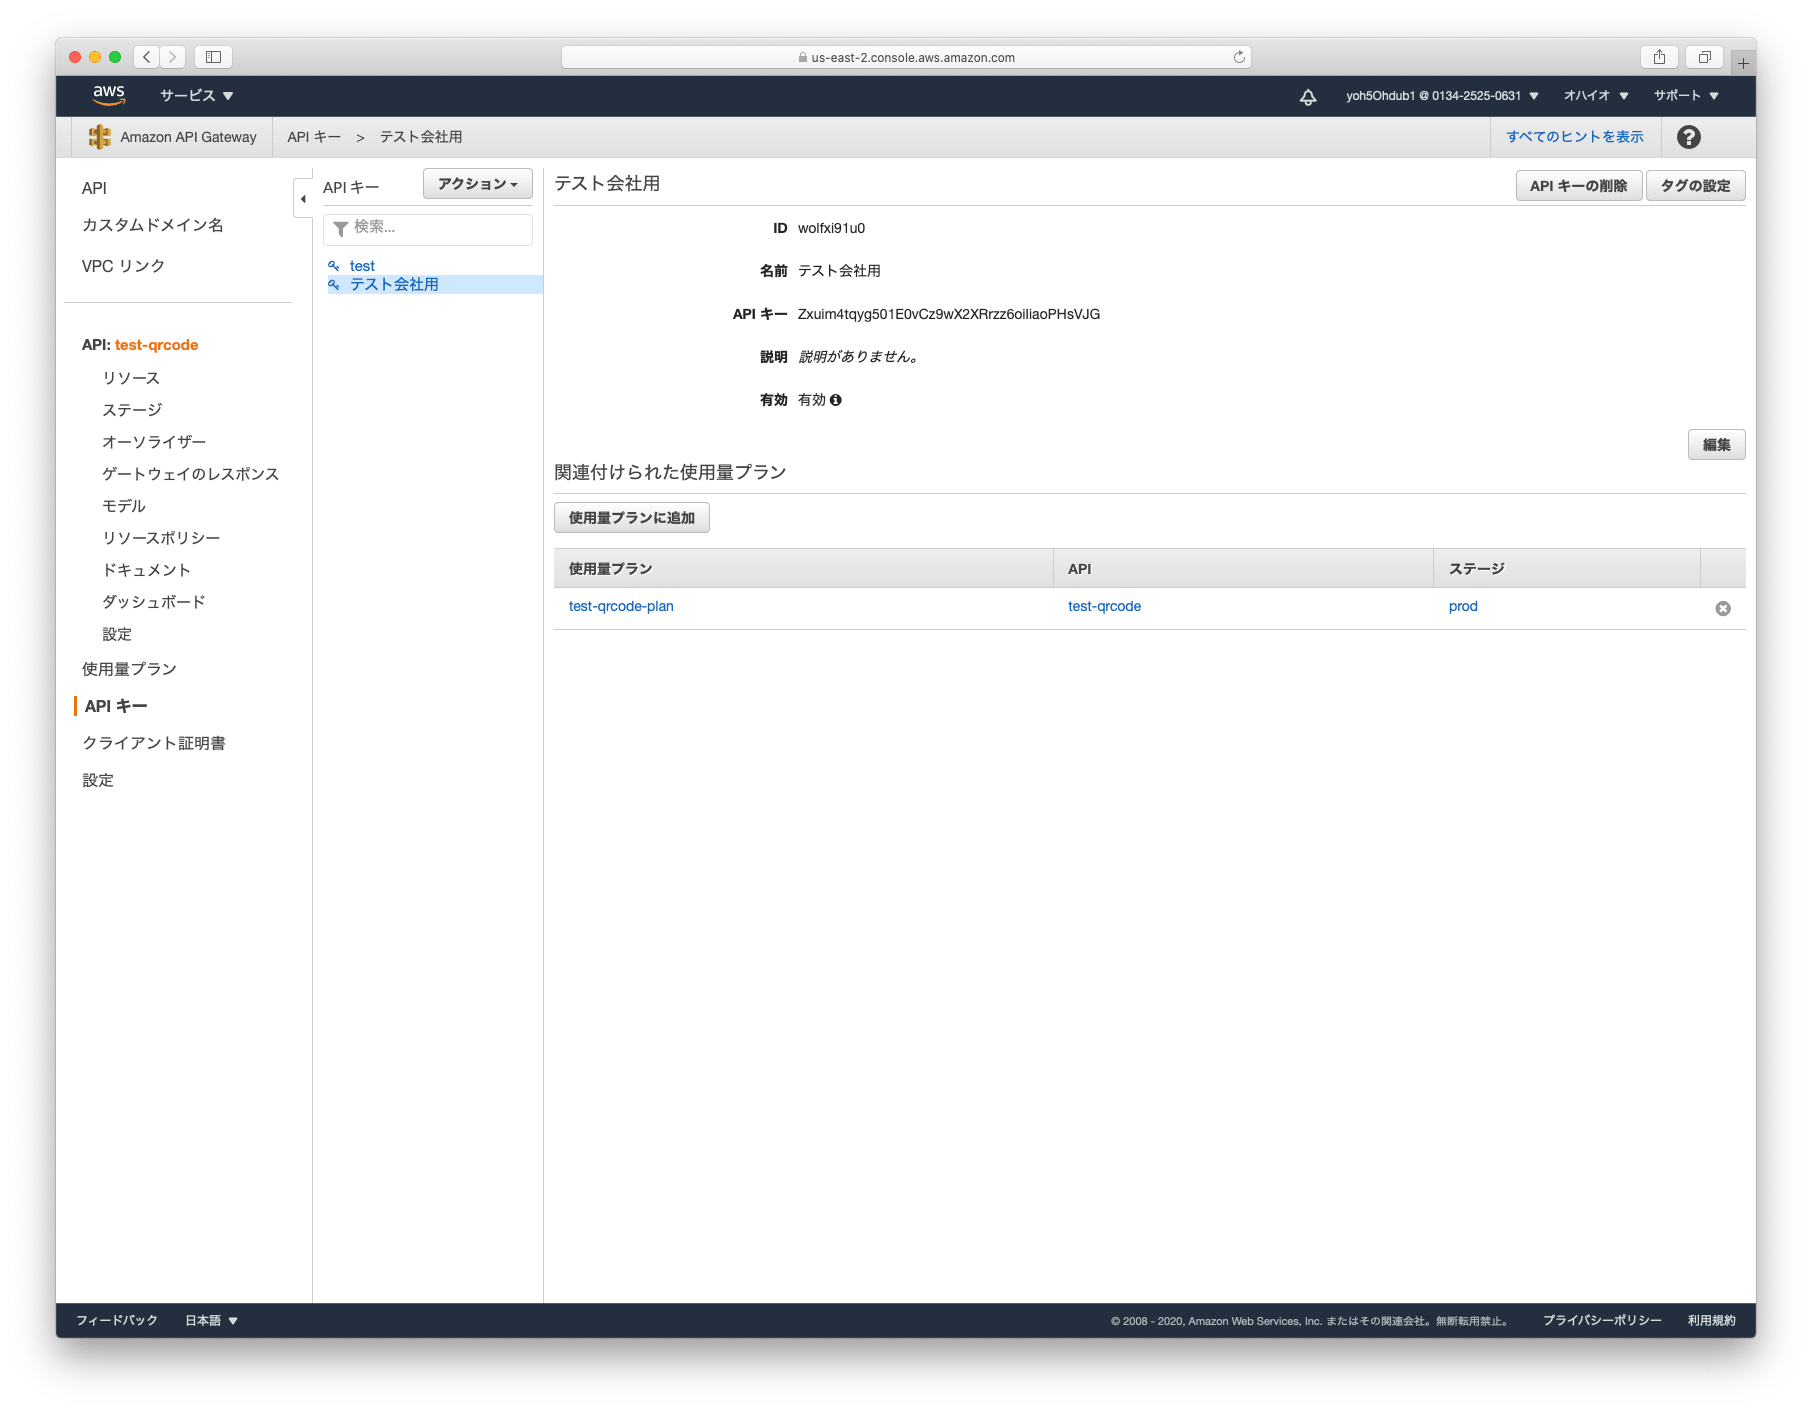
APIキーの横の「表示」をクリックして、キーを確認します。
APIキーは以下になります。
Zxuim4tqyg501E0vCz9wX2XRrzz6oiIiaoPHsVJG
API実行時にキーを必須にする
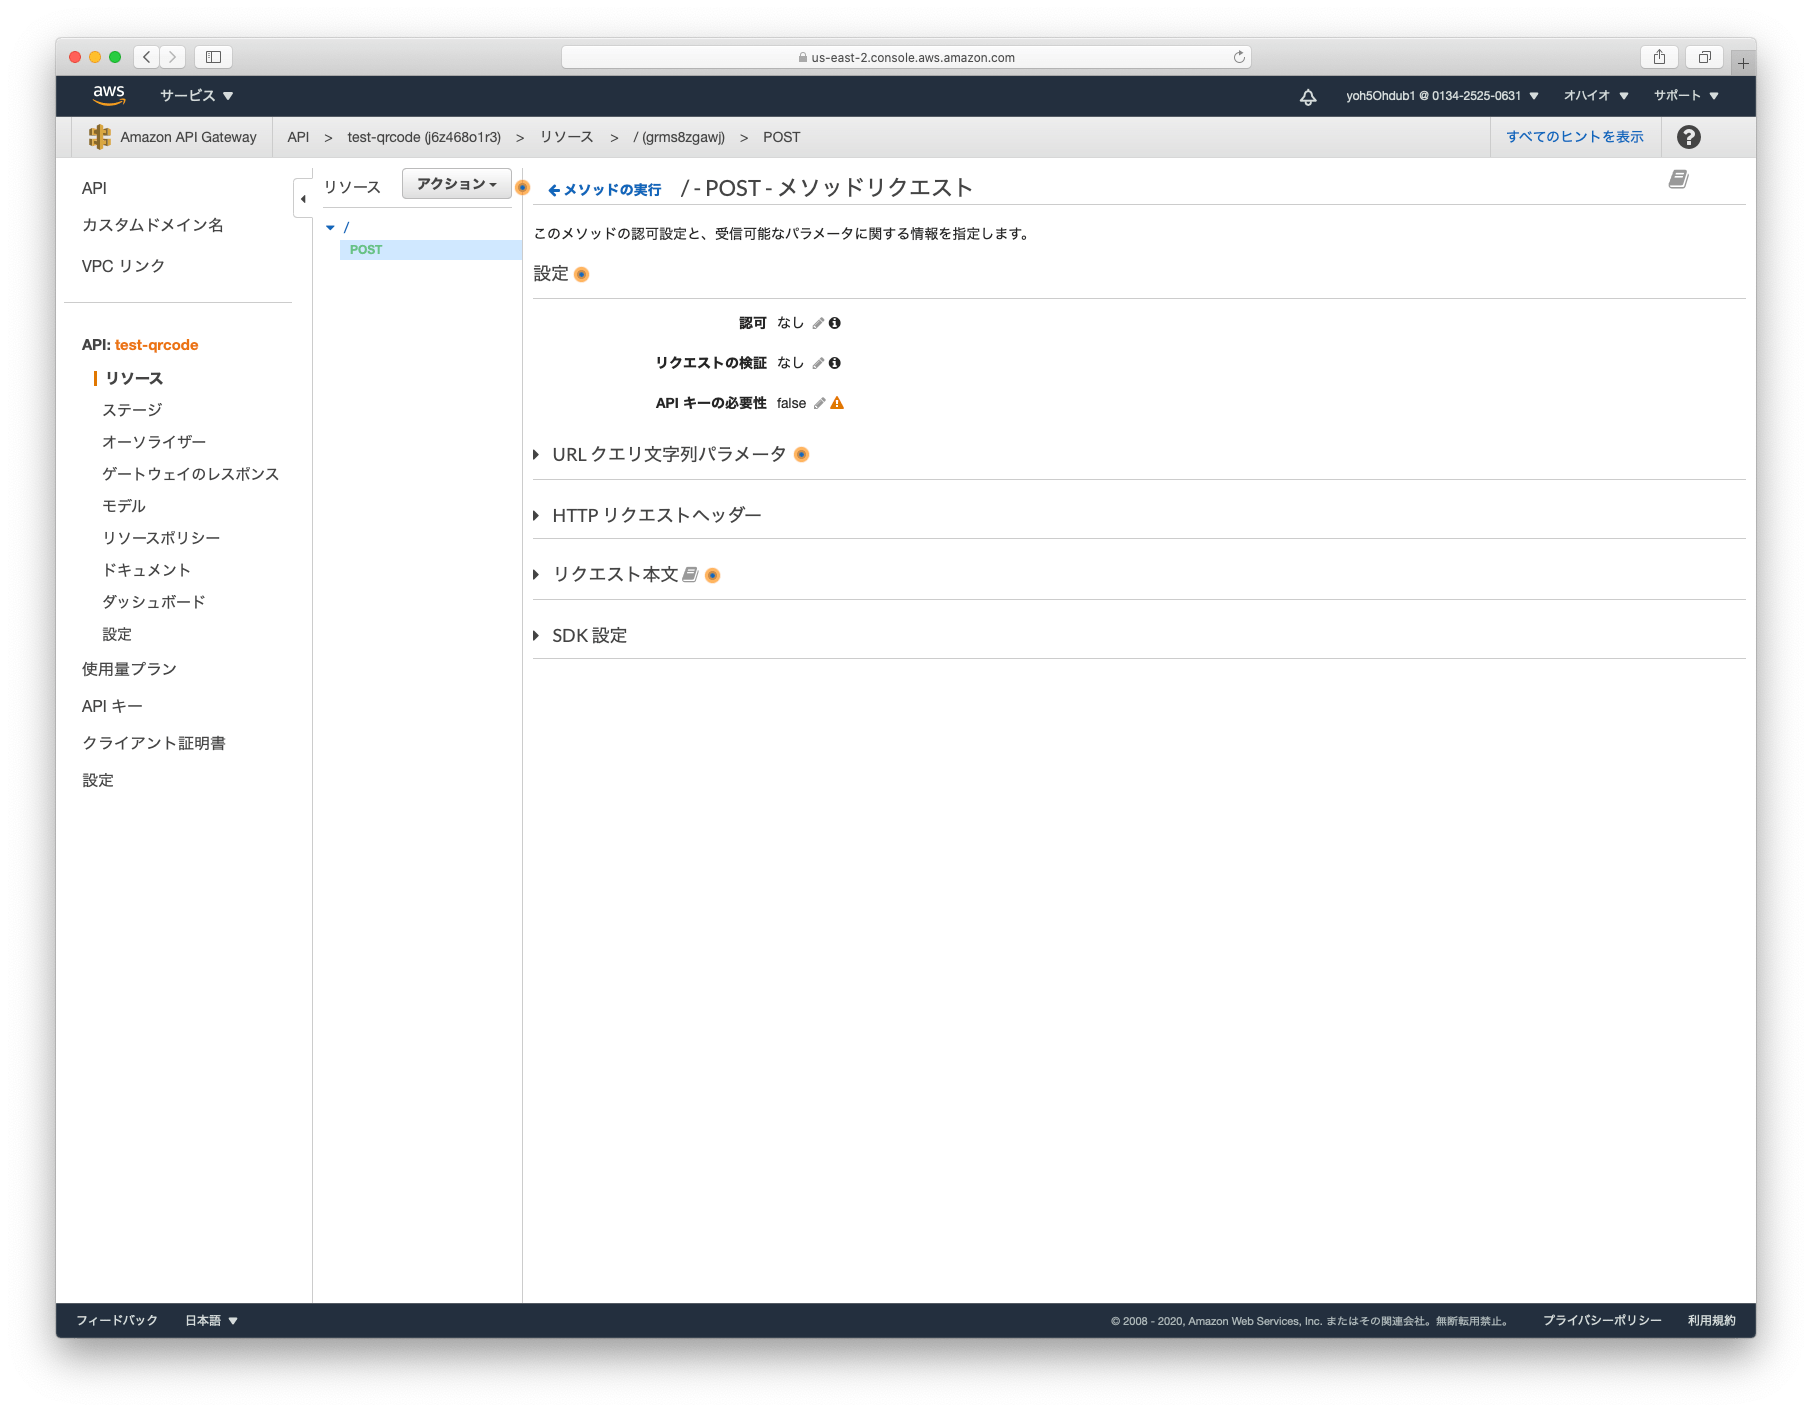
先ほど作成したPOSTメソッドをクリックします。
「メソッドリクエスト」をクリックします。
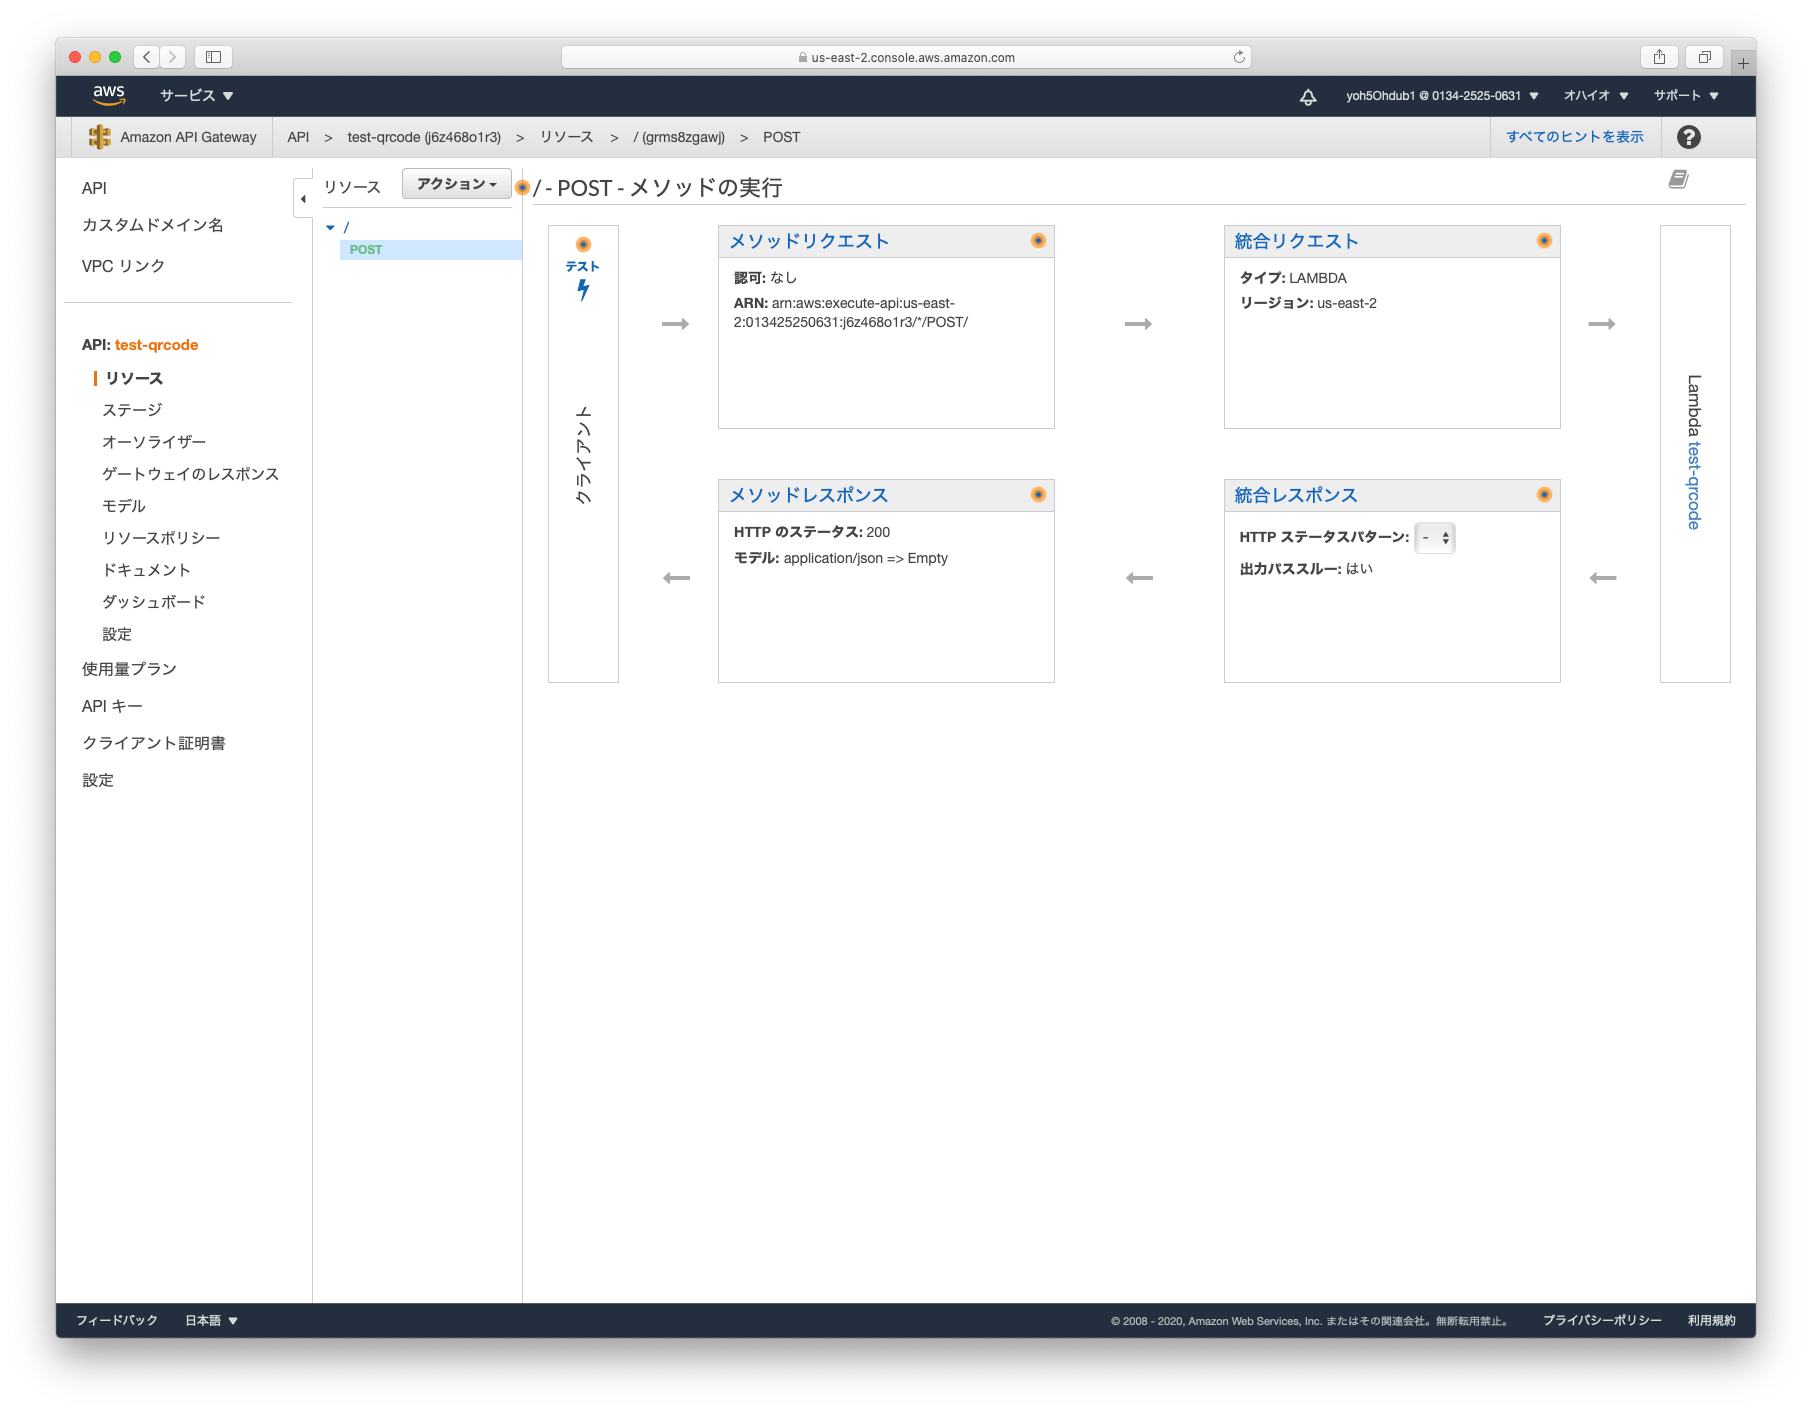
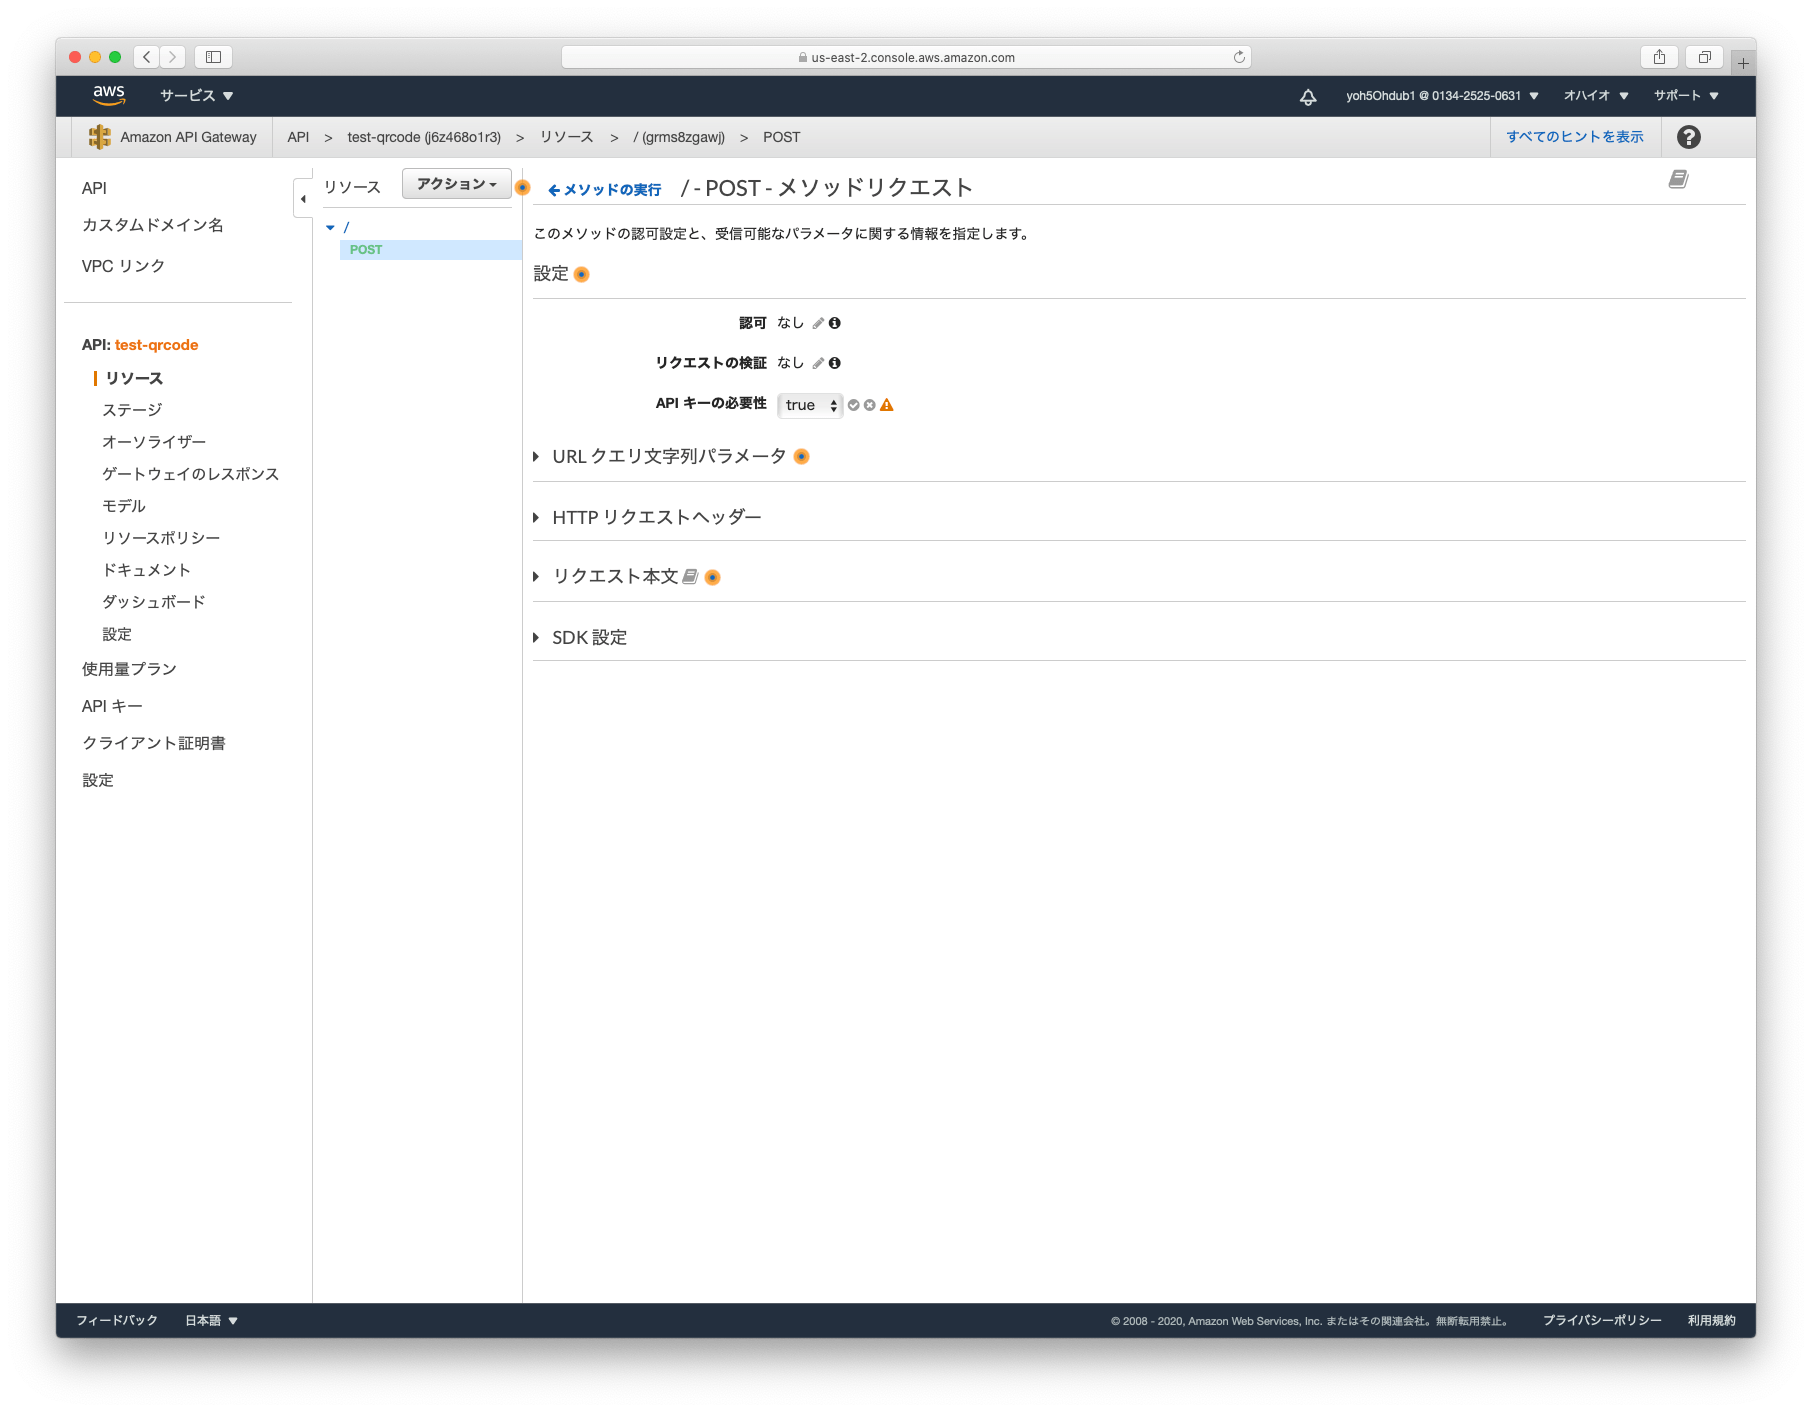
「APIキーの必要性」が false になっているので true に変更します。
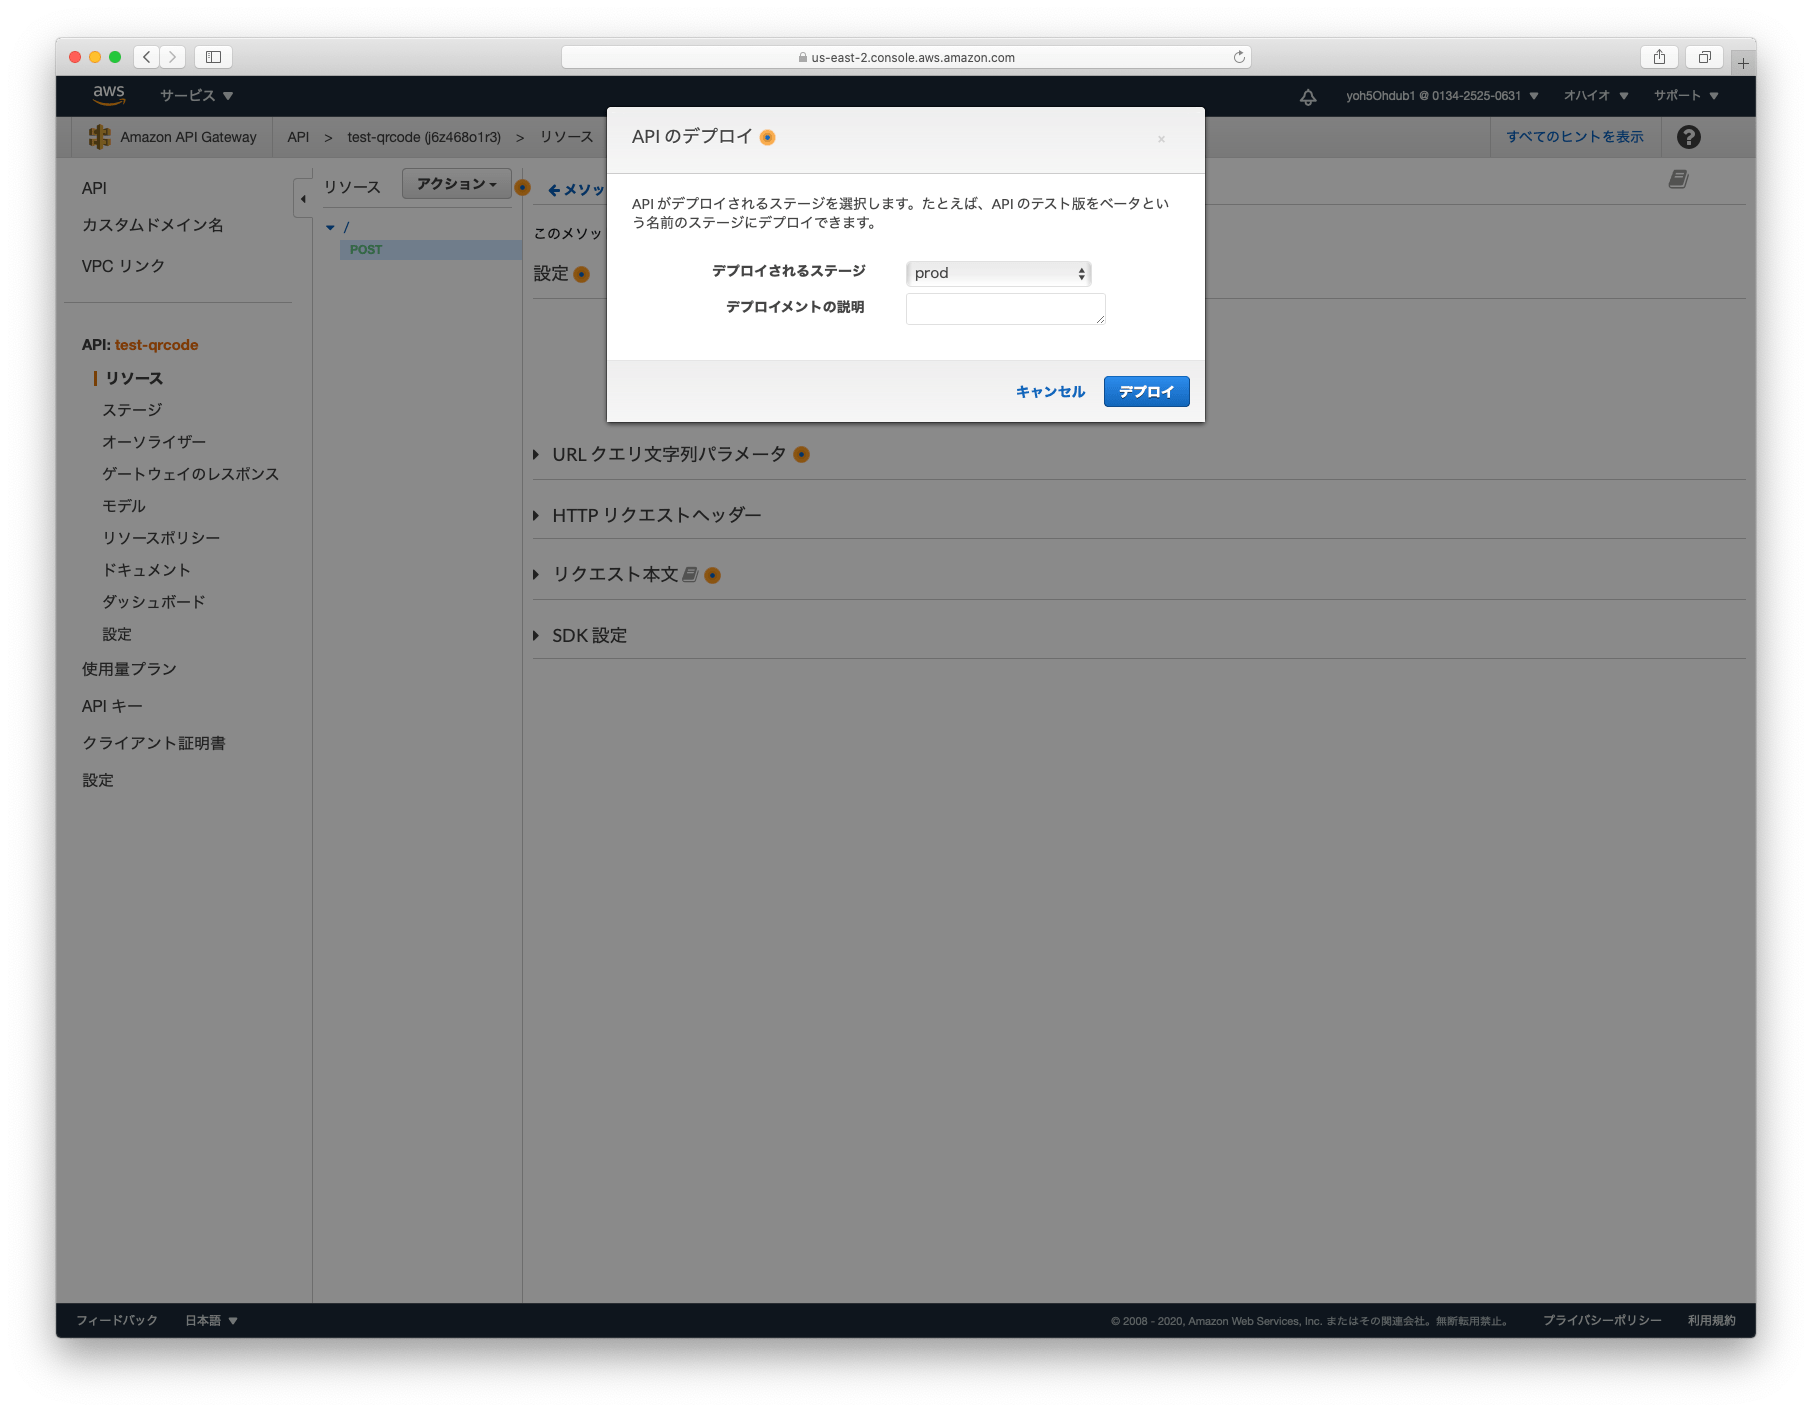
デプロイする
変更したので、デプロイします。
FileMakerでAPIをリクエストして確認する
同じスクリプトを実行します。エラーになりました。
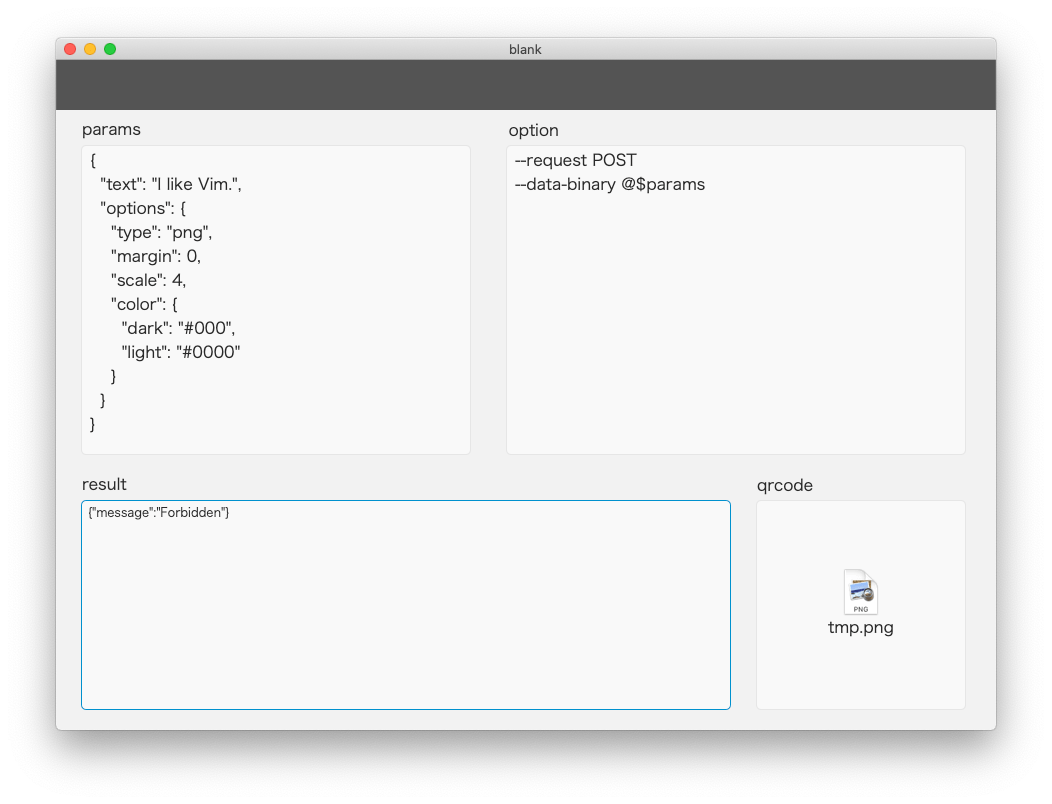
optionを以下のように修正し、スクリプトを実行すると、正常にレスポンスが取得できます。
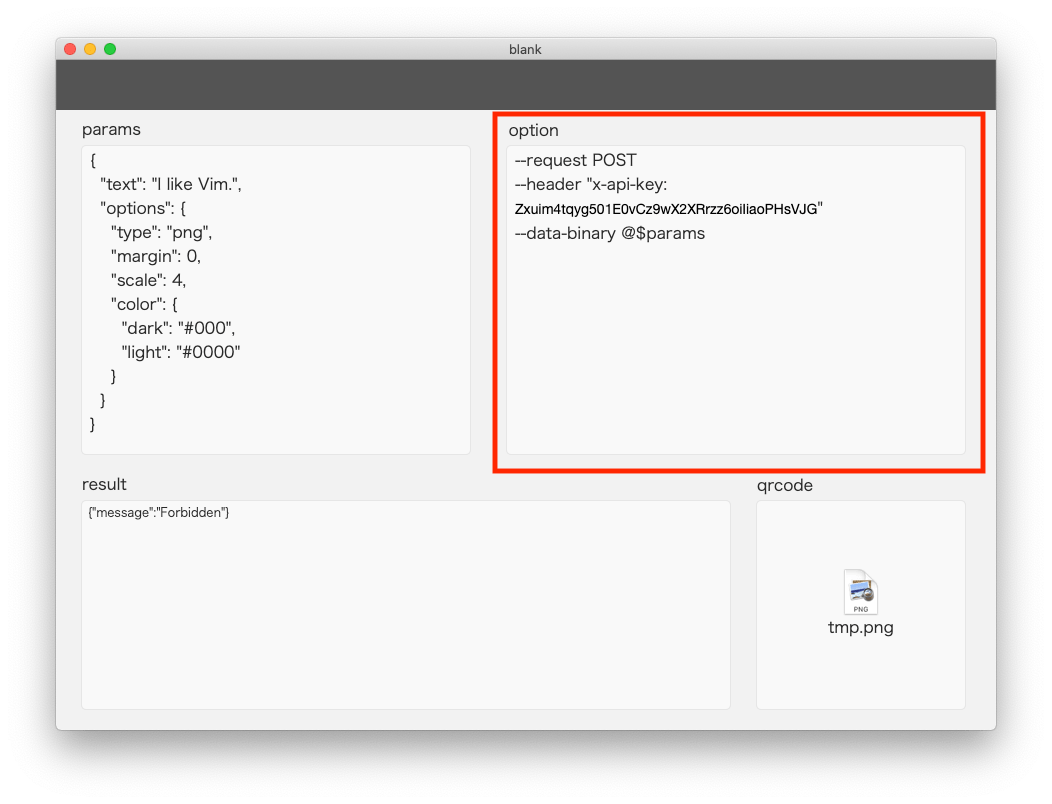
--request POST
--header "x-api-key: Zxuim4tqyg501E0vCz9wX2XRrzz6oiIiaoPHsVJG"
--data-binary @$params
あとがき
今回のようにAPIを作成すれば、どのソリューションにも、数ステップをコピペするだけで、QRコードを生成することができます。
API GatewayとAWS Lambdaを活用することで、npmの様々なパッケージが使えるようになります。
今後は、以下のような記事を書きたいと思います。
- FileMaker Admin API関連
- FileMaker Data API関連
- API GatewayとAWS Lambdaを活用し、FileMaker からS3にアクセスする
- TwilioのAPIを活用し、SMSの送信やFAXの送受信をする
- EC2の自動停止や自動起動
- FileMaker Server Linuxの設定
- BaseElementsの使い方
- ターミナルの使い方や設定
- AWS CLIの使い方
リクエストがあれば、Twitterでお声かけ頂けると大変嬉しいです。
1件のコメント